
1. Market Structure and Phase Identification
In high-frequency environments, technical execution is secondary to the identification of the prevailing market regime. Understanding the four-phase market cycle—Accumulation, Markup, Distribution, and Markdown—serves as the Standard Operating Procedure (SOP) for filtering high-probability setups from non-directional market noise. This macro-structural framework allows a strategist to align micro-level scalp entries with the broader directional delta of institutional capital, ensuring that "liquidity probing" maneuvers are not mistaken for definitive trend reversals.
The Definitive Guide to Dow Theory and Market Phases
To achieve consistent alpha, professional traders must synthesize the six basic tenets of Dow Theory with the four-phase cycle. Dow Theory posits that the market discounts all news, price movements are composed of three simultaneous trends (primary, secondary, and minor), and—critically—that averages must confirm each other. In the context of digital assets, this means a bullish impulse in a high-beta asset like WIF is only valid if confirmed by its primary ecosystem driver (e.g., SOL) or broader market benchmarks.
Market Phase
Price Action
Volume Behavior
Dominant Sentiment
Dow Theory Tenet Alignment
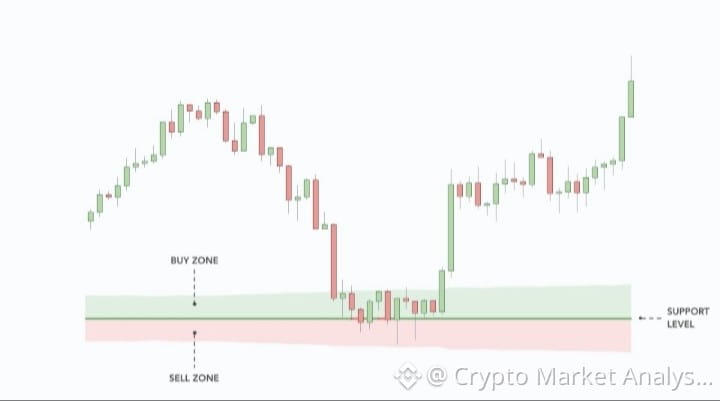
Phase 1: Accumulation
Range-bound; tight consolidation after capitulation.
Muted; institutional "Large Lot" absorption is discreet.
Disbelief / Boredom
Informed participants buying against general opinion.
Phase 2: Markup
Clear uptrend; higher highs and higher lows.
Expansionary; volume confirms the price discovery path.
Optimism / Greed
Trend followers and technical participants join the move.
Phase 3: Distribution
Sideways topping; sharp rallies met by aggressive ask-side absorption.
Elevated; churn increases as smart money exits into retail demand.
Euphoria / Split
Informed participants exit to the "public participation" crowd.
Phase 4: Markdown
Downtrend; lower highs and lower lows.
Surges during panic; liquidations accelerate price velocity.
Anxiety / Panic
Trends exist until definitive reversal signals are printed.
Volume Confirmation and Scalp Conviction
According to the fifth tenet of Dow Theory, volume must confirm the trend. During "Phase 2 - Markup," a scalper’s conviction is quantified by the expansion of volume during impulsive moves and its contraction during corrective pullbacks. This expansion represents the transition from Phase 1 (Accumulation) to Phase 2, where aggressive bid-side absorption clears overhead supply. If price appreciates on declining volume, the move is a statistical outlier and likely to be retraced. High-volume price action, however, indicates a sustainable trend, providing the necessary volatility for profitable scalp execution.
While macro structure dictates the directional bias, we transition to the micro-signal of the Pin Bar to identify the exact coordinates of price rejection.
2. The Pin Bar: Mechanics of Price Rejection
The Pin Bar is a visual proxy for failed price discovery and the immediate psychological capitulation of aggressive market participants. It signifies a "liquidity grab" where price probes a level of interest only to be met by overwhelming counter-party absorption, resulting in a sharp reversal within a single candle duration.
Anatomical Requirements for High-Probability Signals
To qualify as an executable signal in a professional environment, a Pin Bar must meet rigorous geometric and structural criteria:
Wick-to-Body Ratio: The rejection wick (shadow) must be at least two-thirds the total length of the candle, with the real body situated at the terminal end.
Structural Confluence: Pin Bars lacking structural confluence—those forming mid-range—are discarded as non-directional volatility. A high-probability Pin Bar must "lean" against established support/resistance, moving averages, or high-volume nodes.
Execution Logic: If-Then Identification
Strategists utilize strict "If-Then" logic to eliminate subjective bias during trend exhaustion:
Bullish Reversal: IF a long lower wick forms at a Phase 4 terminal support level AND the Stochastic %K is < 20, THEN aggressive bid-side absorption is present.
Bearish Reversal: IF a long upper wick forms at a Phase 2 resistance pivot AND the Stochastic %K is > 80, THEN sell-side liquidity is absorbing market buy orders.
The Mandatory Three-Step Confirmation Process
Structural Identification: Confirm the market is not in a low-liquidity "chop" zone.
Location at Key Pivots: Ensure the wick penetrates a known liquidity zone (e.g., a previous swing high or heatmap resistance).
Next-Candle Close Confirmation: Entry is only authorized if the subsequent candle closes beyond the Pin Bar's real body, confirming the rejection's validity.
The Pin Bar identifies the floor or ceiling, but to filter out "fake-outs," we must layer momentum and trend-following indicators over the raw price action.
3. Indicator Synergy: Stochastic Oscillator and Parabolic SAR
Layering momentum oscillators over structural price action acts as a noise filter, ensuring that entries are timed with the immediate velocity of the market. This multi-layered approach reduces slippage and increases the probability of catching a "clean" move.
Momentum and Trend Filters
Stochastic Oscillator: This momentum filter compares the closing price to the price range over a specific period. We monitor the %K line and the %D line (a 3-period SMA of %K).
Overbought (80) / Oversold (20): These are the critical thresholds for reversal identification.
Execution Rule: Long entries require a bullish %K crossover above %D within the < 20 zone. Short entries require a bearish %K crossover below %D within the > 80 zone.
Parabolic SAR (Stop and Reverse): This trend-following indicator provides an objective signal for trend shifts. A "dot flip"—where the SAR moves from above the price to below it—serves as the final confirmation for scalp entry and a dynamic guide for trailing stop-losses.
High-Probability Synergy Matrix
Signal Component
High-Probability Long
High-Probability Short
Pin Bar Type
Bullish (Long lower wick)
Bearish (Long upper wick)
Stochastic Alignment
%K > %D below 20
%K < %D above 80
Parabolic SAR
Dots flip below price
Dots flip above price
Volume Confirmation
Expansion on rejection wick
Expansion on rejection wick
Relying on indicators alone is a retail-level approach; for professional-grade execution, we must integrate the real-time dynamics of the Limit Order Book and Heatmaps.
4. Advanced Order Flow: Liquidity and Price Absorption
Monitoring raw candlestick charts is insufficient for high-frequency environments. Professional execution requires visibility into the Limit Order Book (LOB) and Heatmaps to identify where institutional "resting orders" reside.
Absorption, Exhaustion, and Institutional Tools
Price discovery is the result of market orders interacting with limit orders.
Price Absorption: This is identified when the tape shows high-volume market orders hitting a level, yet price fails to advance. This indicates a dominant participant is utilizing Iceberg Order Detection or passive liquidity to fill a large position without moving the market.
Exhaustion: This occurs when aggressive participants run out of capital to sustain a move. Using Large Lot Tracking, we can see if institutional bids/asks are pulled from the book, signaling a path of least resistance in the opposite direction.
Heatmaps: These provide a 3D visualization of traded volume, allowing us to see "liquidity walls" and areas of intent that are invisible on standard charts.
The Bid-Ask Spread and Liquidation Strategy
Spread Scalping: In high-liquidity environments, profit is extracted from the "Bid-Ask Spread." We target tokens where the spread is < 3–5%, allowing for rapid execution of buy-at-bid and sell-at-ask protocols.
Liquidation Indicator: This tool provides real-time data on margin liquidations. A cluster of sell-side liquidations during a Markdown phase often signifies a capitulation event, creating a high-probability "mean reversion" long entry as the market overextends.
Advanced liquidity analysis allows for precise pivots on high-beta assets like JUP and WIF, where retail sentiment often diverges from institutional flow.
5. Asset-Specific Execution: JUP and WIF Case Studies
High-beta tokens require tailored pivot analysis due to their heightened sensitivity to sentiment and liquidity depth.
JUP (Jupiter) Technical Synthesis: The 72.7:1 Short Setup
Current quantitative data for JUP indicates weak sentiment across all time horizons, supporting a primary short bias.
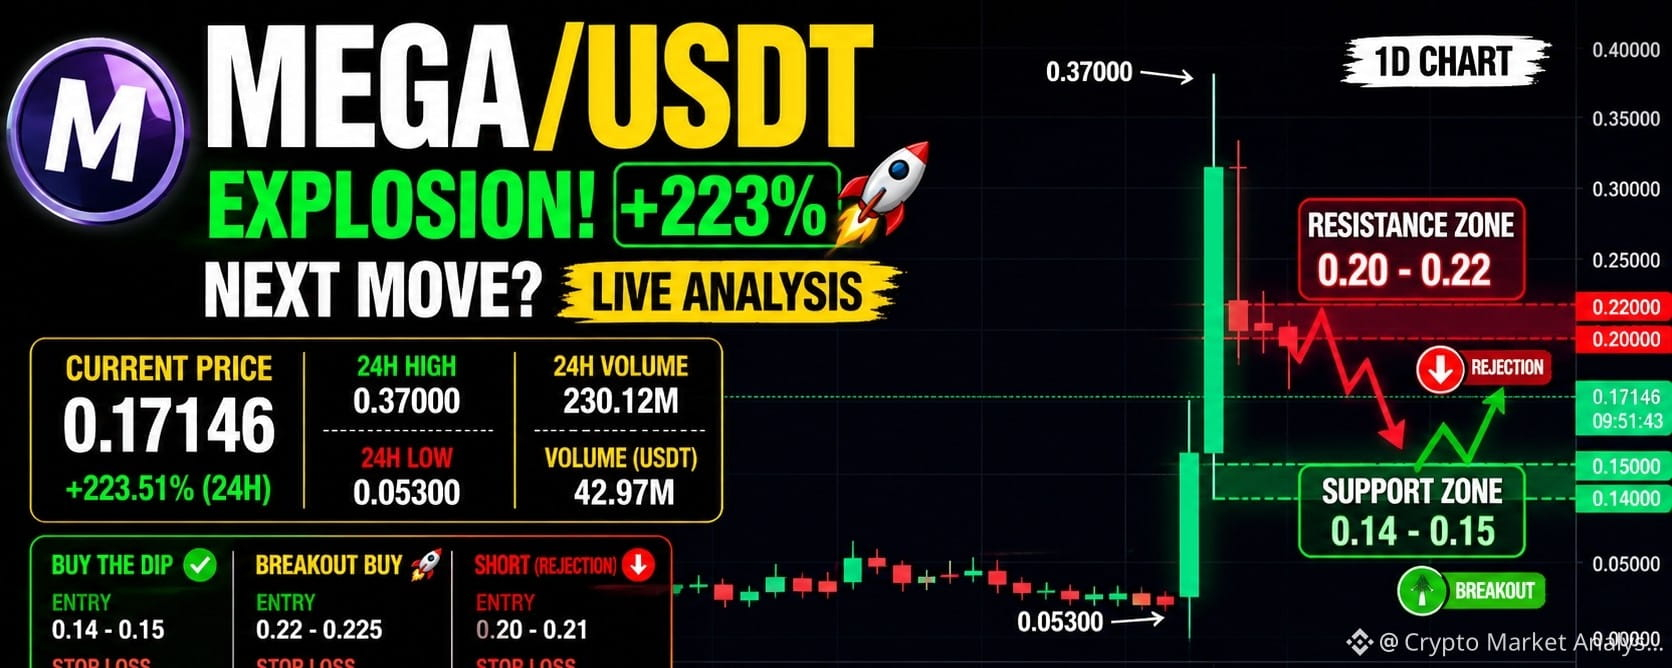
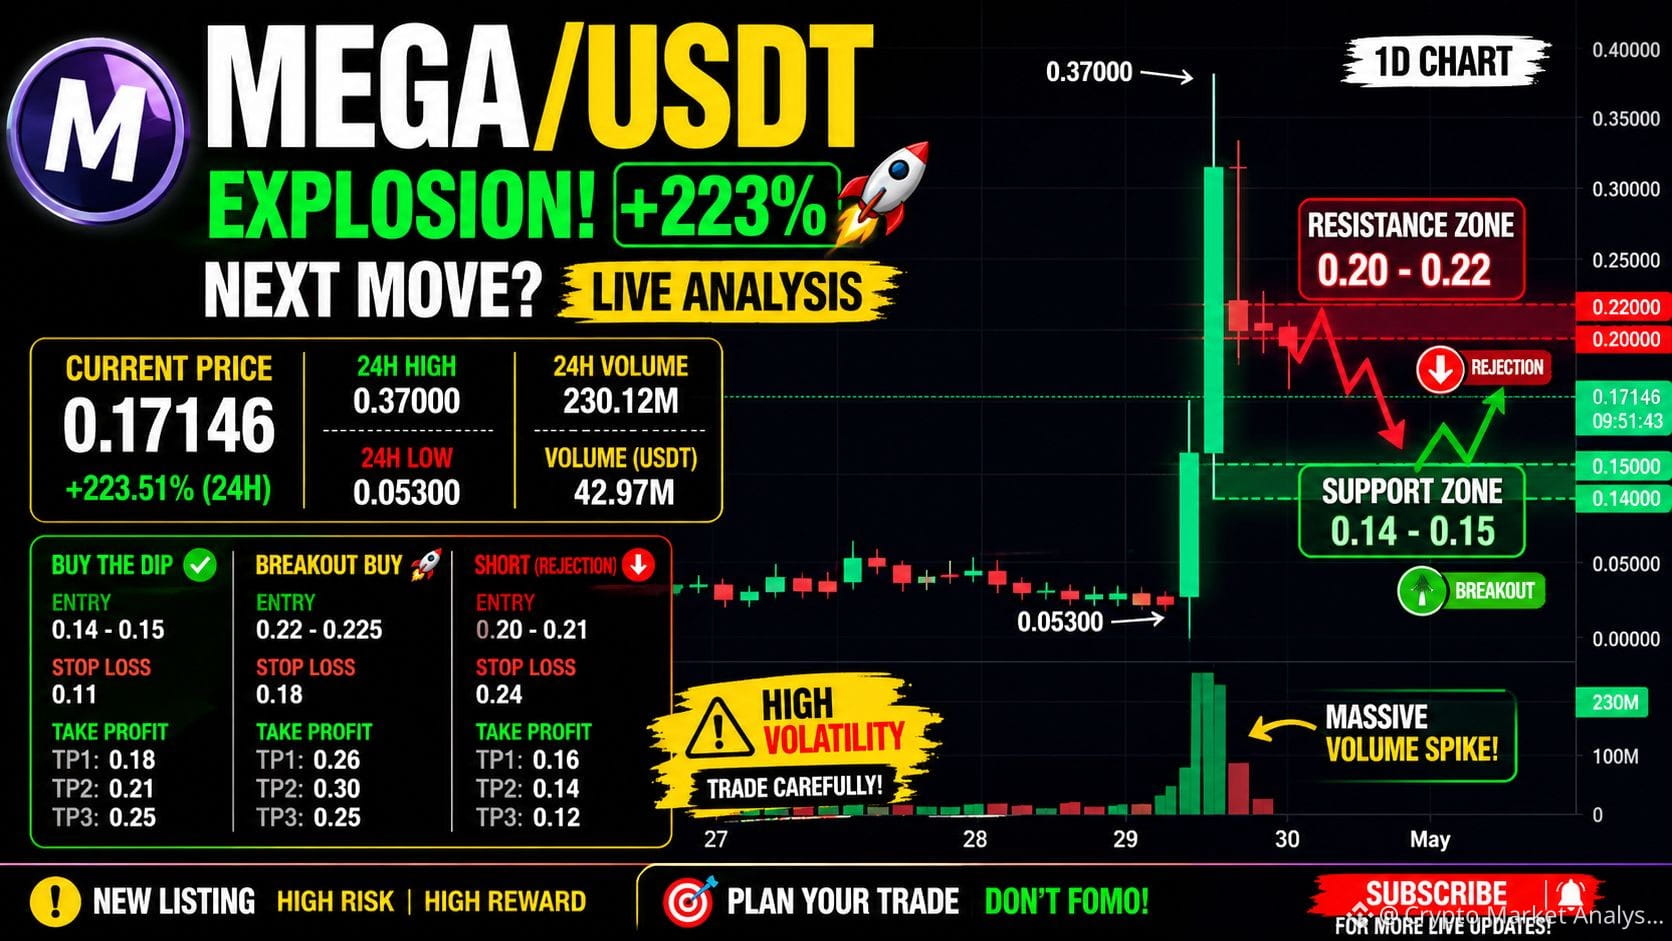
Critical Pivots: Resistance at 0.22**; Support targets at 0.18, 0.17, and **0.14.
Quant Parameters: Our AI models identify an exceptional 72.7:1 risk-reward short setup.
Execution Strategy: Short entry at the $0.22 resistance zone with a strict 0.5% risk parameter (Stop-Loss at $0.221). The target is a 36.4% downside move toward the $0.14 support node.
WIF (dogwifhat) Technical Synthesis: Reversal Recovery
WIF is currently consolidating between $0.16 and $0.22, showing signs of an impending oversold reversal.
Oversold Metrics: RSI is at 33.01; Stochastic %K is 8.06 and %D is 6.45.
Bollinger Band Position: Currently at 0.20, indicating price is hugging the lower band ($0.15), often a precursor to a mean-reversion bounce.
Sector Confirmation: Per Dow Theory’s fourth tenet, this recovery setup must be confirmed by a similar bullish impulse in the SOL index before full position commitment.
Execution Blueprint: WIF Recovery Trade
Entry Trigger: Confirmed breakout and close above the $0.19 (SMA 20) level on expanded volume.
Primary Target: $0.22 (SMA 50) resistance.
Risk Control: Stop-Loss placed at $0.15 (below the Bollinger lower boundary).
Precision in asset-specific pivots is meaningless without a rigorous framework for capital preservation.
6. Professional Risk Management and Execution Discipline
Risk management is the only variable within a trader's control. In the volatile crypto market, it is the singular factor that prevents a single "Black Swan" event from resulting in total capital depletion.
Risk-Reward and Stop-Loss Protocols
Risk-Reward Ratio: A minimum 1:2 ratio is the baseline. High-probability setups like the JUP short (72.7:1) are rare but highlight the necessity of asymmetric returns to offset the inherent risks of scalping.
Geometric Stop-Loss: Stops must be placed according to price geometry, not arbitrary percentages. For long trades, stops are placed below the terminal wick of the bullish Pin Bar; for shorts, above the bearish wick.
Pre-Trade Verification Checklist
Every asset must pass a six-factor verification protocol before capital allocation:
Team: Fully disclosed with verifiable track records.
Whitepaper: Technical depth and clear tokenomics (avoid generic templates).
Utility: Real-world use case with managed supply/vesting.
Price Patterns: Healthy stair-step movements over isolated spikes.
Volume: High volume must accompany the trend to confirm validity.
Liquidity Depth: Deep order books on major exchanges (Binance/Coinbase) to minimize slippage.
Maintaining Analytical Objectivity
Traders must insulate themselves from "YouTuber Hype Tactics" and emotional FOMO. Influencers often utilize social proof and artificial urgency (e.g., "100x gem") to facilitate their own exit liquidity. Professional execution relies exclusively on cold data, heatmap analysis, and market microstructure. If a trade thesis relies on social media sentiment rather than technical structure and liquidity, it is a high-risk red flag.
Conclusion: The protocols in this manual provide a robust framework for professional-grade trading. Success requires rigorous backtesting of these strategies in demo environments to ensure disciplined execution under live market pressure before committing institutional capital.