I am 35 years old. Starting from when I was 25 years old in the cryptocurrency circle, I have been working for 10 years.
Someone asked me if I have made money over the years. The answer is very simple: from 2020 to 2022, my account exceeded 8 digits. Now I stay in hotels that cost 2000 a night, living more comfortably than many people who are in manufacturing and e-commerce born in the 80s.
What is the secret? It's not talent, it's not luck, but a simple and silly '343 batch building method'. With it, I steadily secured over 20 million.
Take BTC as an example:
Step one: —— start with a small test.
If I use 120,000 to create a liquidity pool, I will first use 30%, which is 36,000, to test the waters. With a small position, a stable mindset, and the ability to withstand risks.
Step Two: — Further batches
If the price goes up, wait for a pullback to buy more; if it goes down, buy more at a rate of 10% for every 10% drop, gradually increasing your 40% position. This way, no matter how the market fluctuates, your cost basis will remain balanced.
Step 3: — Finishing Touches and Adding to the Strategy
Once the trend has stabilized, add the final 30%, making the whole process clean and efficient.
This method may sound "clumsy," but clumsy things tend to last longer.
In the market, the hardest thing is not finding divine interventions, but controlling greed and fear.
I've seen too many people lose everything overnight by taking shortcuts, but what I rely on is "staying calm, not being greedy, and doing things in batches."
The result is that while others chase highs and sell lows, I can steadily go far.
Brothers, don't underestimate the "clumsy method"—it's the real ATM in the crypto world.

Adhere to these ten principles when trading cryptocurrencies; you're guaranteed to reap great rewards.
First, don't be easily tricked into buying low-priced shares. Stay firm in your convictions and prevent the market maker from dumping shares through wash trading.
Secondly, chasing highs and selling lows, and going all in or out are always major taboos. When the overall trend is favorable, buying in batches during a downtrend is less risky, has lower costs, and yields greater profits than chasing highs.
Third, allocate profits reasonably and maximize the release of funds, rather than constantly adding more funds to the position.
Fourth, sell during sharp rises and hold during sharp falls. Always maintain a positive mindset: avoid speculation, impatience, greed, and fear. Never fight a battle you're unprepared for.
Fifth, the initial investment in or private placement of low-priced coins relies on experience and the bettors' predictions of the coin's future. The subsequent secondary market speculation relies on technical skills and information to follow the lead of the major players. Don't put the cart before the horse, or you'll end up making a mess of things.
Sixth, when building a position and distributing shares, it is essential to do so in stages, gradually widening the price gaps to effectively control the risk-profit ratio.
Seventh, you need to be familiar with the interconnectedness of different cryptocurrencies. When trading a cryptocurrency, you should also pay attention to the movements of other cryptocurrencies. Each cryptocurrency traded in the overall market is not isolated; seemingly unrelated, they are actually interconnected. To understand the interconnectedness, you need to know the cryptocurrencies. Many tools are available now for viewing cryptocurrency information and seeking related information.
Eighth, proper portfolio allocation is crucial. The allocation between hot and value coins should be reasonable, and attention should be paid to the ratio of resilience to profit intake. Being too conservative will cause you to miss opportunities, while being too aggressive may lead to high risks! The biggest characteristic of value coins is that they are mainly stable, while the biggest characteristic of hot coins is that they are highly volatile. They may soar to the sky in one battle or go to zero in another.
Ninth, having cryptocurrency on the trading platform, money in your account, and cash in your pocket is the safest and most reassuring standard. Never go all in; going all in will lead to ruin. A good grasp of risk management and proper allocation of funds are crucial to your mindset and success. Investing with spare cash is fundamental.
Tenth, master basic operations, learn to apply what you've learned to other situations, grasp the basic trading strategies, observation is a prerequisite, remember each high and low point as reference data, learn to record, learn to summarize materials yourself, develop reading habits, and cultivate the ability to filter and select information.
Finally, remember that while we are speculating and trading cryptocurrencies, we are definitely not gambling. Amidst the flood of information, we must sift through the noise, stick to our principles, and we will surely reap the rewards.
Cryptocurrency trading is no easy task, requiring comprehensive consideration of numerous factors. From selecting market trends and monitoring policies and trading volume, to strictly adhering to stop-loss and take-profit strategies and diversification, every point is crucial. Investors should continuously learn and practice, integrating these key principles to form an investment system suitable for themselves. Maintaining a good mindset and navigating the ups and downs of the cryptocurrency market steadily is essential to increasing the probability of profitability and achieving steady asset growth.

A trading strategy with a 95% win rate in the cryptocurrency market (trend drawing) – once mastered, it can guarantee a stable monthly income of seven figures and an annual income of eight figures!
This chapter is very important and detailed. It might be a bit difficult for first-time learners, so I hope you can read it several times.
We'll first explain how to draw lines, mainly based on the following three steps:
Confirm the trend
Determine the high and low points
Draw lines correctly
Let's look at the first one: confirming the trend. As we've discussed before, not all structures can be analyzed using the Fibonacci tool. At least in range-bound markets, we don't use it. We only use this tool in trending markets.
So how do we confirm a trend?
Of course, you can use the previous trend line lessons to help you identify a trend. If you can draw a line between two points and verify it at a third point, then the trend line is a valid trend line.
At this point, you can also use trend lines to confirm the trend, which is another method.
Of course, you can use other tools to determine the trend, such as moving averages. There is no unified standard for this. Today, we will use another method to confirm the trend, which is simpler: EMA200.
EMA (Exponential Moving Average) is also known as MA, which is simply the Moving Average.
MA simply means adding up the closing prices of each day and dividing by the number of days.
EMA is different; it has weights. This means that yesterday's price has a more significant impact on today's price. The price from the day before yesterday also has an impact on today, but not as much as yesterday's. The price from the day before yesterday has a smaller impact on today compared to yesterday and the day before yesterday.
The EMA moving average is smoother than the MA moving average, and I personally prefer to use the EMA.
Of course, we will provide a detailed explanation of the usage and differences between MA and EMA in the moving average section.
As an aside, many stock traders usually use the daily MA250 as a filter line to distinguish between bull and bear markets. That is, if the daily price of a stock is below the MA250, they will not consider buying it.
They will only consider buying a stock when its daily chart is above the 250-day moving average (MA250), and then use other indicators to screen for stocks to buy.
Returning to our main topic, we use the EMA200 to determine market trends. Let's look at Figure 2.4-17 below.
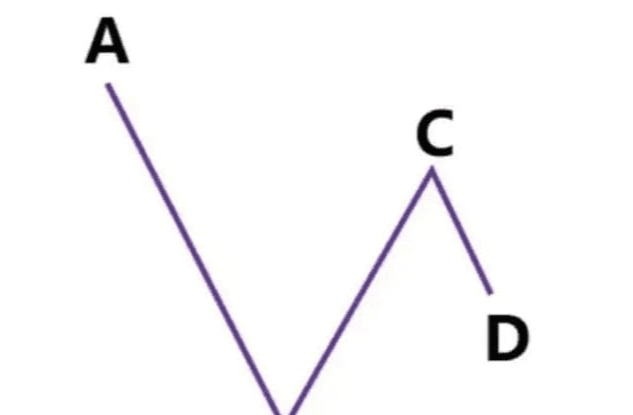
Figure 2.4-17
We can see that the price fell from a high point A to a low point B, and then rose to a high point C. C did not break through the previous high point A. At this point, the price reached position D. How should we draw this?
Should we draw it using the high and low points of AB, or the high and low points of BC?
This is quite simple. We add an EMA indicator and change the parameter to 200, as shown in Figure 2.4-18, which represents the EMA setting of 200.

Figure 2.4-18
If the price fluctuates around the EMA200, as shown in Figure 2.4-19,
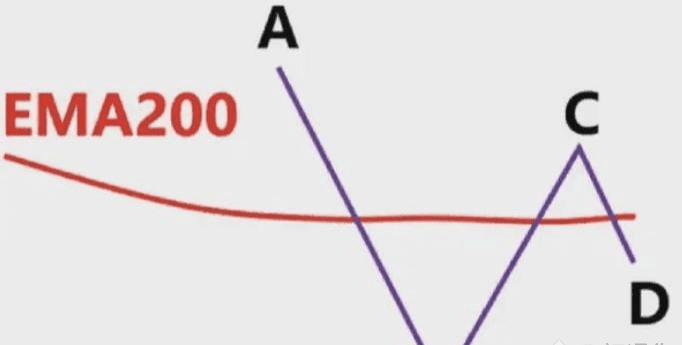
Figure 2.4-19
Therefore, we consider the current market to be a range-bound or disorderly market, and we will not participate in this type of market.
If the price is above the EMA200, then we consider the current market trend to be mainly upward, as shown in Figure 2.4-20.
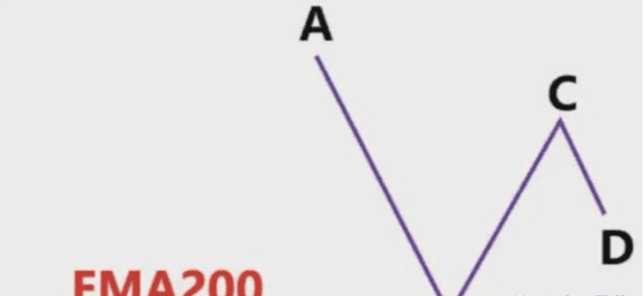
Figure 2.4-20
At this point, we should draw Fibonacci retracement lines based on the highs and lows to observe the price's reaction when it retraces to the 0.382-0.618 range, so as to formulate corresponding strategies.
If the price is below the EMA200, then we consider the current market trend to be mainly downward, as shown in Figure 2.4-21.
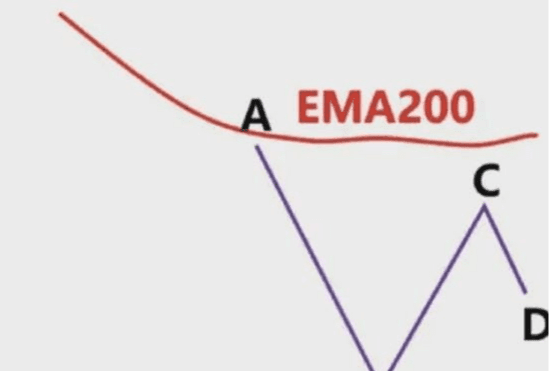
Figure 2.4-21
At this point, we should draw Fibonacci retracement lines based on the highs and lows to observe the price's reaction when it rebounds to the 0.382-0.618 range, so as to formulate corresponding strategies.
After confirming the trend, we move on to the second step: identifying the highs and lows, which is how to find the highs and lows.
Because drawing Fibonacci zones is quite subjective, if you define different highs and lows, then your Fibonacci zones will definitely be different. This will inevitably lead to different support and resistance zones, which may cause misjudgments. So how should you find the highs and lows?
Assuming the market is trending upwards, as shown in Figure 2.4-22, how should we proceed?
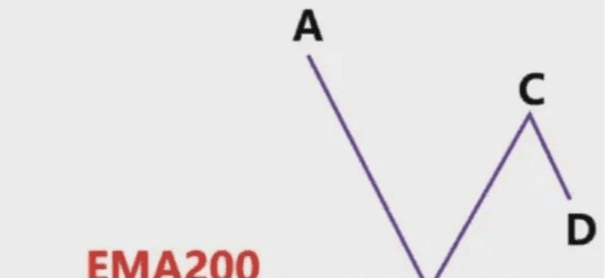
Figure 2.4-22
First, we cannot directly connect BC as the high and low points of the wave and then draw Fibonacci retracements. At this point, the price has fallen from the high point C to point D. At point D, it is possible for the price to fall or rise. Let's assume it falls first.
Then we need to draw Fibonacci retracements based on the previous high point A and the previous low point, and then observe whether the area of point B is the 0.382-0.618 position area of this Fibonacci backtest.
If region B is within the callback range of 0.382-0.618, as shown in Figure 2.4-23,
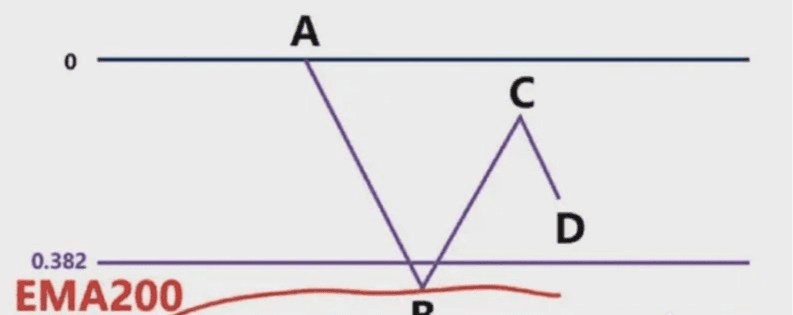
Figure 2.4-23
At this point, there might be a second test of the low point B, which means it will retest the previous low point B, forming a double bottom pattern, and then rise directly.
Remember, double tops and double bottoms are more powerful when they are in the direction of the trend. In other words, we should look for double bottoms in an uptrend and double tops in a downtrend.
Therefore, we need to draw a horizontal support line at point B, as shown in Figure 2.4-24, and wait for the price to reach this area to see if the price behavior will form a double bottom.
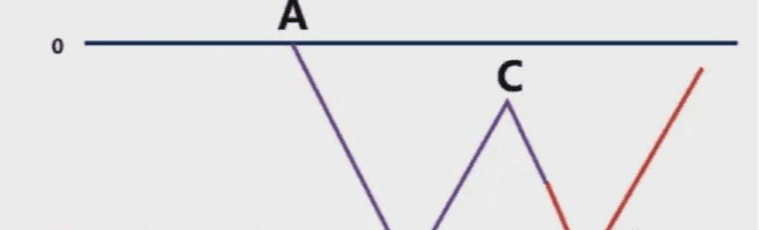
Figure 2.4-24
If area B is not within the 0.382-0.618 retracement range, but above 0.382, which is considered a minor retracement, as shown in Figure 2.4-25,
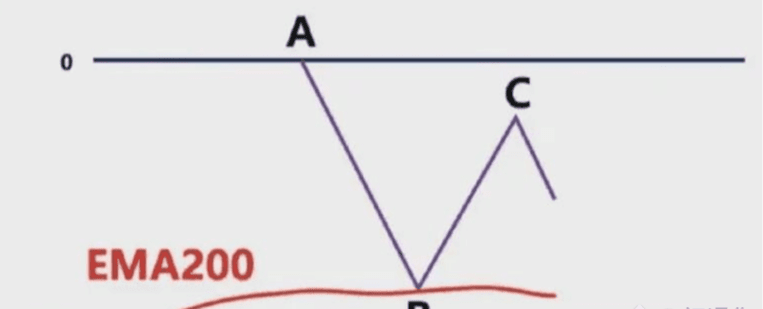
Figure 2.4-25
At this point, we also need to draw the horizontal support line at point B. The price may, like above, retest the low point B of the wave, forming a double bottom pattern, and then rise directly.
It's also possible that the price will break below the support area to point D, forming a pattern where AB and CD are equidistant, and point D happens to retrace to the 0.382-0.618 Fibonacci retracement level before continuing to rise, as shown in Figure 2.4-26.
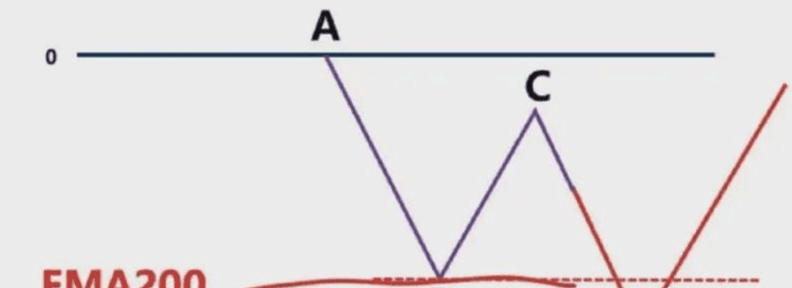
Figure 2.4-26
In other words, the pullback at this point is not a simple pullback; it is a two-stage, equidistant pullback. This is because traders who shorted at point C will take profits and close their positions at point D based on the principle that AB and CD are equidistant. As a result, the short-selling momentum is exhausted, the bulls continue to exert their strength, and the price continues to rise.
Of course, it is also possible for a three-stage pullback to continue rising, but as long as the trend is not broken, we should trade in the direction of the trend.
If region B is not within the 0.382-0.618 range, but below 0.618, meaning it's in a deeper pullback, as shown in Figure 2.4-27,
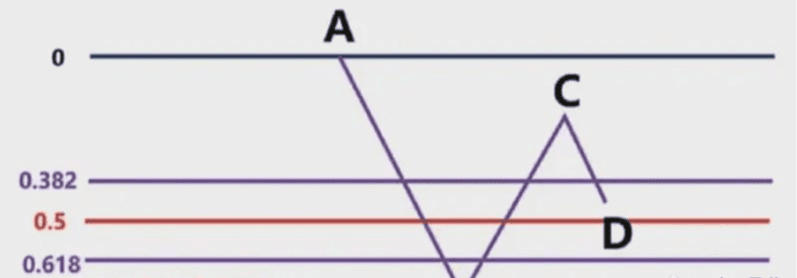
Figure 2.4-27
That would indicate a deep pullback, meaning the upward momentum is weakening and the buying power is diminishing. Sellers will also realize this and may intervene in the market.
At this point, we also need to draw the horizontal support line at point B. We can observe the reaction when point C falls back to this horizontal support level, as shown in Figure 2.4-28.
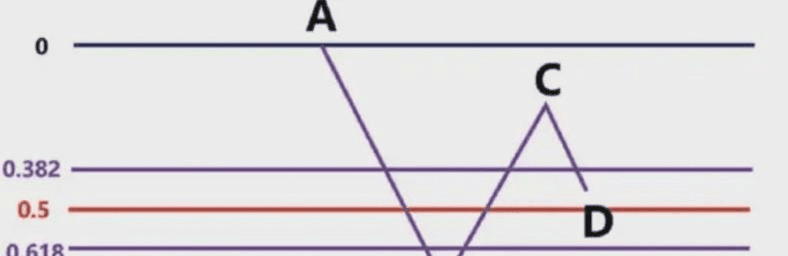
Figure 2.4-28
As mentioned many times before, we should trade with the trend until the market reverses, because trading with the trend is always the easiest way to make money.
If point B above is broken, a consolidation pattern may form.
At this point, we need to pay attention to the price performance of the horizontal support area drawn from the low point before the low point B of the wave. These will be explained in detail in later lessons. Here, we mainly talk about how to find the high and low points of the wave.
The above charts illustrate the situation where the decline in segment CD did not stop after reaching point D, but continued to fall, and the corresponding strategies we adopted.
If there is no decline at point D, but instead an increase, how should we draw the high and low points of the wave? As shown in Figure 2.4-29.
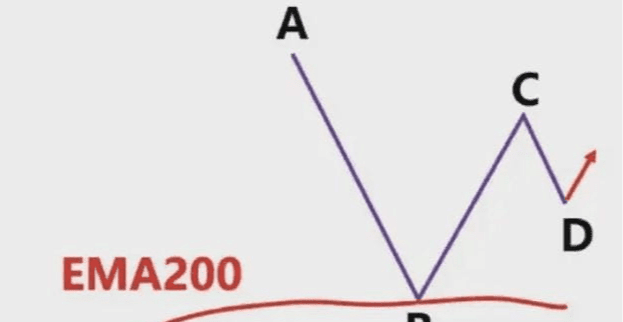
Figure 2.4-29
At this point, we should draw a horizontal resistance line at the previous high point A and wait for the price to break through the previous high point A before observing its performance.
If the price breaks through the previous high point A, then creates a new high point E, and subsequently falls, we can draw a Fibonacci retracement level using the low point B and the high point E, and observe the price action within the 0.382-0.618 range, as shown in Figure 2.4-30.
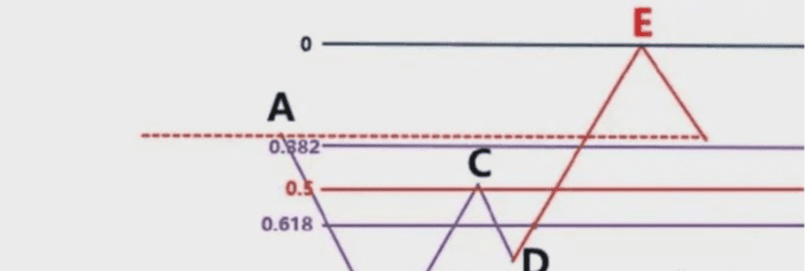
Figure 2.4-30
If the horizontal resistance line drawn at point A is also in this area, regional resonance will form, and this area should be closely monitored.
Of course, when the price breaks through the previous high point A, it may be blocked and fall back before breaking through again, forming a dense range, as shown in Figure 2.4-31. This is a position where it is accumulating momentum and waiting for a breakout.
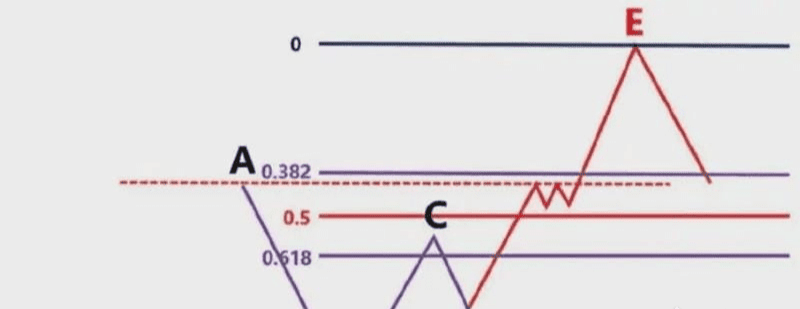
Figure 2.4-31
The most important thing is to see if it can eventually break through and form a new high point. After the breakthrough, we can find the high and low points to draw the Fibonacci zone.
Therefore, the above is the entire process of identifying the highs and lows of a price swing in an upward trend.
Let's assume the market is trending downwards, as shown in Figure 2.4-32. How should we proceed?
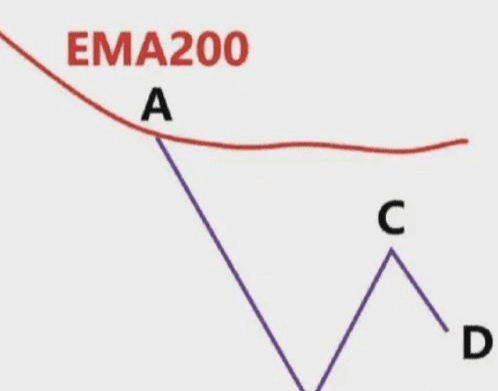
Figure 2.4-32
First, we cannot directly connect B and C as the high and low points of the wave and then draw the Fibonacci sequence. If the price falls from high point C to point D, then at point D, it's possible for the price to rise or fall. Let's first consider the assumption of an upward move; how should we draw the Fibonacci zone then?
At this point, we need to draw the Fibonacci region based on the previous high point A and the previous low point B, and then observe whether the position of point C is within the 0.382-0.618 range of this Fibonacci backtest.
If position C is within the rebound zone of 0.382-0.618, as shown in Figure 2.4-33,
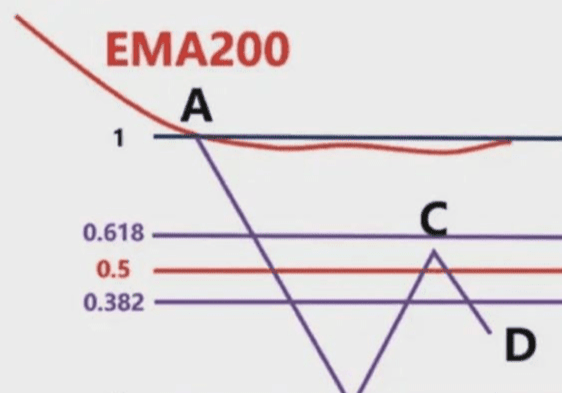
Figure 2.4-33
At this point, there might be a second test of the high point C, which means it will retest the previous high point C, forming a double top pattern, and then fall directly.
As we mentioned earlier, we need to look for double bottoms in an uptrend and double tops in a downtrend. Always remember to trade with the trend.
Therefore, we need to draw a horizontal resistance line at point C, and then wait for the price to reach this area to observe its behavior and see if a double top pattern appears before deciding how to enter the market, as shown in Figure 2.4-34.
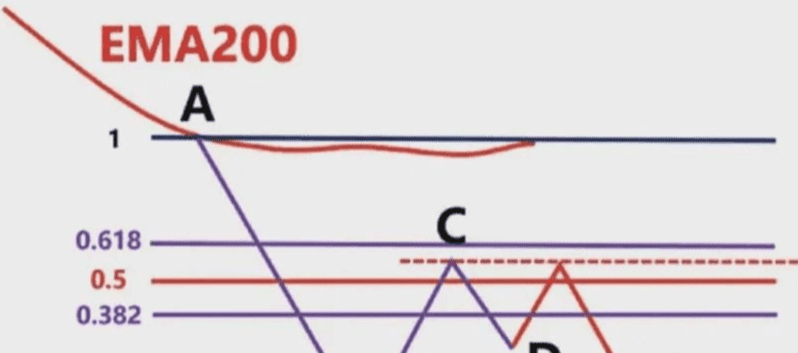
Figure 2.4-34
If area C is not in the 0.382-0.618 range, but above 0.382, which is above the mild rebound range, as shown in Figure 2.4-35, then what should we do?
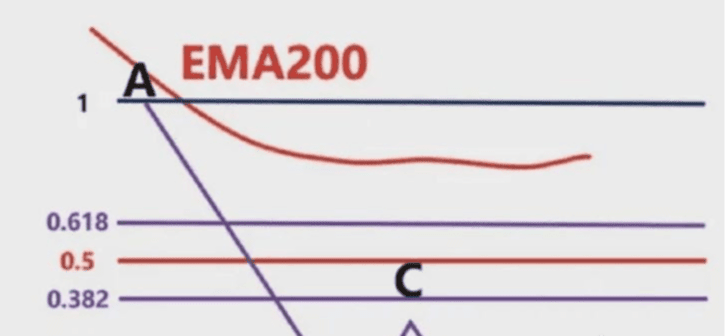
Figure 2.4-35
At this point, we also need to draw the horizontal resistance line at point C. The price may, as before, retest the high point C, forming a double top pattern, and then fall directly, as shown in Figure 2.4-36.
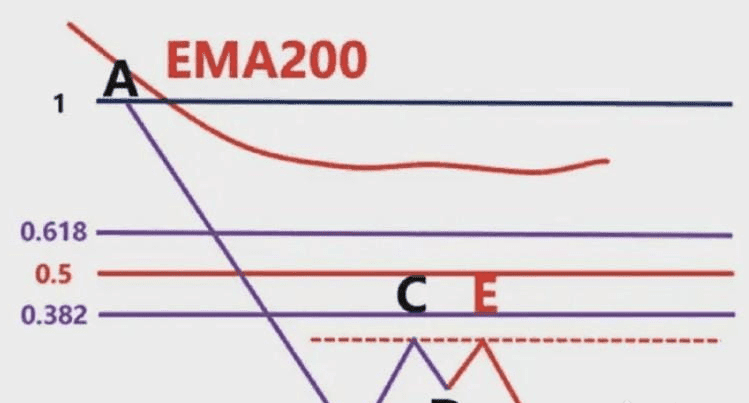
Figure 2.4-36
It's also possible that the price will break through the resistance zone to point E, forming a pattern where BC and DE are equidistant, and the rebound point at E happens to be in the 0.382-0.618 Fibonacci retracement level, before continuing its decline, as shown in Figure 2.4-37.
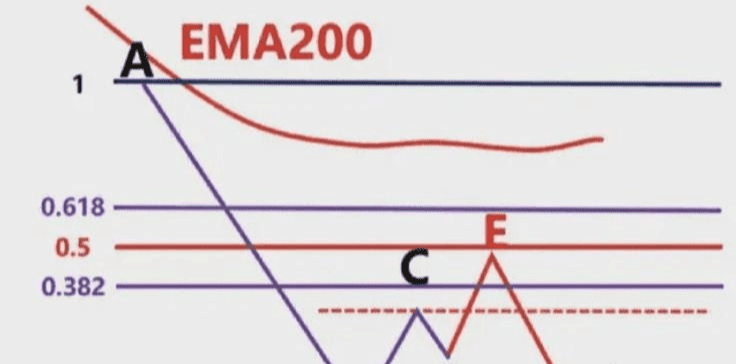
Figure 2.4-37
In other words, the rebound at this time is not a simple rebound; it is a two-stage, equidistant rebound.
Because traders who went long at point D will take profits and close their positions at point E based on the principle that BC and DE are equidistant, the bullish momentum will be exhausted, the bears will continue to exert their strength, and the price will continue to fall.
Of course, it is also possible for a three-stage rebound to form before continuing to fall, but as long as the trend is not broken, we should trade in the direction of the trend.
If position C is not in the 0.382-0.618 range, but below 0.618, it means it belongs to a deeper rebound, as shown in Figure 2.4-38.
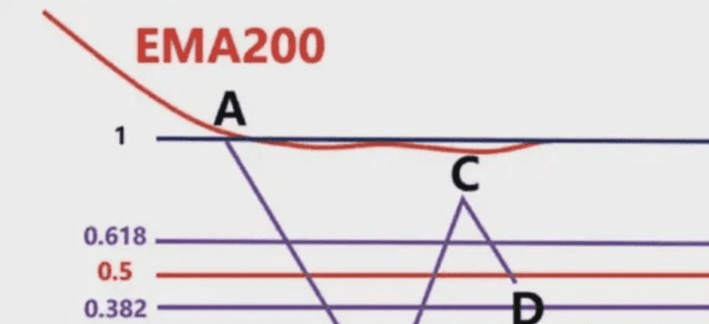
Figure 2.4-38
This indicates that a deep rebound has occurred after the decline, reflecting insufficient selling pressure and potentially causing market volatility or a reversal.
Now we draw the horizontal resistance line at point C. We can observe the price's reaction when it rebounds to this horizontal resistance level, as shown in Figure 2.4-39.
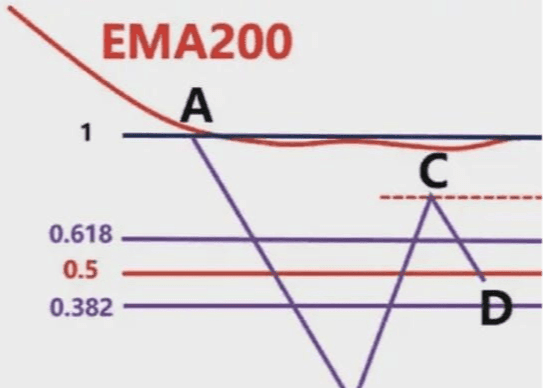
Figure 2.4-39
As mentioned many times before, we should trade with the trend until a reversal occurs, because trading with the trend is always the easiest way to make money. We should watch for the formation of a double top, as shown in Figure 2.4-40.
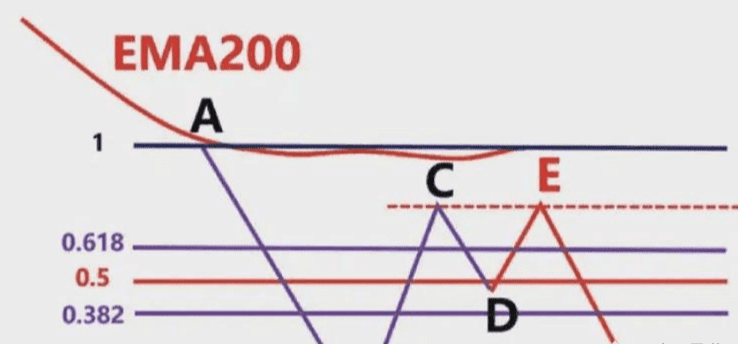
Figure 2.4-40
Therefore, it is possible that it will form a double top at the resistance line drawn at the high point C, and then fall in the same direction. Of course, it is also possible that it will break through this resistance line directly.
If point C is broken, we should pay attention to the high point A of the wave. Draw a horizontal resistance line through A, and then observe the price reaction when it approaches this resistance line, as shown in Figure 2.4-41.
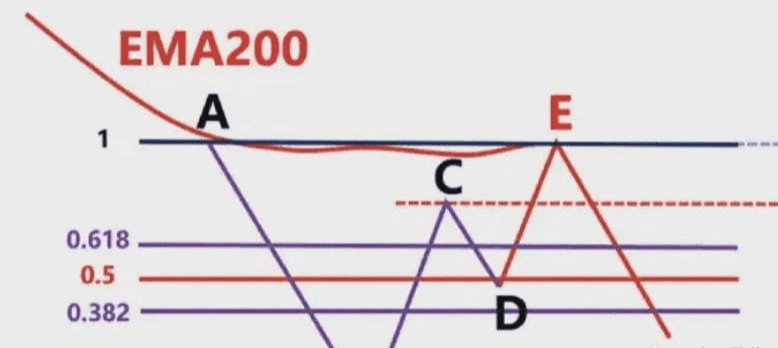
Figure 2.4-41
It might then enter a consolidation phase, or it might reverse, or it might continue to fall after the consolidation. These are all unpredictable, and all we can do is keep a close eye on it.
The above diagrams mainly assume several scenarios where the price rises at point D.
If the price continues to fall instead of rising at point D, as shown in Figure 2.4-42, how should we identify the highs and lows of the price swing?
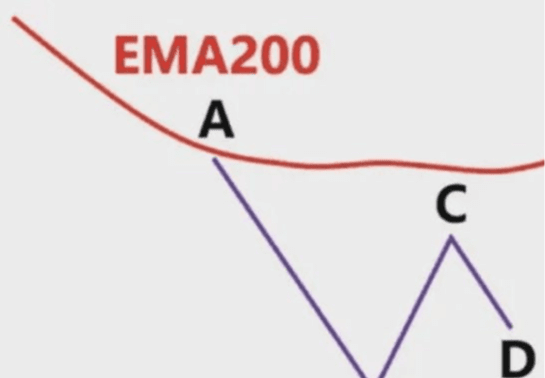
Figure 2.4-42
At this point, we should draw a horizontal support line at the low point B of the wave, wait for the price to break below the low point B, and then create a new low point E.
At this point, we can draw the Fibonacci range using the high point C and the low point E of the wave, and observe the price action within the 0.382-0.618 range, as shown in Figure 2.4-43.
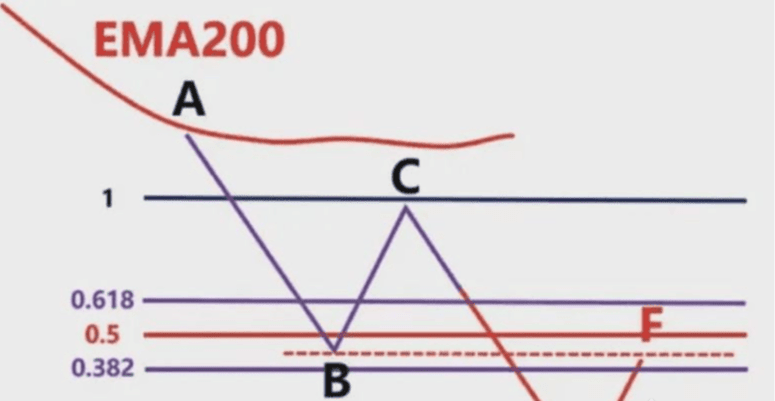
Figure 2.4-43
If the horizontal support line drawn at point B is also within this area, it will create regional resonance, and this area should be closely monitored.
Of course, when the price breaks below the previous low point B, it may find support and rebound before breaking below again, forming a dense range, as shown in Figure 2.4-44. This is a position where momentum is building and waiting for a breakout.
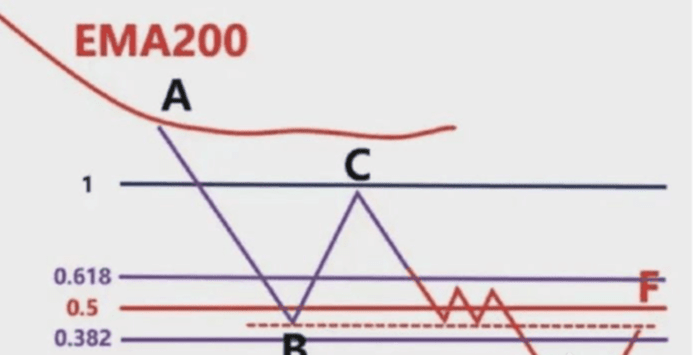
Figure 2.4-44
The most important thing is to see if it can eventually break down and form a new low point for the wave. Then we can draw the Fibonacci zone in this way.
That concludes the entire process of finding the highs and lows of a downtrend.
Now that we've determined the trend and confirmed the highs and lows of the price swings, how do we draw the chart correctly?
It's very simple. If it's an upward trend, the rule for drawing the lines is to first find the low point of the wave, then find the high point of the wave, that is, draw from bottom to top. At this time, we can see that 1 is at the bottom and 0 is at the top.
If you find the high point of the wave band first and then the low point, the numerical display on your graph will be different, as shown in Figure 2.4-45.

Figure 2.4-45
It's obvious that the left side is correct, while the right side's value is reversed.
Some people don't pay attention to detail when they draw and draw very casually, which leads to bad drawing habits. So in the early stages of learning, try to learn the correct habits, otherwise it will be difficult to correct them later.
If it's a downtrend, the rule for drawing the line is to first find the high point of the wave, then find the low point, that is, draw from top to bottom. In this case, we can see that 0 is at the bottom and 1 is at the top.
If you find the low point of the wave band first and then the high point, the numerical display on your graph will be different, as shown in Figure 2.4-46.

Figure 2.4-46
It's obvious that the left side is correct, while the right side's value is reversed.
That concludes the detailed process of how to draw Fibonacci numbers.
Here's a question: when connecting high and low points, should we connect the shadow line or the solid?
My personal understanding is that it connects the highest and lowest points, which naturally means connecting the shadow line, not the body.
Finally, let's look at the explanation of the live chart to reinforce our understanding, as shown in Figure 2.4-47.
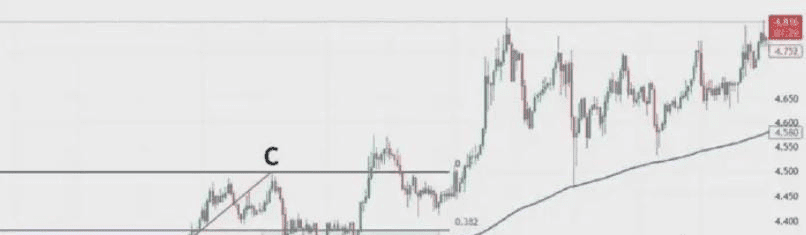
Figure 2.4-47
The blue line in the chart is the EMA200. We see a high point A and a low point B. At this point, the price is above the EMA200. We only go long and not short. We draw a purple horizontal resistance line with the high point A.
We see that the price subsequently breaks through A and reaches the high point C. We then draw the Fibonacci zone using the low point B and the high point C, and observe the price performance when it returns to the 0.382-0.618 range, which is the light green area on the chart.
We see that the price forms a double bottom in the area marked by the red arrow, and at the bottom on the right, a small dense range forms. We can enter the market directly when the price breaks through the top of this range. Of course, you can also choose other entry methods.
Let's look at another chart, as shown in Figure 2.4-48.
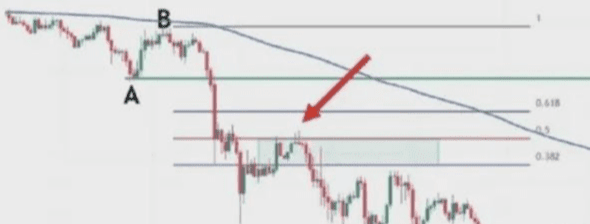
Figure 2.4-48
The blue line in the chart is the EMA200. We see a low point A and a high point B. At this point, the price is below the EMA200, so we only short and not go long. We draw a green horizontal support line from the low point A.
We see that the price subsequently fell directly below A to reach a low point C. We then draw the Fibonacci zone using the high point B and the low point C, and observe the price's performance when it returns to the 0.382-0.618 range, which is the light green area on the chart.
We see a double doji (DD) signal appearing in the 0.5 Fibonacci retracement level, indicated by the red arrow. This, along with a minor high on the left, forms a mini double top, which is an entry signal. Of course, you can choose other entry methods. That's all for how to draw Fibonacci retracements. I hope you can practice more and master it.
In the crypto world, it all boils down to a battle between retail investors and market makers. If you don't have cutting-edge information or firsthand data, you'll only get fleeced! If you're interested in investing together and profiting from the market makers, contact me! I'm A-Xun.