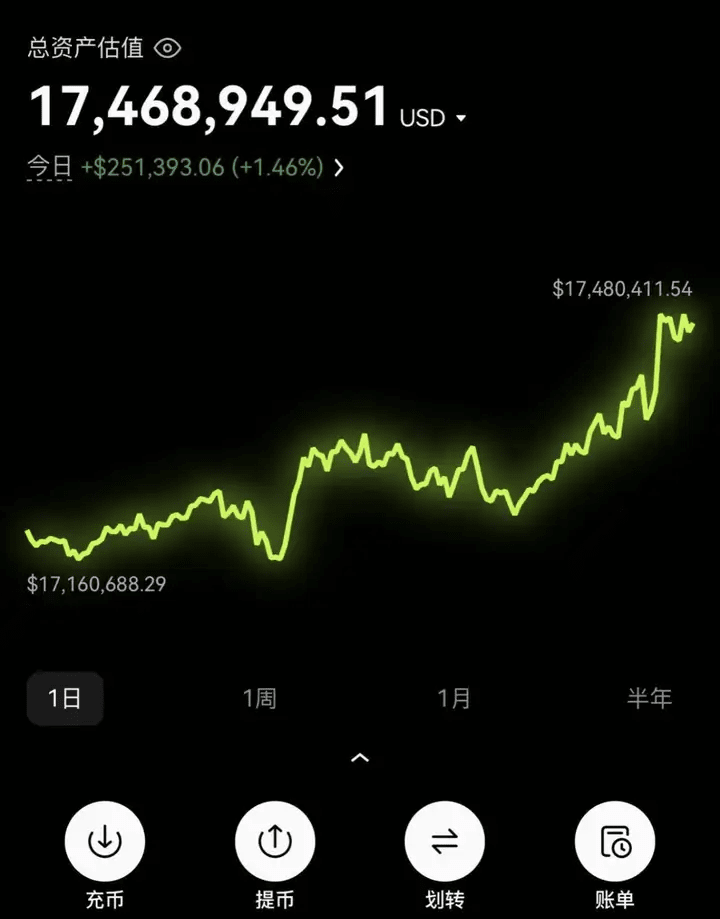
After ten years of ups and downs in the cryptocurrency world, I started with the 180,000 yuan I accumulated from my initial job, and now I have amassed over 80 million yuan in wealth. I focus on spot trading and keep a respectful distance from contracts. Although I have not achieved billionaire status starting from ten thousand like some legends, I feel deeply satisfied, progressing steadily, and quietly hoping that my account can surpass the 100 million yuan mark by the end of the year, paving the way for earning more capital next year.
In the journey of the cryptocurrency world, maintaining a calm mindset is crucial. In the face of the market's drastic fluctuations, I do not let anxiety dictate my emotions during sharp declines, nor do I get lost in temporary euphoria during significant rises, fully aware that securing profits is the way to peace. Looking back, when I first entered the cryptocurrency world, I often lost sleep due to worries, waking up in the middle of the night was a common occurrence. Now, I have learned to handle it with equanimity.
Ultimately, while skills are indispensable in making money, what's even more valuable is adhering to a set of principles within oneself. This belief alone is enough to put me ahead of many of my peers, eliminating at least 70% of them!
In the previous article, we briefly introduced the basic concept of "trading ranges," their formation, and their representation on candlestick charts. Today, we will delve deeper into how to actually trade range patterns.
A side note about signal candlestick patterns
Before explaining specific trading strategies, I'd like to address a common problem: many novice traders look for signal candlesticks to enter the market when the market conditions are wrong.
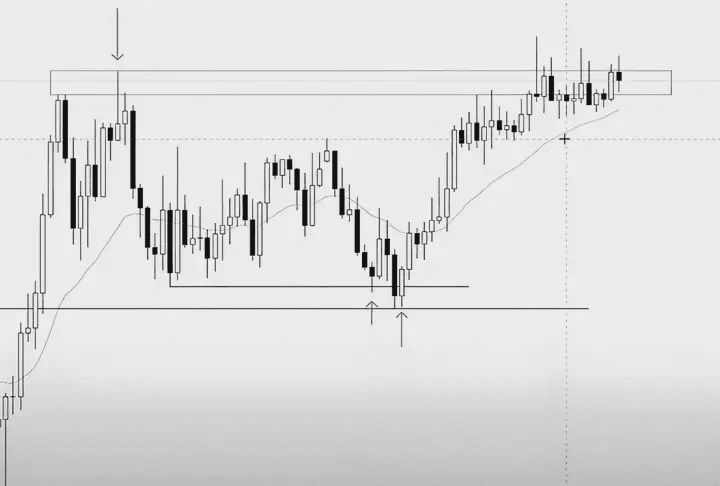
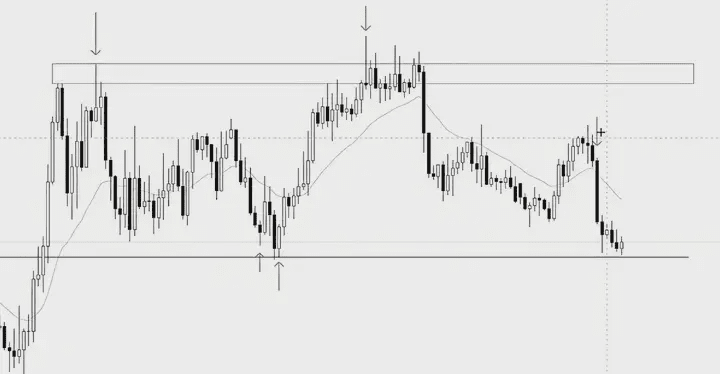
For example, this is a 30-minute chart for gold.
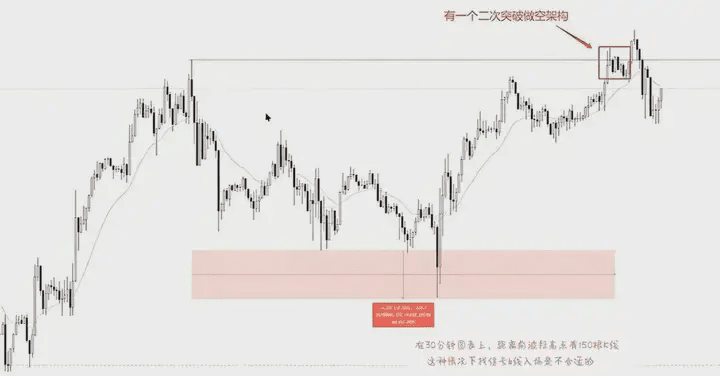
There is a clear resistance level ahead, namely the previous high. In this market condition, there are more than 150 candlesticks away from the previous high. If you look for entry signals at this distance, such as single candlestick reversals, double candlestick reversals, or double breakouts, the success rate is usually very low.
For example, the chart shows a signal to short on a double breakout, but in practice, this signal was rejected by the market. The reason is simple: this structure consists of more than 150 candlesticks, while your signal only has one or two, or at most five or six. In comparison, a signal from a few candlesticks is easily obscured by the complexity of the larger structure, thus resulting in a poorer performance.
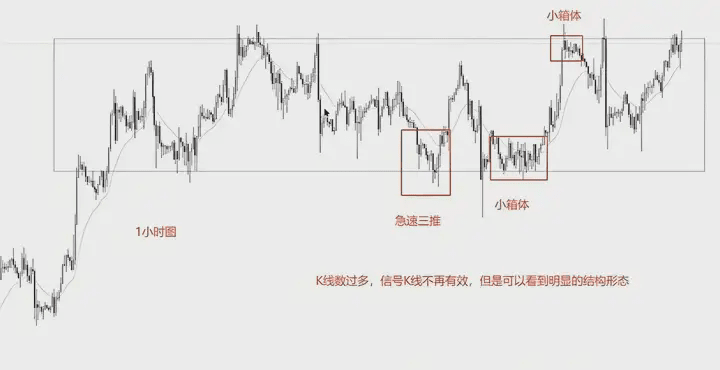
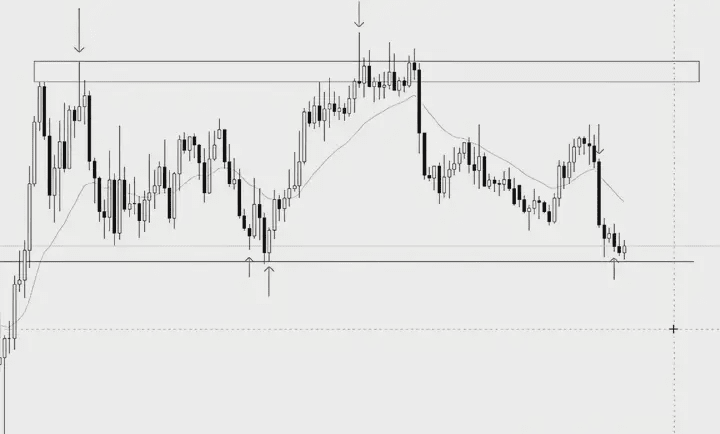
Switching the chart to a 1-hour timeframe reveals that the distance between the previous wave points has shortened to just over 80 candlesticks.
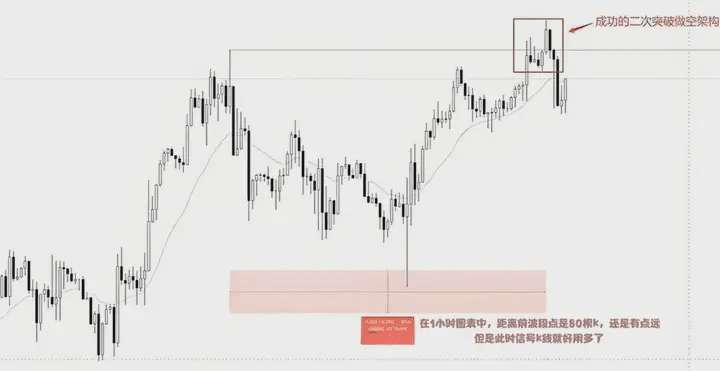
At this point, the effectiveness of the signal candlestick pattern is significantly enhanced; for example, a successful second breakout of the short-selling structure.
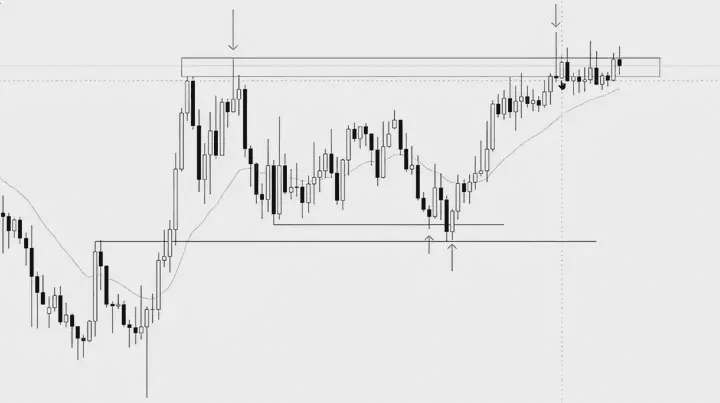
Let's look at another example of a pullback. On the 1-hour chart, we can see a pullback from the high of the moving average. An entry signal candlestick is formed here, and the price then rises.
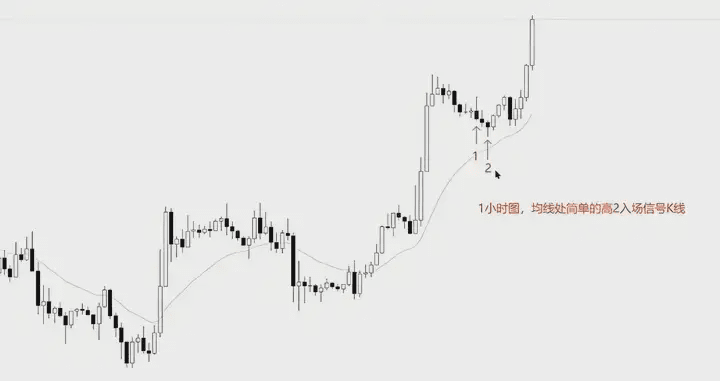
Note that I have marked the signal candlestick, not the entry candlestick.
Let's switch the chart to a 15-minute timeframe.
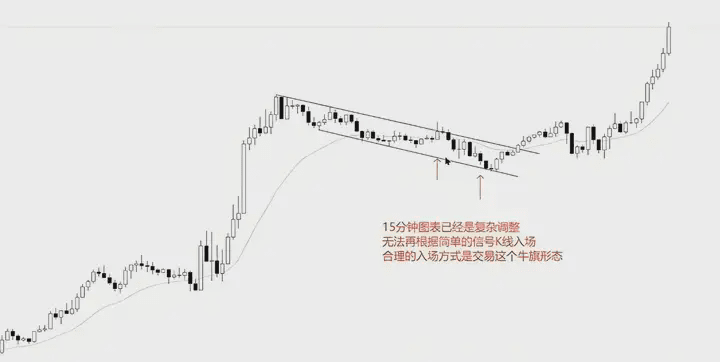
During this cycle, the market has undergone complex adjustments, making it difficult to find effective signal candlestick patterns.
However, trading bull flag patterns is relatively simple at this point. To summarize, in pattern structures with a small number of candlesticks (e.g., no more than 100 candlesticks), signal candlesticks can be used for trading, such as single-candlestick reversals and double-candlestick reversals. In pattern structures with a large number of candlesticks (e.g., hundreds of candlesticks), entry patterns should be prioritized, such as double tops/bottoms and head and shoulders patterns. These differences may not be as important for experienced traders, but for beginners, understanding them is crucial.
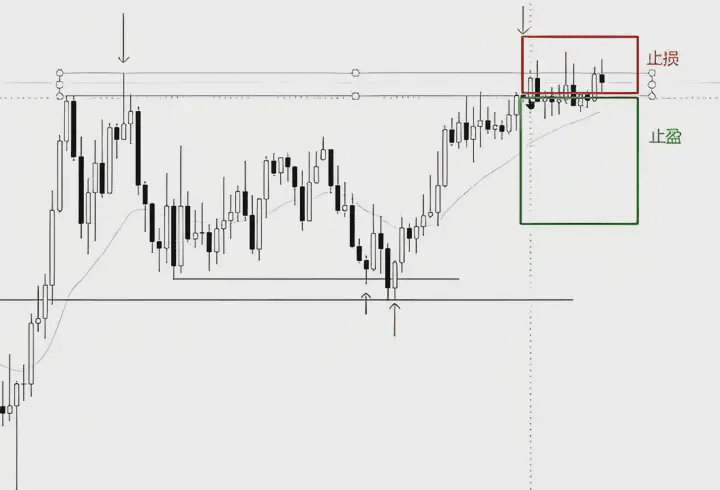
Let's look at another example. In the 4-hour chart, there are approximately 80 candlesticks in this range.
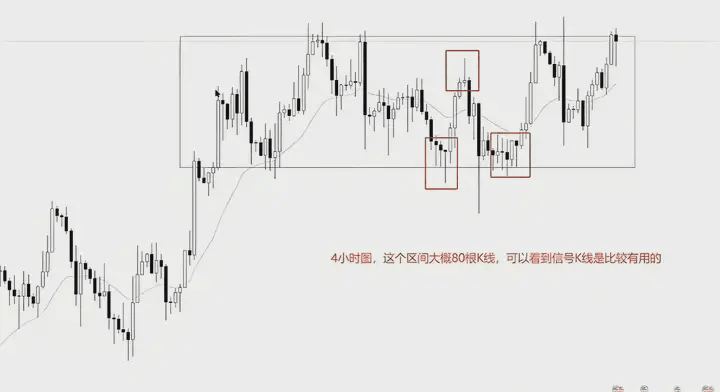
In this situation, signal candlesticks are quite effective, for example, for single-candlestick reversals or support confirmation. However, when the time frame is switched to 1 hour, the effectiveness of signal candlesticks decreases significantly, and failed signals are more likely to occur.
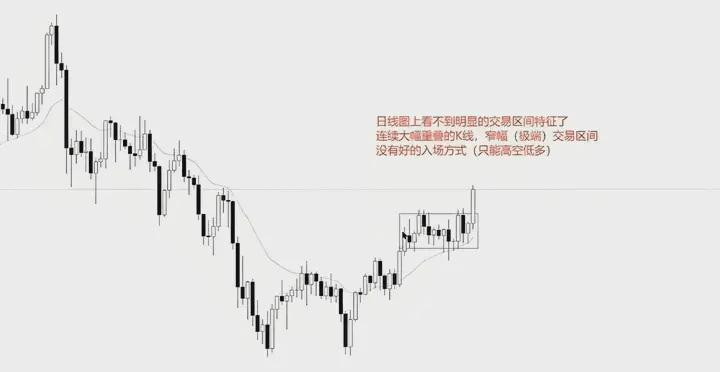
Switching back to the daily chart, the trading range characteristics almost disappear, showing the characteristics of a narrow trading range. In this market condition, there is no obvious entry method. It is best to choose to buy low and sell high, or wait for a clear breakout before trading.
Differences in K-lines across different time periods
The same market condition and the same pattern can appear very differently on charts across different timeframes. Reviewing market conditions across different timeframes helps in understanding price movement patterns. As for how many candlesticks to place a pattern on for trading, there's no absolute answer. The choice depends on your preferred entry method.
Those who like to observe price action will likely have no more than 200 candlesticks on their charts. Others, who prefer to enter the market through patterns, may have more candlesticks on their charts because they focus more on patterns and don't need to pay too much attention to minute price movements.
If you are learning price action trading like I am, please note that you should not look for signal candlesticks in large timeframe structures to trade.
Summary of this article
This article mainly explains the signals of a failed breakout from a trading range.
A failed breakout from a trading range can also be termed a pullback within that range.
This is an analytical method I frequently use in trading. I won't go into detail about successful breakouts from ranges and the strategy of buying low and selling high within a range, because this strategy usually doesn't rely on signal candlesticks but instead places orders directly within the range. I personally rarely use this method, preferring to wait for signal candlestick confirmation before entering the market. This is because placing orders directly makes me feel insecure in trading.
The mathematical advantage of range trading lies in the inertia of market movements, which tend to maintain the current state. In other words, once a range is formed, the probability of a false breakout is usually greater than a true breakout. Therefore, range-bound trading strategies (buying low and selling high) have a higher success rate. While I personally prefer using signal candlesticks to confirm entry points, the final choice varies from person to person; the key is to find a trading style that suits you best.
Before we delve into the lesson on range trading, here's one last point:
The success or failure of a breakout from a trading range can only be determined in hindsight.
When a price pauses during a breakout from a range, it's impossible to determine in advance whether the breakout will be successful or not. No matter what indicators or methods you use, you cannot determine the outcome before the breakout occurs. Indicators related to range breakouts often have a significant lag. Some suggest using trading volume to judge the validity of a breakout, but in practice, this method is often ineffective and more often proves to be "hindsight bias."
Therefore, when trading after a failed breakout from a range, the key is to observe whether the breakout showed signs of weakness, i.e., whether there was a lack of follow-through momentum. If the market shows signs of weakness during the breakout, we subjectively judge it as a failed breakout. However, if the market first shows signs of weakness before continuing to break out, then our previous failed breakout signal will also be considered a failure, i.e., a breakout pullback.
The success or failure of a breakout from a trading range can only be determined in hindsight. This is a conclusion reached by master traders after analyzing hundreds of thousands of charts; ordinary traders like us shouldn't try to predict it in advance. During trading, we can only make decisions based on the signals that appear. Once the market contradicts our judgment, we need to strictly implement stop-loss orders and not fight the market.
Why go through so much before starting the course, even if some might consider it redundant? Because trading and technical analysis are inherently logical processes. If your fundamental logic is incomplete or even flawed, subsequent learning and trading will become difficult, let alone expecting to profit. The content presented here, including the material for the entire future course series, is merely the tip of the iceberg compared to the trading materials I've studied. If you aspire to achieve stable returns and become one of the few outstanding traders in the market, you must be adept at learning, researching, and summarizing; laziness is unacceptable.
Real-world case study
Truly standard and simple trading ranges are very rare in the market. You can verify this by reviewing past trades.
The movement within a range represents uncertainty in market direction, thus naturally appearing complex. If the market condition is uncertain, false breakouts are more likely to occur, because genuine breakouts are more common in a more definite market.
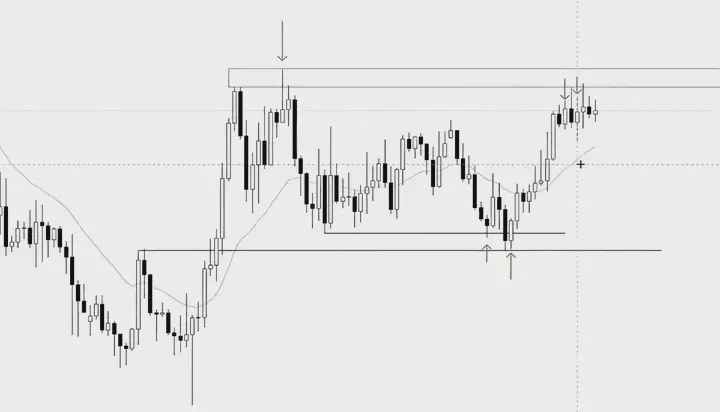
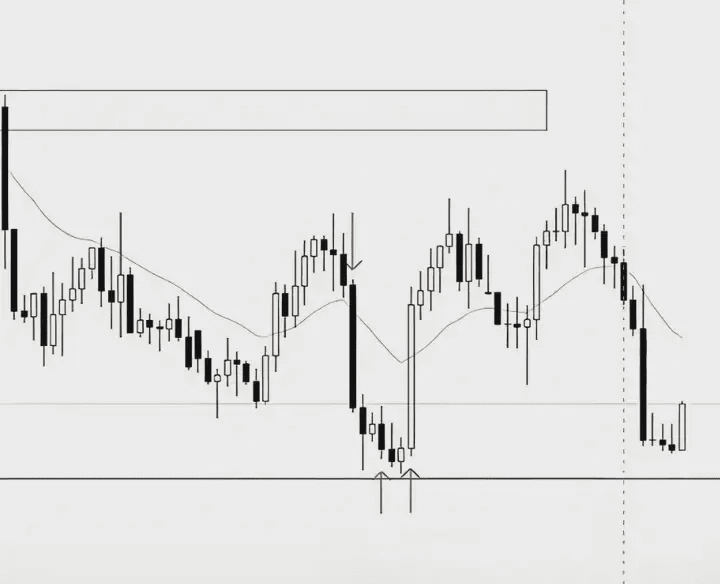
Let's take a look at this picture.
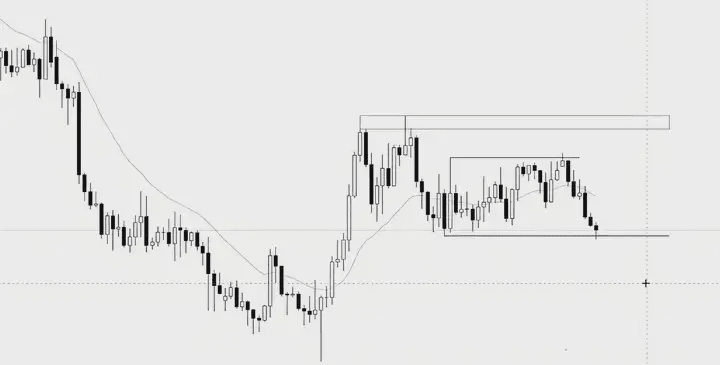
We previously saw the market experience a trend of decline, followed by a rapid sideways consolidation phase, and then a rapid downward channel. Afterwards, prices saw a significant upward correction. Since this video mainly focuses on trading ranges, I will briefly touch upon other trading opportunities.
As an aside: In this case, there is actually a very simple short-selling signal, namely, a pullback trade during a downtrend.

We can observe the rise to the previous verification point and signal candlestick, including a false breakout of the second upward move, which is a very clear short-selling signal.
Given the previous market context, we see a downward trend that is difficult to reverse.
After a sharp rise and subsequent correction, it is highly likely that the market will test the extreme point of the trend; this is a fundamental law of market movement.

After the price fell from here, we found that the market did not test the extreme value of the downtrend, but instead made a false breakout of the previous shadow extreme value.
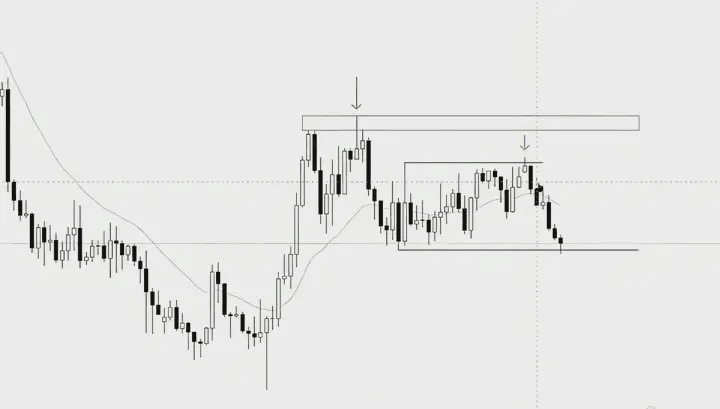
The market is showing hesitation here. We can see many overlapping and non-trend candlesticks, indicating current market uncertainty. This signal is quite evident in the candlestick pattern; after a false breakout, the price fell rapidly. This decline shows a downtrend, with the candlesticks demonstrating strong bearish momentum. While the signal appears relatively clear from the candlestick pattern, in actual trading, we might not rely solely on such long wicks to determine support and resistance levels.
This rapid decline has resulted in a false breakout of the previous low; we can see if this is confirmed.
The breakout point is currently quite far off. Although this signal candlestick didn't form a bullish candle, it has a long wick and represents a false breakout of the previous level. While this candlestick could be a buy signal, given the rapid decline, waiting for a secondary entry opportunity might be better. However, this depends on individual trading style. Personally, I wouldn't enter immediately because I want to see a stronger reversal signal, ideally a bullish candle with a shorter upper shadow. Nevertheless, this candlestick itself is acceptable.
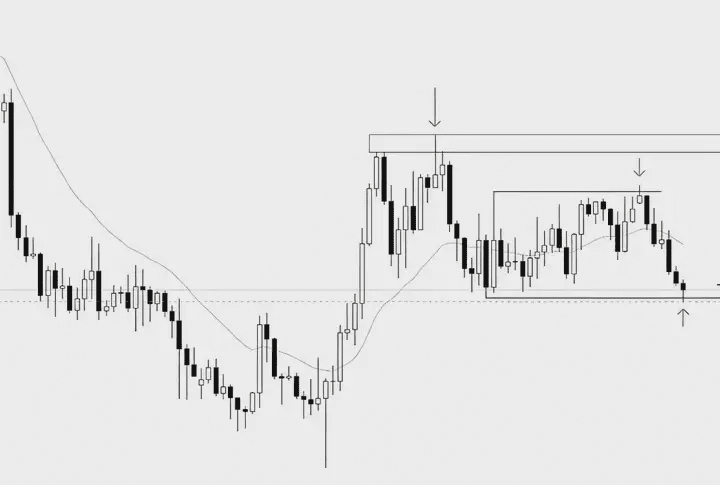
Let's take a look at the subsequent trend.
The initial buy signal broke through and performed well, but the market subsequently rejected it, continuing to fall and breaking below the low of that candlestick. If we had entered based on the current signal candlestick, the stop-loss would typically be placed below the signal candlestick, potentially resulting in a break-even exit or a stop-loss exit.
However, it gave us a second chance to go long.
This is a signal candlestick pattern from a high school sophomore year. It's a signal candlestick, not an entry candlestick. Whether it's Abu's "Rat" candlestick pattern or my commonly used double breakout pattern, both can be used as entry signals. The arrow points to this candlestick; you can enter the market after it breaks through.
To recap: the first signal candlestick falsely broke through the previous low, but the second entry signal candlestick tested the breakout point, forming a better entry signal. Sometimes, when the market approaches the next support or resistance level, it may initially deny the previous price action and test the nearest support or resistance. This is a common occurrence in the market.
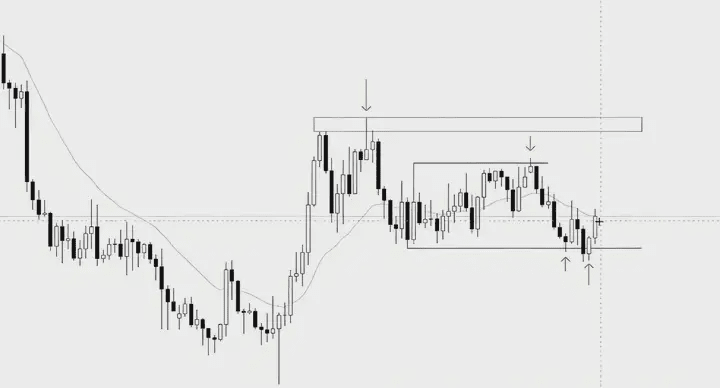
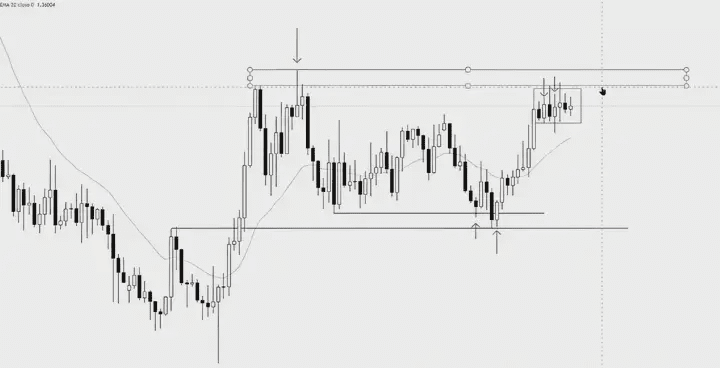
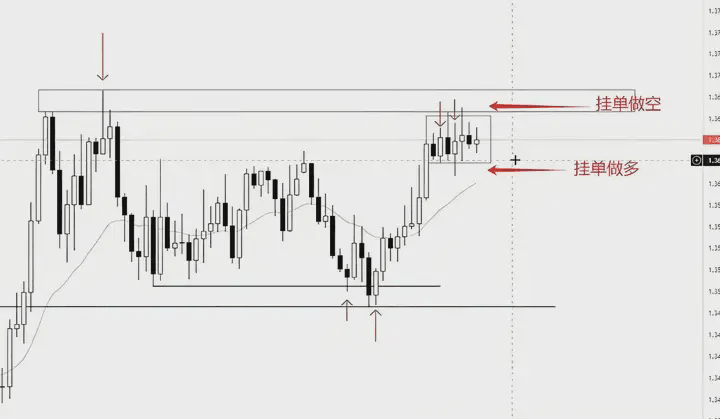
We observed that the second breakout high was a false breakout of the previous wave point, while simultaneously validating the earlier breakout. After this, the market did not fall to test the bottom, but instead underwent complex sideways movement. This indicates that the market has become ambiguous, and we can sense that a potential trading range may have formed.
Here, the entry signal and false breakout validated our idea, revealing a potential trading range. We believe this is a large trading range. Therefore, this "potential trading range" has now become the verified "trading range."
How do you manage your orders when you're going long within a range? Many people struggle to manage their orders effectively when trading within a range.
Inter-regional order management
First, we need to understand the logic behind price movements within a range.
Within a trading range, we generally know that buying low and selling high has certain advantages.
For example, the potential trading range mentioned earlier, based on the preceding market movement, may form a trading range. In this case, going long at the bottom or short at the top is usually advantageous.
However, this advantage diminishes significantly when the price moves to the middle of the range. When the price returns to the middle of the range, it's in a neutral probability state; while it might be slightly biased to one side, the probabilistic advantage is very small. For example, if a false breakout occurs downwards, it might tend to test the top upwards, but this probabilistic advantage is minuscule. You cannot rely solely on this tiny advantage to design your trading system.
When managing orders, you need to adjust your strategy based on the overall structure of the range and the specific price position. For prices in the middle of the range, don't rely too much on minor probabilistic advantages; instead, focus more on risk control and position management.
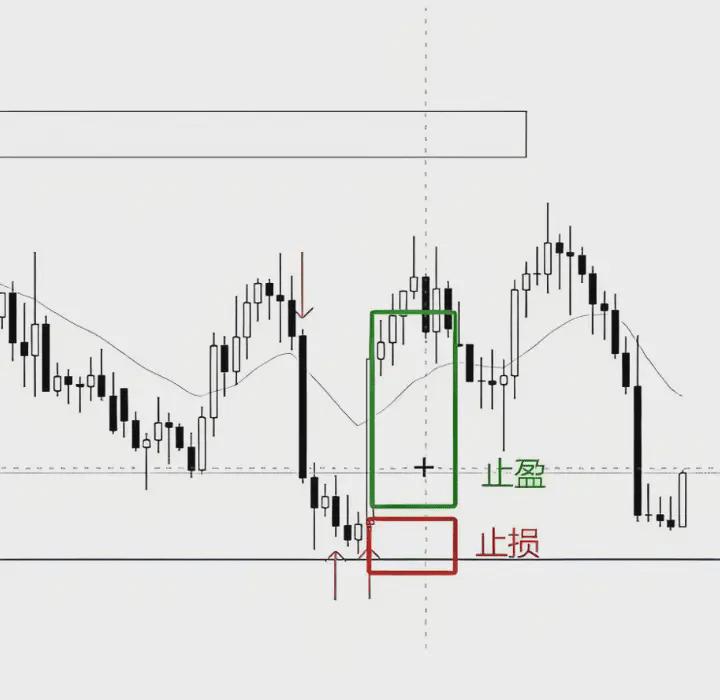
Half position closed in the middle of the range
If we go long at the potential bottom of this range, and the price moves to the upper part of the range, I would close half of my position there, and hold the other half until the upper part of the range.
Why do we do this? Because when the price reaches the middle of the range, that's when our advantage is greatest. If the price quickly returns to the middle of the range, our probability advantage diminishes, and the odds may return to a 50/50 split.
We're holding the remaining half of the position because we entered the market early and set our stop-loss at the bottom, giving us a profit advantage. Now, the probability of it testing higher is 50/50. At this point, the profit/loss ratio has improved. Even if the win rate is only 50%, we still have a data advantage due to the profit/loss ratio, so we can still take a gamble with the remaining half of the position.
Some might ask, is it possible to hold the entire position until the upper part of the range?
Mathematically, this makes sense, but it can be very difficult in practice. If you hold onto your position instead of closing half when the price reaches the middle of the range, and the price continues to fall, breaking the range, you might lose all your profits, which can be very psychologically damaging. Therefore, I don't recommend doing this. Close half your position first, and deal with the rest later.
Subsequent verification
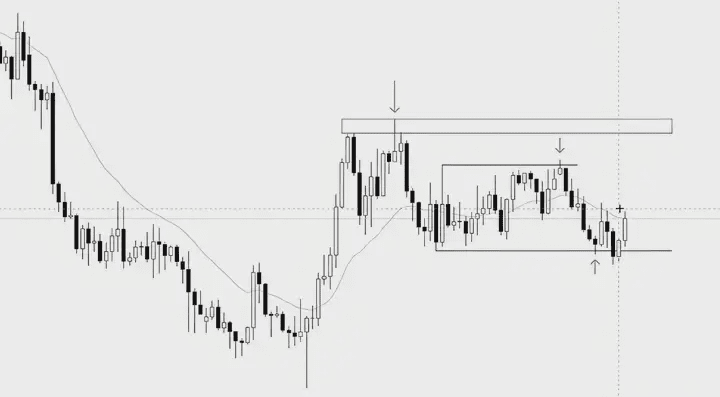
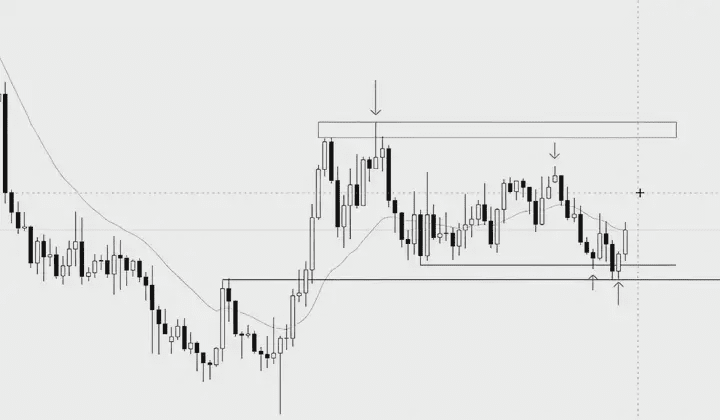
Let's take a look at the subsequent market trend.
The price rose simply and easily reached the profit target; there's nothing particularly special to say about that. Successful trades are often unremarkable; the key lies in the logic behind the trade.
Our previous assessment that the market might form a potential trading range has been validated.
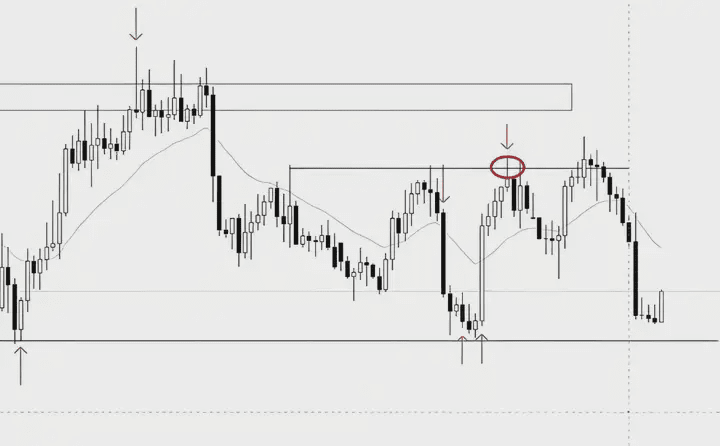
Short at the top of the range
The price has now moved to the top of the range. Should we short it? The key is to find an entry signal.
In fact, a second breakout signal has already appeared here, and the short-selling signal has been established. This breakout pattern has formed two lower lows.
Logically, this second breakout entry signal is reasonable, especially at the top of the range. However, I personally prefer to wait for a false breakout, such as a false breakout of the previous swing point, before taking action. But logically, however, this second breakout signal is worth considering.
If you enter the market here, you can observe the subsequent price action. The market didn't immediately validate your logic because after the subsequent candlestick (your entry candlestick), the market closed with a doji, followed by a series of consecutive sideways doji candlesticks. At this point, you need to manage your orders.
Because when you entered the market, you judged it to be a double breakout shorting pattern, but in reality, the market has changed from a double breakout pattern to a barbed wire pattern. We can see a series of non-trend candlesticks, including doji stars.
The barbed wire pattern represents an extreme range and suggests market uncertainty. When you enter a trade and this pattern appears, the best course of action is to exit with a small loss, accepting a small loss, or at least break even, because your entry logic has been invalidated by the market.
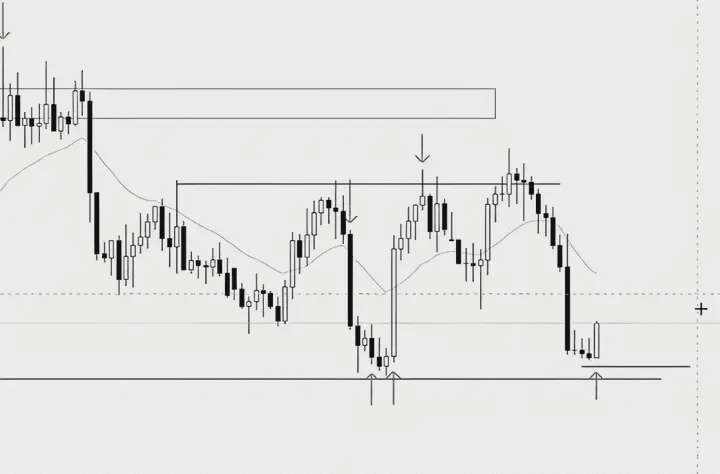
Superimposed patterns of large and small intervals verify entry
If you don't have any positions right now, meaning you didn't enter the market during the second breakout to short, what should you do now?
Let's look at the overall market situation. It's a potentially large trading range, but on a micro level, it has formed an extremely narrow trading range.
At this point, you can place a short order at the upper end of this narrow trading range, as this serves as a confirmation of the price pattern. The trading strategy of trading within a range—buying low and selling high—is always effective.
Within this narrow trading range, you can place a short order at the upper limit.
What are your strengths? Mainly my strengths in mathematics.
The probability of a breakout above or below the range is 50:50. When you place a short order above this small, narrow trading range, if it breaks down, it coincides with the formation of the top of a larger trading range, and it will test the lower middle part of the range.
At this point, your win rate is 50%, while your profit/loss ratio could reach 2 or even 3. This is where your mathematical advantage comes into play.
Remember, the advantage here is mathematical, not your judgment of direction, nothing more.
learn by analogy
A savvy friend might ask, if placing a short order at the top of this narrow trading range has a mathematical advantage, can I place a long order at the bottom?
Since the probability of a breakout above or below is 50:50, if the price breaks out upwards, doesn't that mean it has broken out of the large range?
Yes. When prices are at the top or bottom of a range, or when there is a pause during a breakout, we cannot determine in advance whether the breakout will be successful. This is because no indicator or method can accurately predict the outcome of a breakout. If someone claims to be able to accurately predict whether a breakout will occur within a range, in most cases, they are either misleading you or do not understand the market well enough.
If someone truly possesses the ability to judge whether a breakout has occurred within a range, then their name will appear on the world's wealth list within 20 years. Because such an ability is simply too powerful.
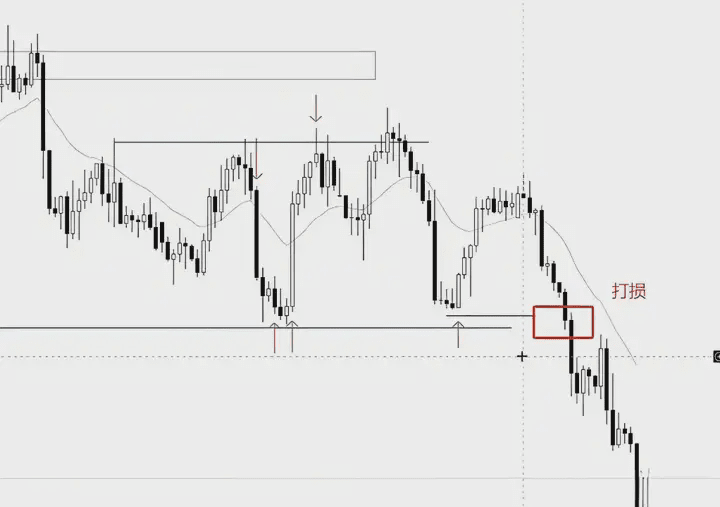
Looking at the subsequent market trend, the short positions taken earlier should have all been stopped out.
Regardless of your entry logic, even if you place a short order at the top of a later narrow trading range, the upward movement is still significant and may have already triggered your stop-loss order. This situation is very common in trading, and we need to be prepared to deal with it at all times.
The transaction was damaged.
However, we noticed that despite your stop-loss being triggered, this range has not yet been broken upwards. In this situation, we need to monitor subsequent market movements to see if they can provide new trading opportunities.
We see that this candlestick broke through both the high of the narrow trading range and the previous level, but it actually formed a false breakout. The appearance of this candlestick indicates that the breakout was weak and lacked follow-through momentum; this breakout can be considered a failed signal. Therefore, we can look for opportunities to short.
The mindset of re-entering the market after a stop-loss order
Whether to re-enter after a failed first entry is a matter of personal choice. Logically, each trade should be analyzed and handled independently. Even if the first entry fails, a second entry can theoretically be considered if the same entry pattern emerges. However, personal style and psychological state are also important.
For me, I usually don't make a second entry. The reason is that I know I'm easily influenced by emotions when trading.
If the first short position is stopped out, even if the pattern still conforms to my trading logic, I may be psychologically affected when I try again, which may lead to overtrading.
If the second entry also fails, it might lead to an emotional trading state, even making it difficult to control oneself. Therefore, I set limitations for my trading style: I only trade each pattern once, and I try to choose very strong yet conservative patterns. If the first trade fails, I will not continue to try. This is to avoid letting emotions affect trading results.
Of course, everyone's trading style and mindset are different. Some people can rationally engage in continuous trading, which is truly impressive. If you can do that, you can decide whether to make a second entry based on your own circumstances. Assess your own skill level and develop trading rules and discipline that suit you.
Not a good entry point for trading
When faced with a long upper shadow line, it confirms a failed breakout and increased selling pressure, but it is not recommended to short directly.
The reason is that such candlestick patterns usually indicate that the stop-loss order is too far away. If you short directly at the top of such a long candlestick, your stop-loss distance could reach 50 points. Such a far stop-loss distance makes you vulnerable to being stopped out during market fluctuations.
If you encounter a long candlestick pattern, you can place a short order in the middle or above the candlestick and set a stop-loss of 50 points. The advantage of this is that you can trade from a relatively more favorable position. This is more conservative than placing a stop-loss at the top of the candlestick, because the appearance of a long candlestick often indicates significant market uncertainty; shorting directly at the bottom of the candlestick or placing a stop-loss at the top may be triggered by further market fluctuations.
55% mathematical advantage trading
When observing the candlestick patterns following the signal candlestick, the appearance of long, non-imaginary candlesticks overlapping horizontally indicates that the market has entered a narrow trading range. In this state, the probability of an upward or downward breakout becomes 50:50 again. Since we mentioned at the beginning that our trading strategy is primarily based on failed breakouts from the range, in this ambiguous situation, trading often relies solely on subjective judgment.
If you are bearish, you can place a short order in the upper middle part; if you are bullish, you can place a long order in the lower part.
Regardless of which strategy you choose, remember your mathematical strengths, rather than relying solely on the advantages of technical analysis.
Looking at the subsequent market trend, the market chose to break downwards, which is consistent with the trend of the larger range.
In this situation, the price movement perfectly follows the large range. We won't go into detail about this simple, successful trade; the focus remains on the logic behind it.
Within this range, we will not take any action unless the market provides a clear new entry signal. Remaining vigilant and waiting for a clear entry pattern is key.
Tips in the middle of the interval
If a large trading range has formed, the middle section is usually the most chaotic. At this point, regardless of any signals, it's best to avoid trading. This is because the probability of a breakout in the middle of the range is roughly 50/50, making both risk and reward highly uncertain. Participating in such trades is likely to involve significant uncertainty and the risk of failure.
Let's look at the large bearish candlestick above. Large bullish and bearish candlesticks within a given range usually don't have much significance.
For example, the large bearish candlestick at the arrow that just appeared might make many people think that the bearish forces are very strong, and they might rush to short the market. This is a wrong judgment.
Within the range, our strategy is to buy low and sell high. Since the price has reached the bottom of the range, the large bearish candlestick that appears at this point may actually be a buy signal. The large bearish candlestick in the middle of the range represents a vacuum in buying pressure from the main bullish forces, who are waiting to accumulate positions at the bottom of the range.
Therefore, when the price reaches the bottom of the range and a large bearish candlestick appears, your action should be to go long, rather than blindly following the market's short-term trend to go short.
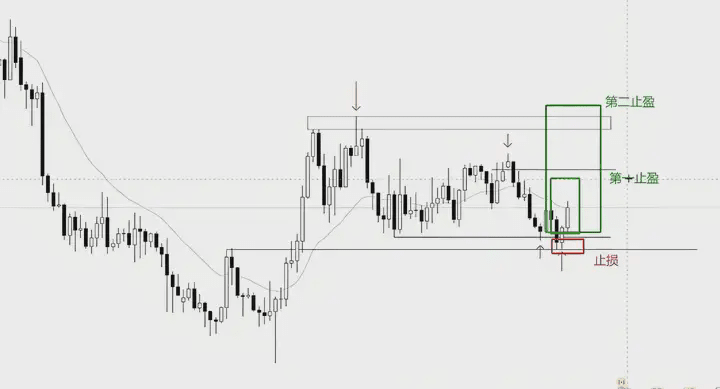
Looking for trading opportunities at the bottom of the range
The price has reached the bottom of the range again. Can we find an entry signal here?
Following the large bearish candlestick, we see another bearish candlestick with a long lower shadow. It's important to note that if this is the first entry signal and the signal candlestick isn't strong enough, I usually won't participate in the trade.
This bearish candlestick with a long lower shadow is not a clear entry signal; it merely confirms the support level at the bottom of the range. We need to wait for a specific entry pattern to confirm the signal's validity. In this case, it is advisable to continue observing the market and looking for a clearer entry signal.
Although this is a bearish candlestick, it has a higher high, indicating the first upward breakout.
In this situation, we can wait for a second upward breakout, which would form a bullish double breakout pattern.
While there might be false breakouts of the previous low, which slightly reduces the win rate, the logic remains sound and there's no problem. The entry signal at the bottom of the range has already been given; as long as the pattern aligns with your trading strategy, there's no issue with trading.
The effect is better if there is a false breakout signal, but even without it, this bullish pattern still has advantages. The win rate differs slightly between a false breakout and a non-false breakout, but it doesn't affect the overall outcome. Let's look at the subsequent price action; I will show all the subsequent candlesticks instead of explaining them step by step.

The signal candlestick we just mentioned was the first upward breakout, and we were waiting for a second breakout. This candlestick appeared, but it quickly rose as soon as it appeared.
If you're not prepared, meaning you didn't anticipate this pattern, you might miss the opportunity. This is a crucial point to remember when trading based on price action: you must read charts quickly. Because we're discussing short-term trading, rapidly identifying and reacting to market changes is extremely important.
Short-term trading is much more exciting than swing trading.
Profit/loss ratio of the trade
We've seen this as the second upward breakout, with the market rising directly and quickly reaching the profit-taking level. This confirms my earlier point about why it's important to close half the position in the middle of the range. You can see that although this long position didn't reach the top of the range, it has already risen quite a bit.
The middle of the range is the most probable target level. Once this level is reached, closing half of your position will ensure a very good risk-reward ratio. If you go long at this level, set a stop-loss of 30 points, and make a profit of nearly 90 points, your risk-reward ratio is already three to one. This is a very high risk-reward ratio for short-term trading, and is perfectly adequate.
Large interval nested with small interval
Let's take a look at the price action in the middle of the range. As we mentioned earlier, long bearish candles within a range don't have much significance, and the same applies to long bullish candles. The appearance of such a long bullish candle within the range, even though the price has quickly risen to the middle of the range, doesn't necessarily mean we should immediately go long.
Trading in the middle of the range carries significant risk, primarily due to the lower probability of a bullish entry point. Even though a strong bullish candlestick appeared at this level, it is not recommended to immediately enter a long position.
We then observed a potential shorting opportunity here. While trading in the middle of a range is generally not recommended, in this case, two clear swing points have been confirmed, forming a horizontal line.
The candlestick pattern here is simple and clear, representing a single-candlestick reversal signal. A secondary breakout subsequently confirmed this short-selling signal.
Continue to look for entry points at the bottom of the range.
In most cases, long candlesticks appearing within a range are often meaningless. These large candlesticks easily deplete market energy, especially long bearish or bullish candlesticks appearing at the bottom of the range, which are usually unreliable within the range.
While such long candlesticks can sometimes signal a breakout, this is very rare. You can verify this by reviewing past charts; you'll find that these long candlesticks often indicate that market momentum has been exhausted.
After a rapid price movement at the bottom of the range, three non-trending candlesticks appeared, essentially forming a small trading range. This bullish candlestick is strong, and its closing price has exceeded that of the previous candlesticks, making it a potential entry signal.
The only thing to be careful about is the stop-loss placement. In this situation, placing the stop-loss below the signal candlestick is standard practice. However, if the stop-loss is too close to the previous swing point, there's a risk that the stop-loss might be triggered even though the market still has room to rise. Therefore, it's advisable to consider widening the stop-loss slightly, placing it below the swing point, which would be safer.
However, traders have different choices. Some may choose not to give up even if their stop-loss is triggered, and will re-enter the market if a new entry opportunity arises. If you belong to this trading style, then your stop-loss strategy is irrelevant.
First profit target in the range
Let's look at the subsequent market movement. After the signal was given, the price quickly reached the middle of the range, which is the first profit-taking level we mentioned earlier. Note that when the price reaches the middle of the range, it usually won't continue to rise. Expecting the price to continue rising could lead to profit-taking or a stop-loss, which can be quite unpleasant.
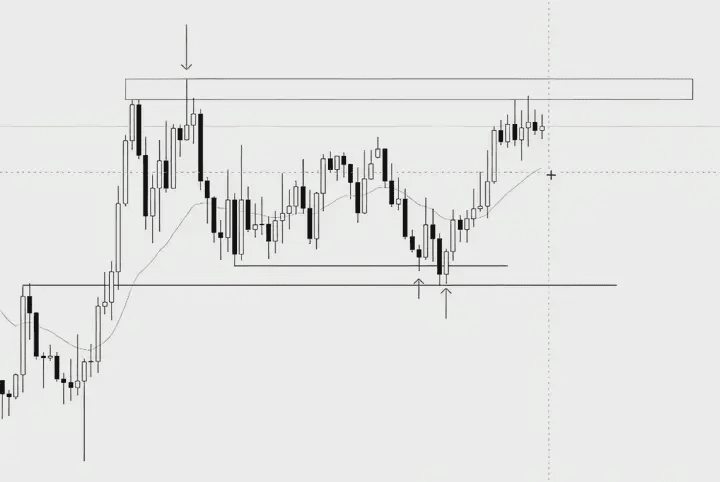
The trend was broken
After that, the range was broken. This range lasted for a long time, and if you used a buy-low-sell-high strategy within it, you should have made a lot of money on those trades.
A final loss is normal, because a range will always break out eventually. While a range may maintain its current state, a breakout will eventually occur. Similarly, a trend will reverse eventually, although it tends to continue.
For novice traders, it's advisable to stick to the side with the market advantage: trade trends and avoid reversals, and trade breakouts within a range. Focus on the direction with a probabilistic advantage; this will make making money much easier. While choosing to trade reversals or breakouts may offer a mathematical advantage, the low win rate and consecutive stop-losses can be difficult for beginners to accept.
Summarize
Let's review this case again. The key point is how we determined the market's potential movement and trading range earlier. Trading within that range is relatively simple, mainly relying on the initial analysis and judgment. Many actual trades may not have such obvious signal lines, but understanding the underlying logic is crucial for identifying trading opportunities.

1. Market Status Analysis:
Major Trend: Initially, the market was in a significant downtrend and underwent a deep correction. The market tends to retest the extremes of the trend.
Range Formation: After a pullback ends, the market enters a horizontally overlapping trading range, entering a state of uncertainty. At this point, we believe the market may be forming a trading range.
2. Signal Recognition:
False breakout signals: In the early stages of a range formation, look for false breakout signals, either upwards or downwards. These false breakout signals can help identify the boundaries of the range and potential entry opportunities.
Specific patterns: For example, when a false downward breakout occurs at the bottom of the range, you can look for opportunities to go long; while when a false upward breakout occurs at the top of the range, you can consider going short.
3. Practical Applications:
First Entry: If you are an experienced trader, you can quickly determine whether the market has entered a potential trading range. This usually requires a deep understanding of the market conditions.
Subsequent entry: After confirming that the market is in a trading range and a clear signal has been formed, subsequent entry is usually relatively simple, and you can trade based on the clear signal.
4. Market norms:
Standard vs. Reality: Ideally, the market will provide very standard patterns, but in actual trading, the patterns may not be obvious or standard enough. In this case, it is necessary to combine market experience and judgment to identify potential opportunities.
The importance of experience: If you lack experience, you may miss potential trading opportunities, but by continuously learning and summarizing your experience, you can gradually improve your ability to judge market patterns.
In summary, understanding the market's potential trading range and recognizing signals are key. In practice, experience and sensitivity to market conditions will influence your trading decisions.
I'm Little Egg Tart, a professional analyst and instructor, a mentor and friend on your investment journey! As an analyst, the most basic requirement is to help everyone make money. I'll help you resolve confusion, get out of trouble, and let my results speak for themselves. When you're lost and don't know what to do, follow Little Egg Tart; Little Egg Tart will guide you.#美国ADP数据超预期 $BTC