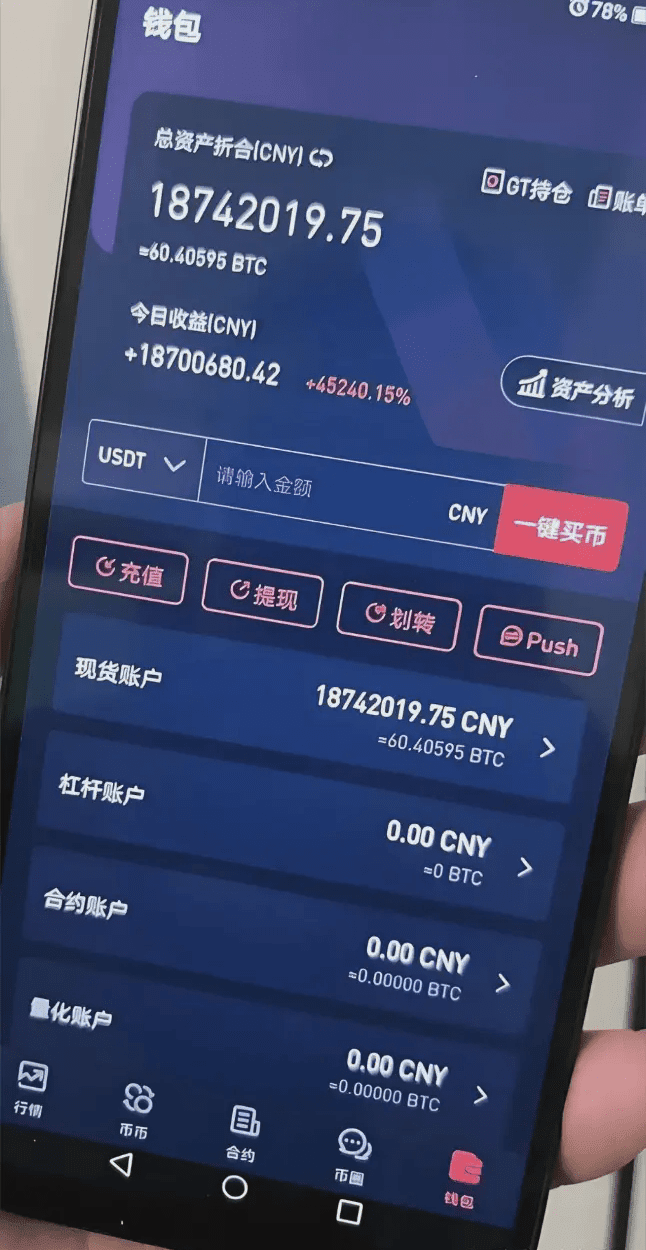
From losing 800,000, then slowly crawling back with 2000U! Now trading cryptocurrencies to support my family, with over 34 million in my account!
That year during the bear market, I lost a full 800,000. I pretended to hold on during the day, but completely collapsed at night. My friend circle was cleared, my contacts were silent, no one understood, and I was left spinning in place.
During that time, I really wanted to give up, feeling that the crypto world was too far away from me.
Until one deep night, I came across a saying: 'Losses are just the beginning, messing around is the end.'
At that moment, I felt like I was awakened.
I took the last 2000U in my hand as my final chip, not to gamble, but to completely start over.
I started reviewing every trade one by one, summarizing each one, and I realized: Losing money is not due to bad luck, but because I wasn't really 'trading'.
No stop loss, heavily invested, chasing highs and selling lows, frequently changing coins, relying on emotions to operate!
To put it bluntly, I am not strategizing; I am just guessing sizes.
This time, I will only do two things: maintain rhythm and enforce strict execution.
I would like to share with you these brain-teasing technical indicators, candlestick patterns, and how to use them [with practical case studies attached].
1. Indicator SAR
The simple 'fool' indicator SAR can determine the market's bullish and bearish transitions, preventing being trapped. It is primarily used as a stop-loss point. Once the SAR is breached, sell immediately to lock in profits and avoid giving back profits already earned, or even turning gains into losses.
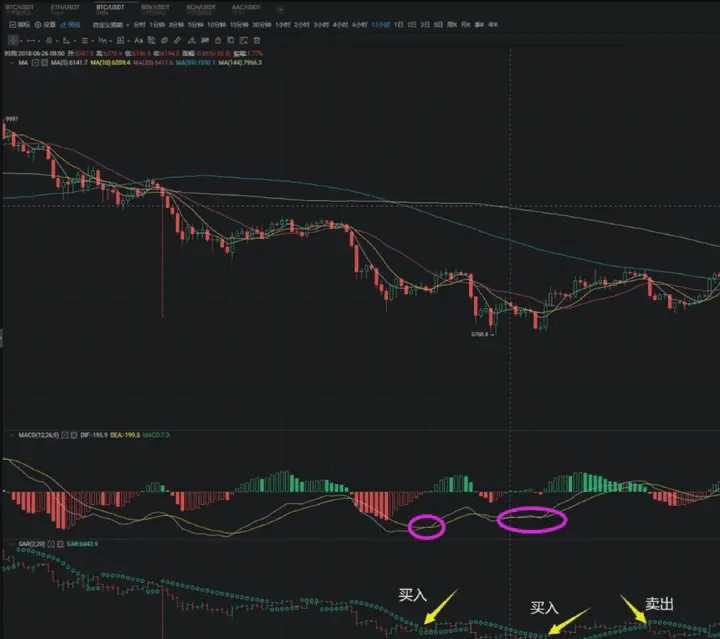
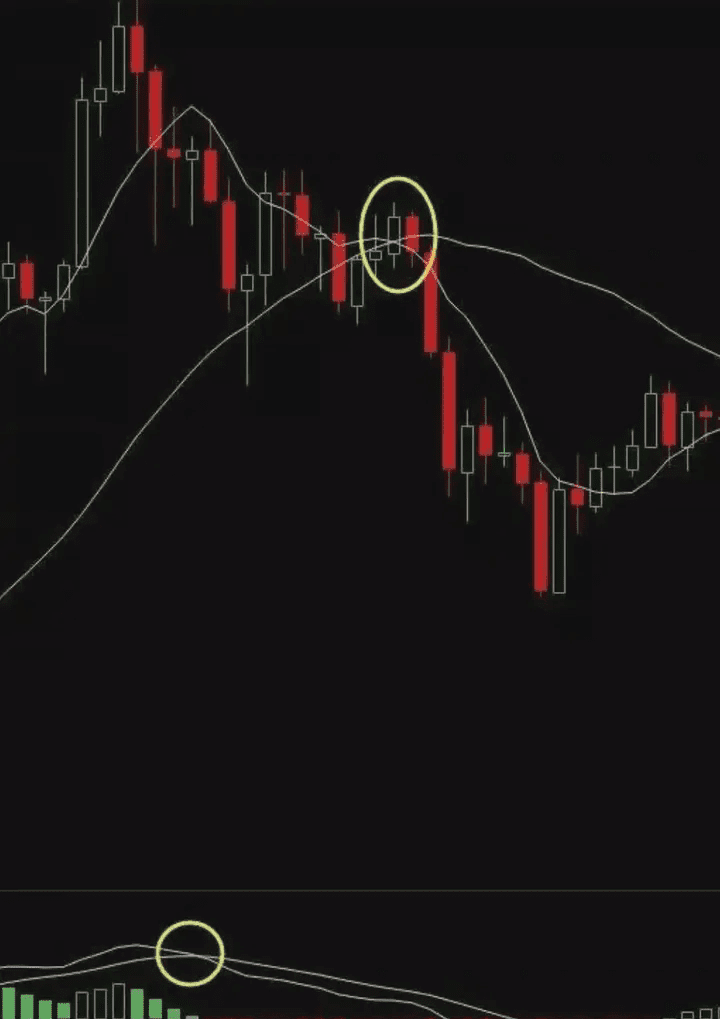
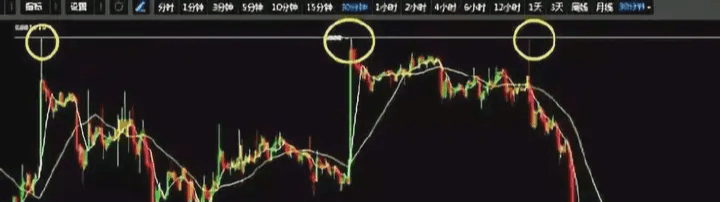
1. When the price is above the SAR curve, it indicates a bullish market. When the price is below the SAR curve, it indicates a bearish market. If the price breaks through the SAR from above to below, you need to sell. If the price breaks through the SAR from below to above, it is a buying signal.
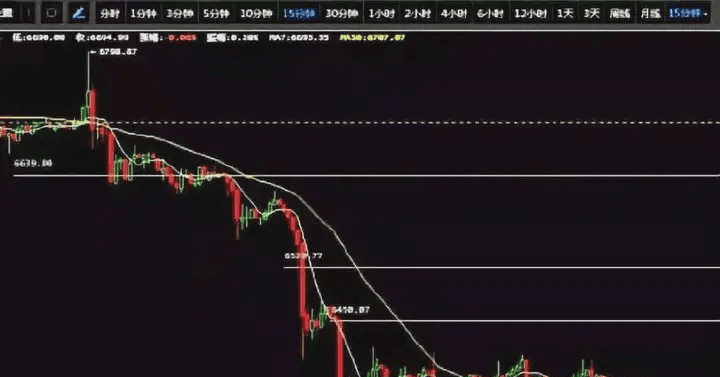
2. When the price breaks down below the SAR curve and continues to move downward while the SAR curve also moves downward, it indicates that a strong downward trend has formed, and the SAR curve exerts significant pressure on the price. Investors should firmly hold their positions and reduce their holdings at high points. According to my observations, this indicator is more suitable for buying and selling on a 12-hour basis.
Compared to the MACD indicator, it is clearer and avoids situations where all MACD lines are intertwined and dead crosses and golden crosses are indistinguishable.
The SAR indicator has the following advantages:
1. Simple operations, clear buy and sell points, can be acted upon as soon as buying and selling signals appear, especially suitable for small and medium investors who have not been in the market long, lack investment experience, and lack trading skills.
2. Suitable for continuous upward trends in a "bull market" that won't be easily shaken out or washed out by the main force.
3. Suitable for continuous downward trends in a "bear market" that won't be deceived by rebounds during declines.
4. Suitable for medium to short-term swing trading.
5. Although long-term use of the SAR indicator cannot buy at the lowest price or sell at the highest price, it can avoid the risk of being trapped for long periods and simultaneously avoid missing out on bull market opportunities.
The SAR indicator has the disadvantage of being prone to failure in volatile markets.
Points to note:
1. When the SAR curve is running downward at an angle greater than 45 degrees, it indicates that the bearish power is strong, the downward trend is rapid, and it will continue to decline. At this time, investors should firmly hold their positions and not easily chase rebounds.
2. When the SAR curve runs upward at an angle greater than 45 degrees and the SAR curve has just started to run upward, it indicates that the bullish force is beginning to accumulate and will continue to rise. At this time, investors should firmly hold their positions and wait for the rise.
3. When the SAR curve is running upwards at an angle greater than 45 degrees and has been running upwards for a long time, and if there has been a significant short-term increase, it indicates that the bullish force has been excessively consumed, and the price may reverse downwards at any time. At this point, investors should closely monitor the SAR curve's movement. Once the SAR indicator emits a clear sell signal, they should decisively clear their positions and exit.
4. When the SAR curve is running downward at an angle less than 45 degrees and has been running downwards for a long time (at least over 3 months), once the stock price breaks above the SAR curve, it indicates that the medium to long-term downward trend of the stock price may end, and investors can start buying on dips.
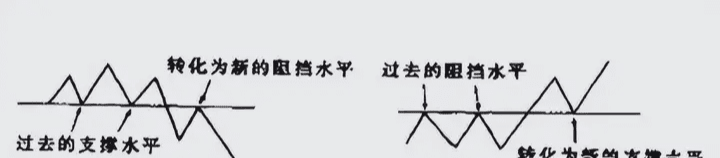
Switching and applying pressure and support
Support and resistance lines are very important in determining points, and these points determine profits.
The transformation of support and resistance levels:
Once a support level is broken with increased volume, the original support will turn into a resistance level. Similarly, once the original resistance is broken, it will turn into a support level.
The reliability of this transformation must also be judged based on the following two aspects:
The number of times the market has tested a support or resistance level in the past;
The size of trading volume during tests.
Resistance levels, also known as resistance points, are named pressure because there is a large amount of capital trapped nearby. Once it reaches that position again, it will encounter a lot of trapped funds selling off, making it impossible to break through the resistance level. If there is no large-scale sell-off, or if buying volume exceeds selling volume, then that position will be broken through, and market confidence will look towards higher levels.
As shown in the diagram, the repeated failures to attack at the 6800 position followed by a massive decline will make 6800 an important resistance level, exerting pressure on future increases. If this resistance level can be broken, further bullish sentiment can be anticipated; if it repeatedly meets resistance and retraces, caution is advised, as repeated failures to attack may lead to declines.
The principles of support and resistance levels seem simple, but never overlook their importance just because they are simple. They significantly improve the accuracy of trend judgment and can become crucial points for chasing increases or cutting losses.
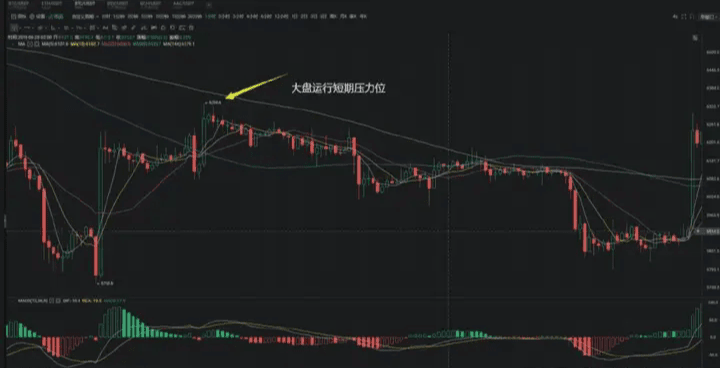
As shown in the figure above, if recently, a rebound with large volume exceeds 6334, there is no need to hesitate; you can immediately chase the increase. Breaking through this important resistance level will continue to look towards the previous high resistance level of 6800.
Simply take a daily or hourly chart; the transition of support and resistance levels is effective, even under stable volatility conditions. The most important reference for short-term operations is whether it can break through resistance levels or fall below support levels.
2. Bollinger Bands BOLL.
The Bollinger Bands (BOLL) is a very practical technical indicator. Indicators like KDJ, RSI, and MACD often signal buying through golden crosses, but when the market is in sideways fluctuation, they lose effectiveness. Typically, we want to know when the market will move during sideways periods, and this is when Bollinger Bands come into play.
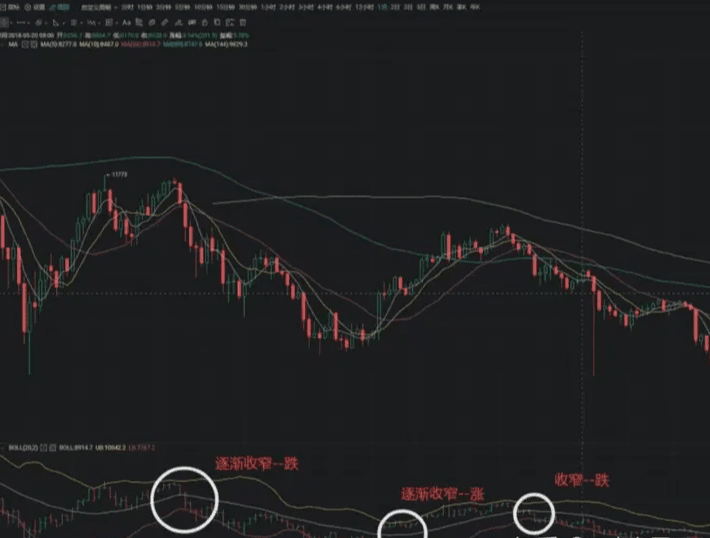
1. The narrowing of the Bollinger Bands indicates that a change in market direction is imminent (as shown in the diagram above).
We can see in the diagram above that at this position of Bitcoin, the Bollinger Bands have become very narrow and have remained level for many days. This is a sign that the forces of both bulls and bears are becoming balanced, with neither side having an advantage. When the Bollinger Bands show this kind of narrowing, Bitcoin may choose a direction to break at any time; the narrower the bands, the greater the force of the breakout. However, whether it breaks upward or downward is unknown. The current state of the Bollinger Bands only confirms that a change in market direction is imminent and could happen at any time. A big market movement is brewing; be extremely cautious and do not easily leverage or operate short-term trades, or you may not even recover transaction fees.
2. The signal brought by the opening of the Bollinger Bands: When the price reaches a certain high, after rising for a period, and the Bollinger Bands open to a great extent, suddenly beginning to narrow, it is a selling signal, usually accompanied by a major drop. When the price reaches a certain low, and the price moves along the white line in the middle of the Bollinger Bands, and the Bollinger Bands narrow, suddenly opening wide, it is a buying signal.
3. The BOLL channel calculation method is derived from the arithmetic mean of historical prices plus or minus the average volatility. If the price experiences significant fluctuations on that day, the channel will also deform accordingly. Therefore, Bollinger Bands have their lagging nature and have lower reference value compared to other technical indicators when judging market reversals, but they are invaluable when determining the end points of consolidation market trends.
Volume (Volume-Price Rule)
Increased volume is a turning point and a key signal; price increases and decreases without volume are misleading; shrinking trading volume indicates sideways movement, and the more it shrinks, the closer it is to a breakout; increased volume followed by price increases without subsequent buying volume will still lead to declines; increased volume with unchanged prices at low levels indicates accumulation, while at high levels indicates distribution.
1. If there is no volume at high levels, you should hold, even if you hold incorrectly, you should still hold.
2. If there is increased volume at high levels, you should run; if you run incorrectly, you should still run.
3. When there is no volume at low levels, you should wait; if you wait incorrectly, you should still wait.
4. If there is increased volume at low levels, you should follow; if you follow incorrectly, you should still follow.
5. Volume increases while price remains stable, transitioning to bearish.
6. Volume increases while price rises, buy.
7. Volume flat price increases, increase positions
8. Volume flat price decreases, exit
9. Volume decreases while price increases, hold.
10. Volume increases while price declines, hold your positions.
The above 10 points are just for understanding, remember that increased volume is an important signal. How to proceed should still depend on the overall analysis of the market. You can’t just use the above rules.
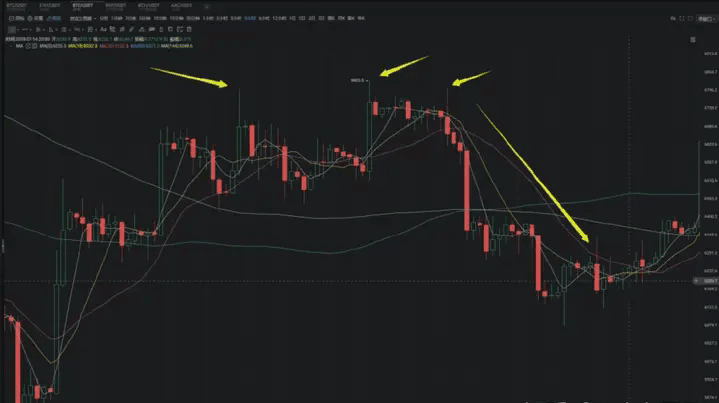
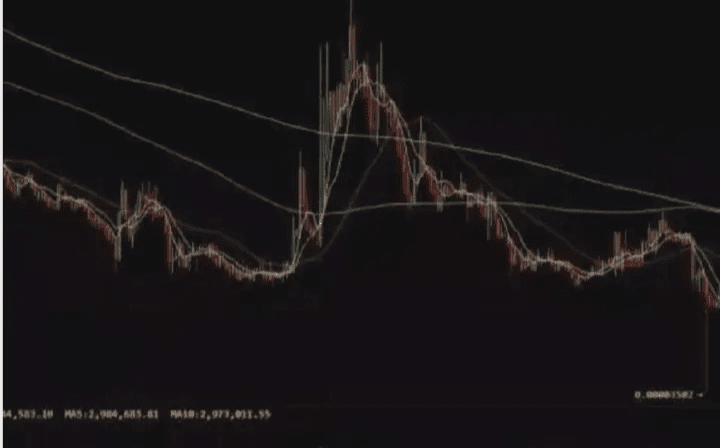
Increased volume should be approached with caution, as it signifies the beginning of a new market trend.
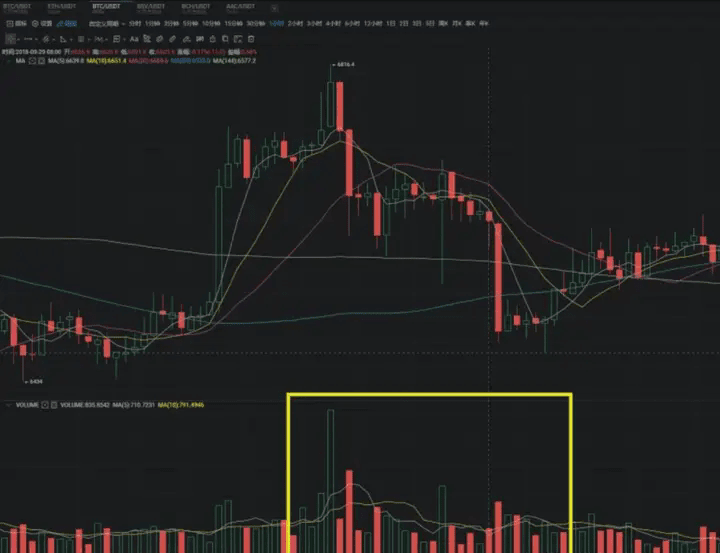
Increased volume means that trading volume suddenly increases, indicated by the bars below, which become significantly higher. This usually occurs at turning points in price and is an important signal. Some people are firmly bearish while others are firmly bullish, which promotes an increase in trading volume. Increased volume during a downturn often indicates capital flight, and the likelihood of continued decline is significant. However, if there has already been a significant decline, it may be the final wave of selling power being released, with bears excessively consuming their strength, leading the market to begin sideways or to rise. Conversely, if price rises with increased volume, it may continue to rise. Similarly, if at high levels, it may be the final wave of buying power, after which a decline will follow.
A large volume release has different implications at different stages. At high levels, if the price rises and the buying volume increases, it may indicate that buying power will be exhausted, marking the final frenzy of the bull market. At low levels, it indicates capital intervention. At low levels, if the price drops and the selling volume is large, it may signal the end of the bear market, indicating that selling power has been exhausted, leading to a turning point. At high levels, it indicates distribution. This point has some reference significance.
The volume-price relationship in the stock market has many shapes and uses. For example: volume rises and price rises. What does this mean? It means that volume continues to increase while the price steadily rises. This point is not applicable in the crypto market, as funds are limited and difficult to achieve sustained volume increases. If you check historical charts, there are basically no patterns of volume rising while price rises steadily. The crypto market only loves sideways movement, surges, and crashes. However, there is one point that needs to be understood: volume-price divergence. Simply put, if after a surge, the number of buyers suddenly decreases and they are not as active as before, it is a warning that good days may be coming to an end. For example, on July 18, 2018, Bitcoin surged once, followed by an increase in trading volume; on the 24th, it surged again, followed by an increase again; on the 27th, it surged again, but the volume clearly shrank and buying power was no longer keeping up, making it easy for prices to fall back.
Volume-price relationship:
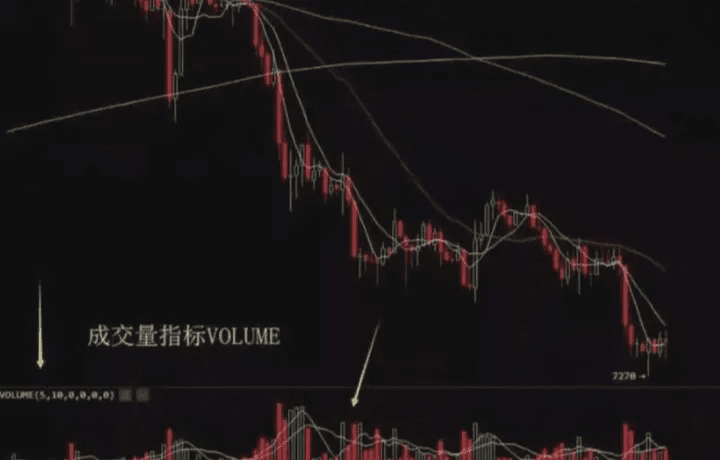
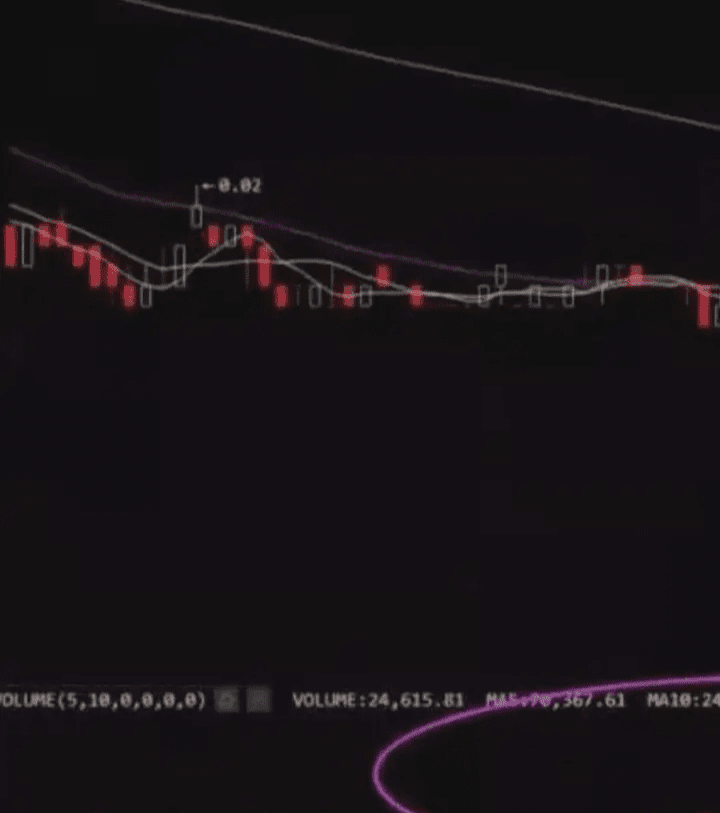
Volume indicator VOL
The red and green bars in the diagram above represent trading volume. The colors red and green indicate the current price's rise and fall, not the buying and selling volumes. Some analysts may tell you to look, this large red bar indicates that many goods have been sold, and capital is fleeing. When you see green, they say the buying volume is strong, and buying is high; these views are very one-sided. Trading volume only has significance in terms of size. Large volumes indicate that both sides agree on the price, resulting in transactions. When discrepancies are large, trading volume is small. If the price declines and large red bars appear, it indicates that there are many buyers and sellers, with sellers slightly more, but this does not necessarily mean that prices will definitely fall afterward. Therefore, trading volume cannot be used purely to judge whether there is capital involved in guiding buying and selling, or mistakes will occur.
Identify air coins through transaction volume.
Buying amount + selling amount = trading volume: For coins with a trading volume of less than 1 million USD, you can simply check the trading volume of a coin through non-small-number websites (as shown in the diagram) and apps. When the 24-hour trading volume is less than 1 million USD, these coins are generally not worth purchasing.
Cryptocurrencies with trading volume hitting the floor (as shown in the diagram): From the candlestick perspective, when trading volume sticks to the floor, be very cautious about buying; investing 50,000 could essentially move the market up.
Stagnant coins: As shown in the diagram, minute charts often show completely zero transactions, and the candlestick pattern does not form a candle shape.
Volume manipulation coins: As shown in the diagram, trading volume aligns uniformly like a comb.
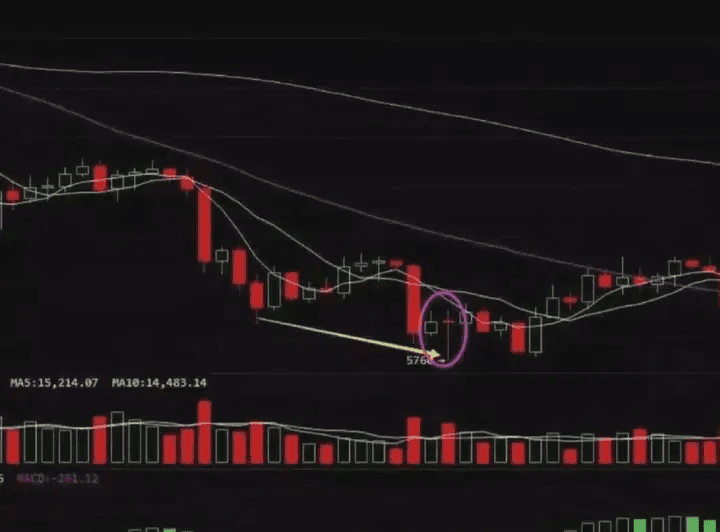
Simple bottom-fishing signals:
You must see a stop-loss signal before bottom fishing; the stop-loss signal at a support level will become very reliable. If it is not a support level, the reliability will be significantly lower.
The bottom signal simply summarized is: a large bullish candlestick or a Doji with significant trading volume forming a MACD divergence at a key support level. Several key points: a large bullish candlestick or a Doji appears on the candlestick chart. The most common in the crypto world are these two: trading volume forms a MACD divergence at a key support level.
Please remember these four points. They are not absolute and cannot guarantee you will always catch the bottom, but they will significantly reduce your bottom-fishing risks. First, reduce risks, and then consider maximizing profits.
In terms of time cycles, because crypto trading does not stop and is global, it changes very quickly. If you are looking at a 15-minute candlestick, the effective time of the signal is 15*4; if you are looking at a 1-hour candlestick, the effective time is 1*4=4 hours, and so on.
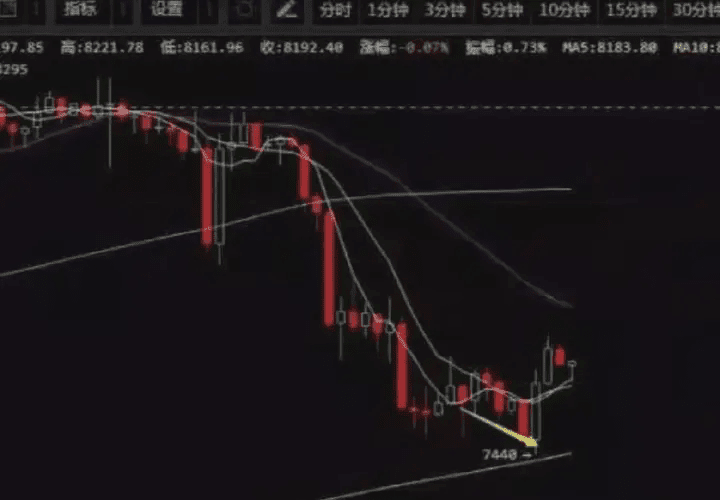
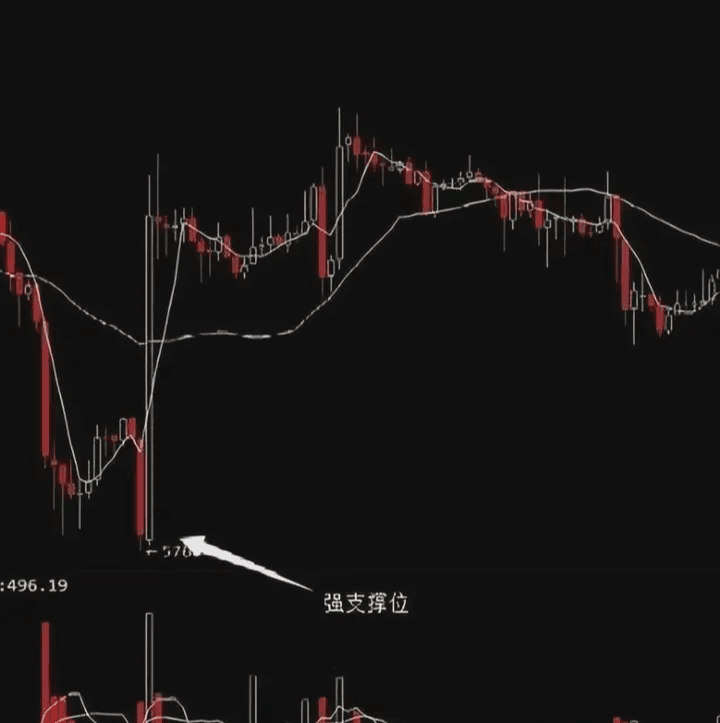
The diagram above shows a significant bullish candlestick with trading volume (in some markets, red indicates a rise, depending on your market. I use Huobi's chart, where green indicates a rise and red indicates a fall). If such a bar appears at a support level, it may indicate a stop-loss signal.
If a candlestick appears at the 2-hour level with some trading volume and shows a MACD divergence, it can be seen as at least safe for the next period, indicating it won't drop within 8 hours. Unfortunately, the volume isn’t strong enough, so it can only be a weak rebound, ultimately still difficult to escape the downtrend, unless a sudden increase in volume changes the situation.
Long-legged Doji: As shown in the figure above
If Bitcoin's long-legged Doji is green, it is even more reliable, and it won’t fall again in the following days. If it is green, it will likely surge directly. This Doji is accompanied by a MACD divergence and is an important support level.
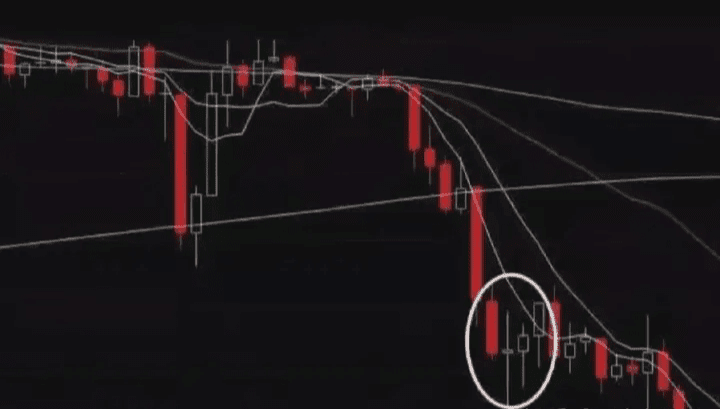
Must be accompanied by trading volume, otherwise it is weak; if it rebounds, it will still fall. As shown in the diagram above, both times have broken the support level, yet the volume was insufficient. In this case, it is very dangerous; if the support level is broken and there is no strong volume to pull back, it indicates insufficient confidence in bottom fishing in the market.
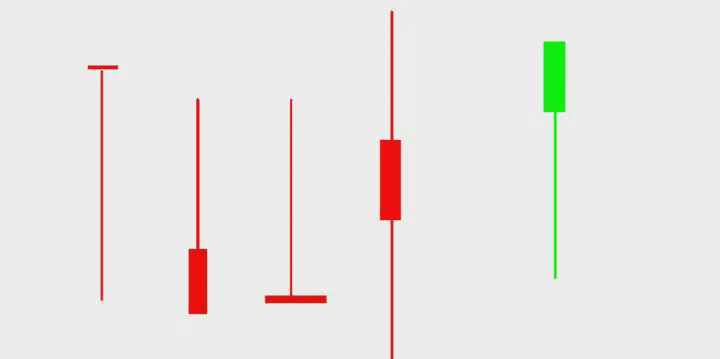
Common types of pin bars: Different positions represent different meanings.
Generally speaking: top exit signals, bottom fishing signals, and mid-way washing.
Basic knowledge MACD classification:
MACD is a must-reference indicator for all-in and leveraged players. When everyone hears 'all-in', they get particularly excited; retail investors love to go all in, putting all their money on the line, and they don't manage their positions or anything. I feel like I am voicing the feelings of the majority of retail investors. But! Going all in, isn't it based on feelings? NO, we need to be rational about going all in! Ensure the odds!
MACD - An important reference indicator for low-frequency, all-in, leveraged players. Everyone knows that moving averages have dead crosses and golden crosses, but moving averages are usually rather delayed. If you operate based on moving averages for buying and selling, the profit margins will be very small. After improvement, it became MACD, which sends signals earlier than moving averages.
For example, in the following diagram, the golden cross on the daily line is delayed by half a month compared to MACD.
Dead crosses are also when you see the daily line forming a dead cross and getting ready to sell, the profits have already dropped significantly. (See the diagram below)
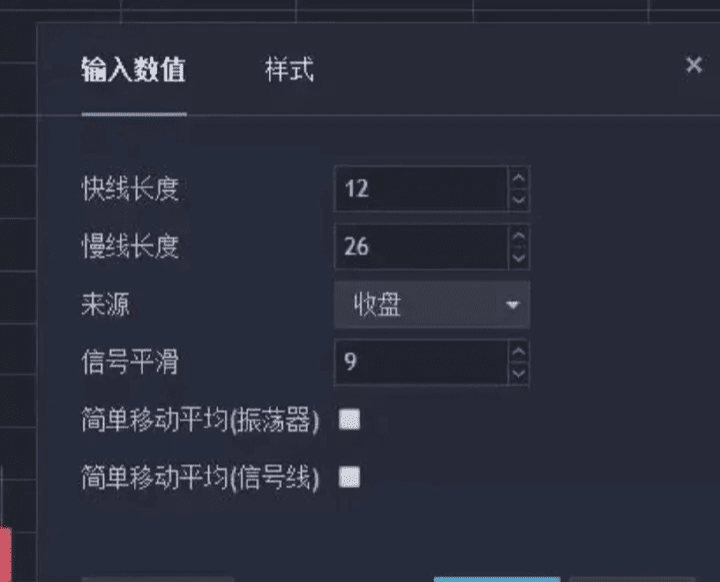
MACD stands for Moving Average Convergence Divergence, which is quite a mouthful, so just remember its English name. It consists of two lines, the fast line and the slow line, which determine trend direction by continuously crossing and separating. The parameter setting is generally set to 12/26/9 (see the diagram below).
MACD has four components: the fast line DIFF (white), the slow line DEA (yellow), the zero axis, and the horizontal line in the middle of the red and green bars. DIFF, which is the white line, is the main core, while yellow is auxiliary. (See the diagram below)
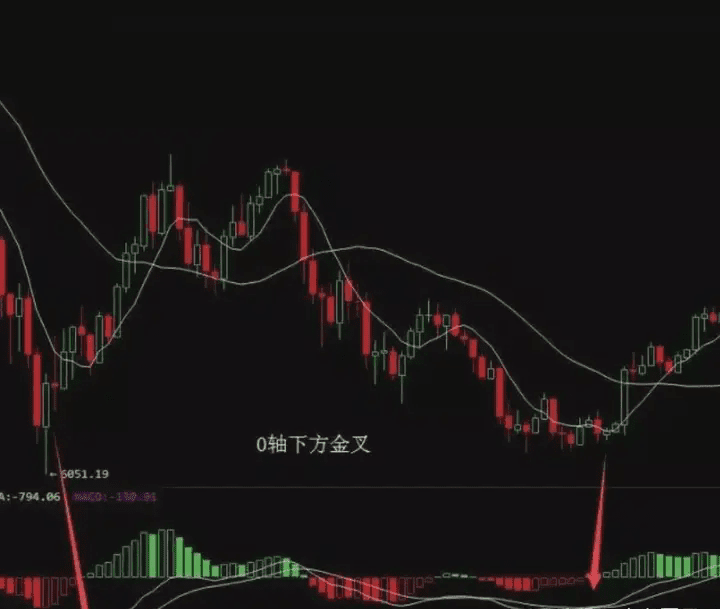
However, the golden cross below the zero axis is not 100% reliable; it only proves that it may stop falling. Cautiously, one can wait until the white line crosses above the zero axis and then go all in. You can see in the diagram below that breaking through the zero axis will lead to an accelerated rise.
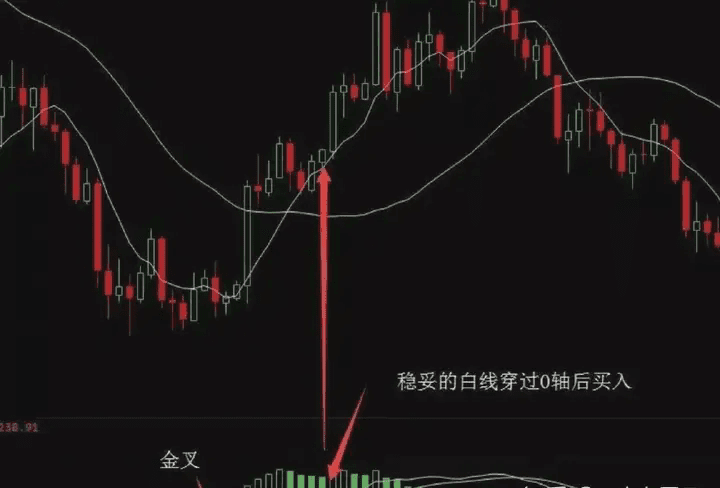
A golden cross above the zero axis, in the crypto market, when you see a golden cross above the zero axis, you can decisively go all in and chase the increase, but in the crypto market, Bitcoin has not yet formed a reliable golden cross above the zero axis, mostly being below it.
MACD usage: Method two - Dead Cross
The fast line crosses the slow line downwards, that is, the white line crosses the yellow line downward. Similarly, above the zero axis, this is a sell signal and a pullback signal.
Below the zero axis is a signal for accelerated declines. Do not hesitate, just clear your position! You can bravely sell off here; there's absolutely no problem! Don't hesitate until you've already lost a lot before you sell off. That's not cutting losses; that's sawing off bones! If two dead crosses form, it's an enhanced version of escape!
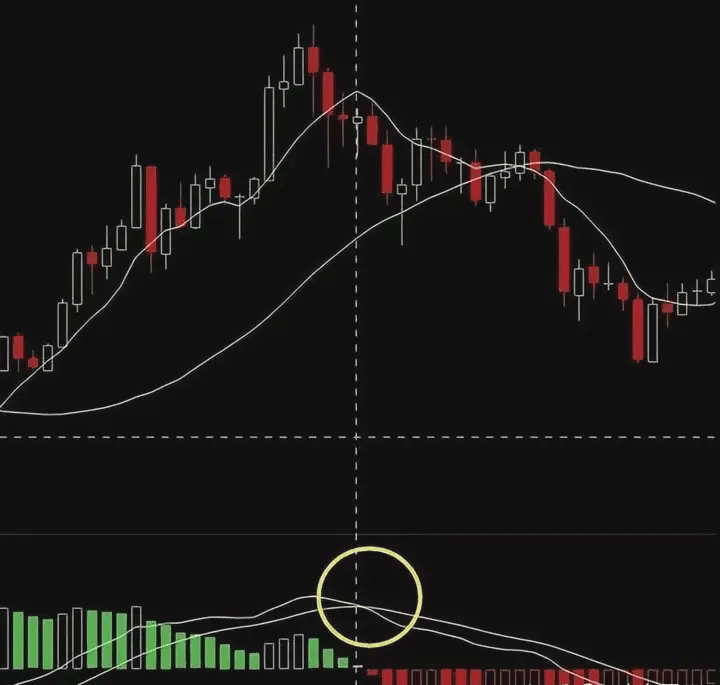
MACD usage: Method three - Energy bars
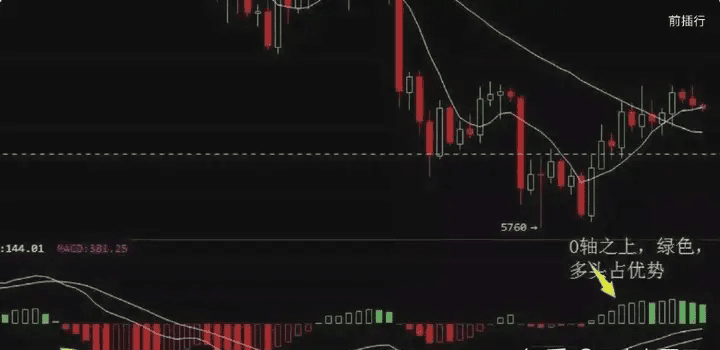
What is the energy bar? - The energy bar is simple: it is the red and green bars above and below the zero axis. Bears dominate below the zero axis, while bulls dominate above it. Once you learn to read this, you won't need to ask others whether the current market favors bears or bulls.
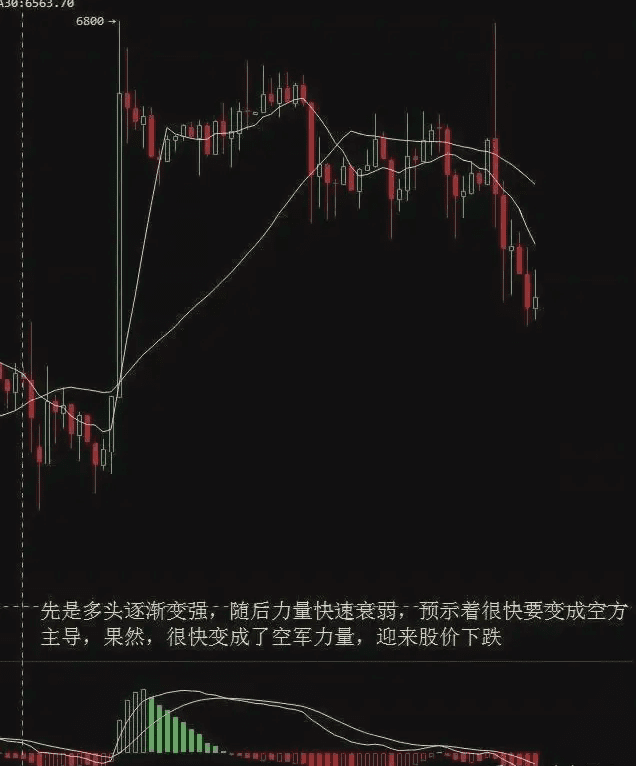
You can judge changes in strength through changes in energy bars.
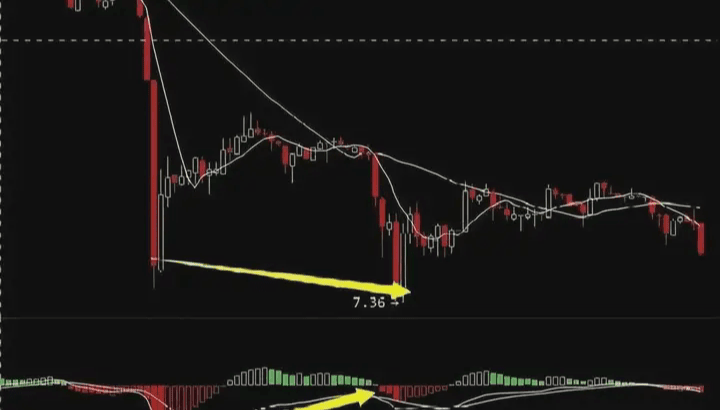
MACD usage: Method four - Divergence
Divergence is something you must learn to see because this method of divergence exists in every indicator you study. RSI and OBV both have it.
Top divergence: Top divergence occurs when the price reaches a new high, but the indicator does not reach a new high. In this case, the price is usually expected to fall back, which is commonly referred to as consolidating the indicator.
Bottom divergence occurs when the price reaches a new low, but the indicator does not reach a new low. This is a bottom divergence signal, and aggressive traders may bottom-fish at this position, while cautious traders can wait for the price to stabilize before entering. Risks coexist with returns.
For example, in the following diagram, EOS on the 5-minute chart shows a divergence, allowing for bottom fishing when it reaches a new low. However, the duration of the 5-minute divergence is very short, requiring quick entry and exit within 30 minutes to profit, so it is not recommended for beginners.
This indicator is extremely critical. Even if you don’t understand other indicators, you must understand this one.

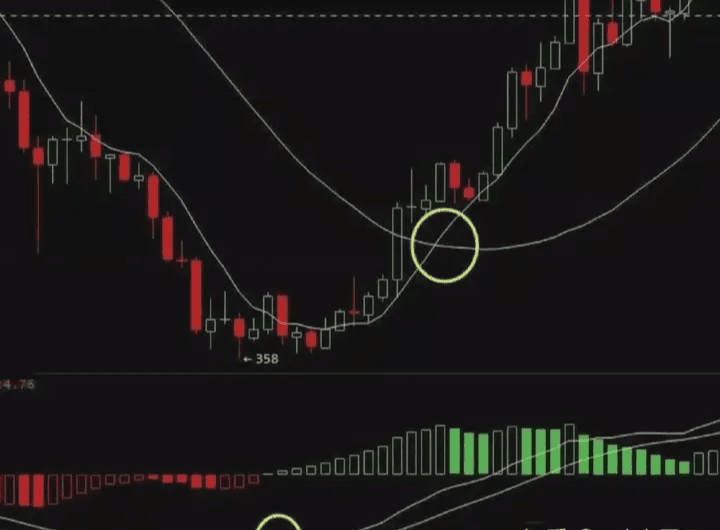
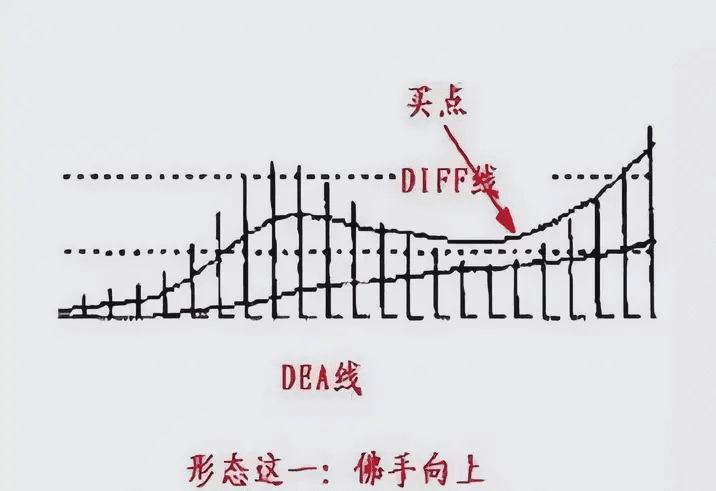
MACD buying pattern
The upward facing Buddha's hand can be seen from the diagram below, where DIF crosses DEA after the coin price rises, and then follows the coin price to pull back. When the main force washes the market, the coin price pulls back, and when the DIE line pulls back close to the MACD line, the DIF line reverses upward, forming the upward-facing Buddha's hand pattern.
Little duck out of water: The DIF crosses the DEA line below the zero axis, does not cross the zero axis, or just slightly crosses it and returns below the zero axis, then dead crosses the DEA, before crossing the DEA line again after several days (as shown in the diagram). This pattern represents a bottom shape appearing when the coin price reaches the bottom after a decline, indicating a sign of rebound that can be understood as a buying signal.
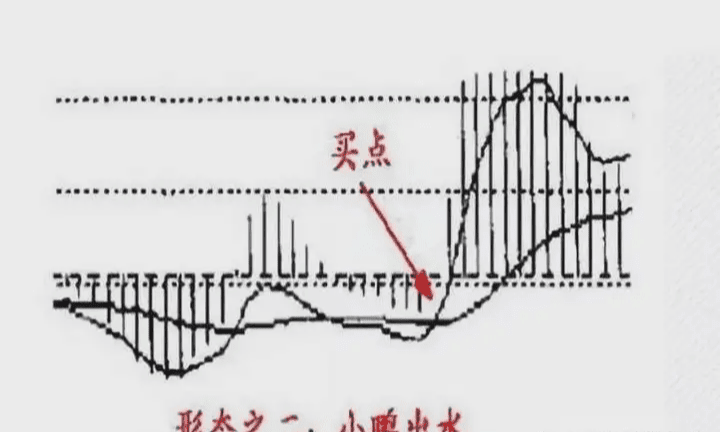
For example, the Bitcoin buying point on April 8, 2018, formed a little duck out of water pattern, igniting a bull market.
Walking on clouds - Refers to the DIF line dead crossing the DEA line above the zero axis, then crossing below the zero axis, and forming a golden cross with the DEA line at or above the zero axis. This pattern forms during the coin price's recovery after a bottoming process, and it can also be a bottoming pattern presenting an upward trend. It should be understood as a positive entry signal, and positions should be entered decisively.
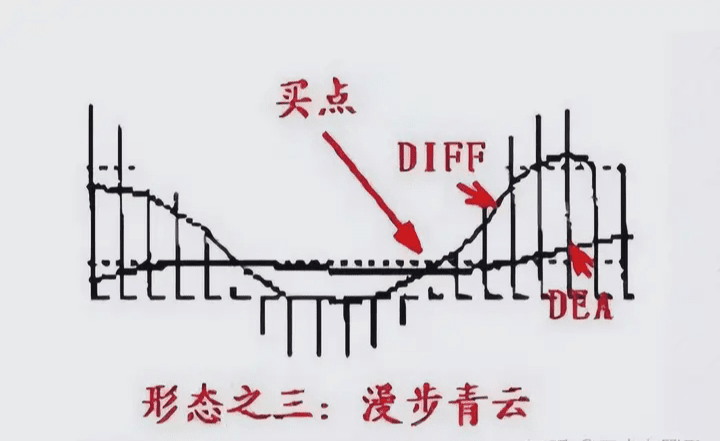
Bitcoin has never formed this pattern on the daily chart, but it has appeared on the hourly chart.
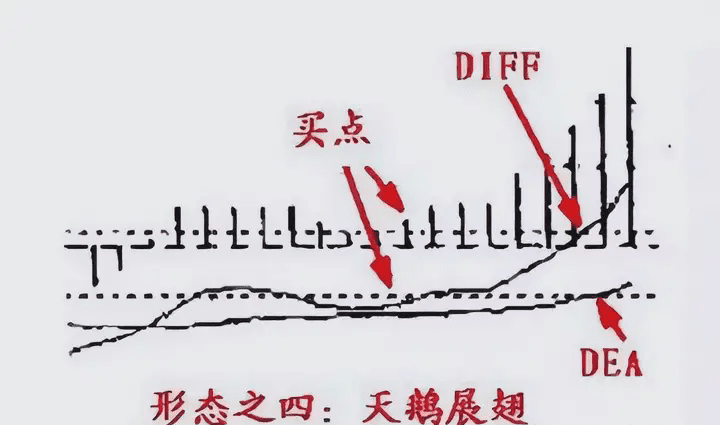
Swan spreading its wings - Refers to the DIFF line forming a golden cross with the DEA line below the zero axis, then retracting without crossing the zero axis, approaching the DEA line. The MACD green bars shorten but do not dead cross the DEA, then reverse upward. When the MACD green bars lengthen, it forms the swan spreading its wings pattern, which is mostly a bottom pattern appearing when the coin price reaches the bottom after a decline, indicating a buying zone for the main force, allowing for timely entry.
Aerial cable - Refers to the DIFF indicator in MACD previously forming a golden cross with the DEA line below the zero axis and then running above the zero axis for a while, before pulling back with the coin price. When DIFF is pulled back to the DEA line, the two lines merge into one, and when they separate again and the bulls diverge, it forms a buying opportunity, signaling the start of a new upward trend. This pattern usually occurs in upper consolidation and is caused by the main force washing the market. After a brief consolidation during the upward movement of the coin's price, a strong upward momentum is presented, which should be understood as an active buying signal, and positions should be entered decisively.
Aerial cable - Mainly refers to the DIFF line crossing the DEA line below the zero axis, but not crossing the zero axis downward, and after a few days, it again crosses the DEA line above the zero axis. This pattern often occurs in upper-level consolidation, caused by the main force washing the market. After a brief adjustment in the coin price, a strong upward momentum is presented, which can be understood as an active buying signal. You can buy decisively, especially if it can continue to increase in volume.
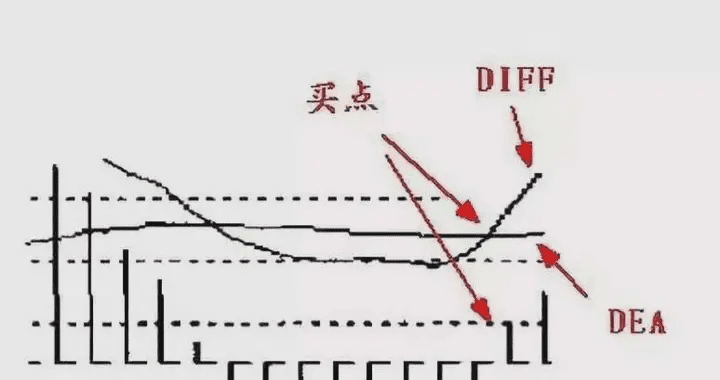
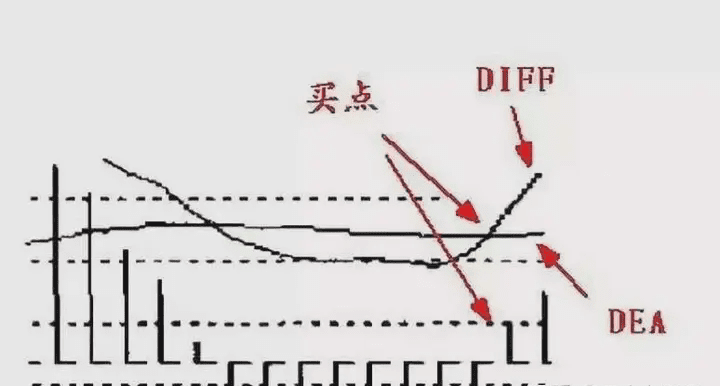
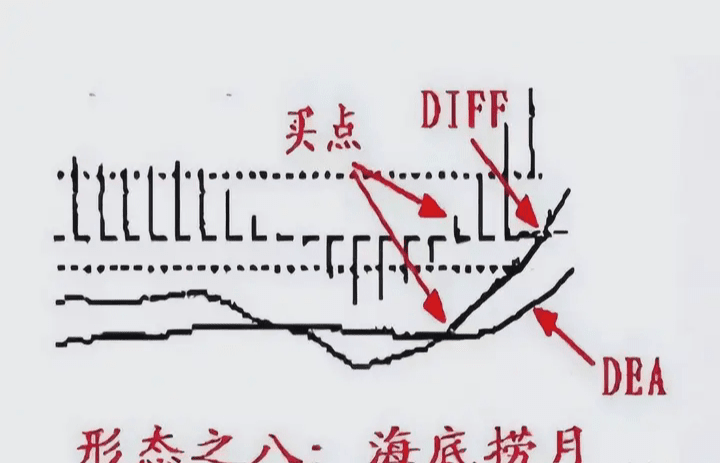
Undersea cable - Refers to the MACD indicator running below the zero axis for a long time (generally over 20 days), after the DIFF line crosses the DEA line (golden cross below the zero axis), where the two lines do not rise strongly but instead merge into a straight line, with values almost equal. Once the two lines begin to diverge, it is time to buy. The formation of the undersea cable shape below the zero axis mostly occurs when the coin price is at the bottom after a decline, indicating that selling has exhausted, and the main force intervenes to enter the market, which should be understood as a timely entry signal.
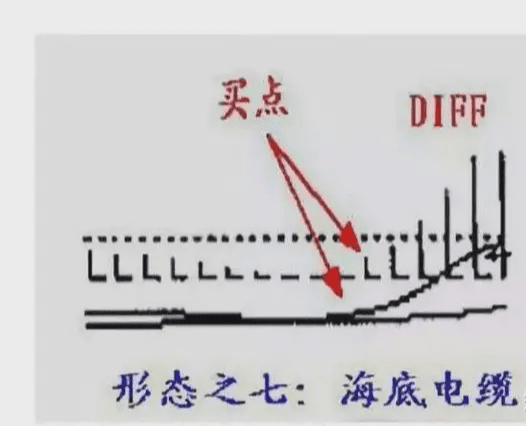
"Fishing at the bottom of the sea" refers to the secondary golden cross formed when DIFF is below the zero axis, indicating that the currency has completed its bottom and is starting to rise from the bottom, allowing for a timely entry.
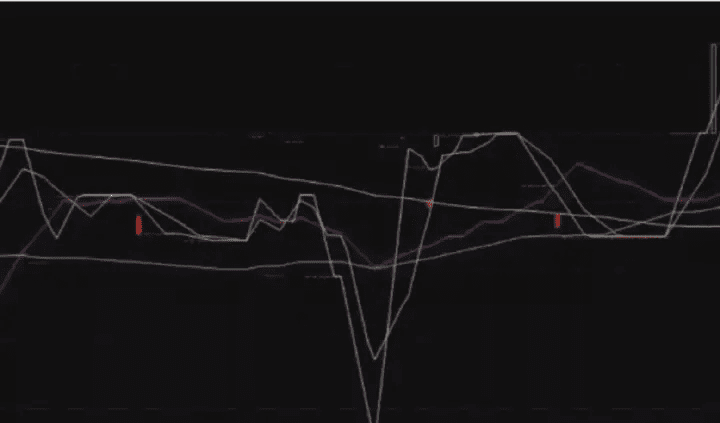
OBV indicator
When the price rises while the OBV line declines, it indicates weak buying power, and the price may fall back.
When the price declines while the OBV line rises, it indicates strong buying power, and when buying at low levels, the price may stop falling and rise again;
The OBV line gradually rising indicates that buying power is gradually strengthening, which is a buying signal.
When the OBV line rises sharply, it indicates that the power will soon be exhausted, signaling a sell.
How to draw support and resistance lines
Support and resistance levels are most commonly and generally determined by drawing horizontal lines. Resistance levels refer to the price at which a coin needs to increase its volume to break through that price. Once broken, the probability of a rise is significantly higher. Support levels refer to positions that are not easily penetrated below; if broken, immediate selling and stop losses are necessary.
Principle:
Chip distribution, this position traps many positions.
Psychological effects lead to bottom fishing or selling after hitting a line.
When the main force sees the support level broken, they will not protect the market, leading to accelerated declines. When they see the support level broken, they will further push the price up.
Drawing method:
Many people are unsure how to draw this, leading to errors in judgment mainly due to incorrect point selection.
The selection of points has the following key reasons:
The closer the point is and forms a recent high or low, the stronger its effect.
Points that are not significantly different can be considered the same.
If many highs and lows are formed during operation, you can rank them according to their importance and draw them as horizontal lines.
As shown in the diagram above, the pressure and support levels of BTC can be drawn based on previous volume positions, touch positions, and breakthrough positions to draw short-term resistance lines for BTC.
The price has repeatedly encountered resistance or support, and the more times it encounters, the stronger it becomes.
This position has a very large trading volume.
Is this position an integer?
Is this position the highest or lowest point?
As shown in the figure above, BTC at the 6800 position has attacked three times, and each time it touches this level, it immediately falls back, indicating that the resistance at this level is very strong. Let's take a look at how strong this level is by pulling the candlestick chart farther back.

Since the volume broke below 6800 in June 2018, this level has become a resistance level, and there have been multiple attacks at this level, each time failing to break through. Over time, this level has become increasingly difficult to conquer, and due to psychological effects, when it reaches 6800, many people will reduce their positions. Once it breaks through, market confidence will increase significantly, leading to a new wave of rebounds.
Note:
If a strong support line is broken, that support line will turn into a strong resistance line.
If a strong resistance line is broken, it will turn into a strong support line.
If you encounter a resistance line that does not break, and there is a significant drop in volume, you need to sell.
If the support line is not broken and there is a strong rebound, you can increase your position.
If it breaks through and quickly falls back, it can be seen as a false breakout.
It's actually that simple. Once you grasp this principle, you can effectively use the points we provide for pressure and support to carry out operations for both long and short positions. Even if we don't actually lead the trades, you can still buy and sell based on the information we provide, taking profits and cutting losses.

Support levels require two or more low points to form, with those low points verified by the market multiple times and difficult to break. Resistance levels require two high points or more to form.
How to judge the strength of support or resistance lines? It depends on the following aspects:
Whether there have been successful multiple tests of the market at low levels without being broken.
The size of trading volume during testing indicates if the support or resistance is weak; if the trading volume is too small, the support or resistance is relatively weak.
The duration that the straight line maintains its effectiveness.
How can ordinary people earn enough 500,000 in a year in the crypto world?
To be honest, it's completely possible, but it requires a method, execution power, and not going off track. No hype, no negativity, just sharing a few practical experiences.
1. The key is in the rhythm, not in getting rich quickly.
Most people lose money because they lack rhythm: chasing after rises and cutting losses on declines, repeatedly being cut. The truly profitable individuals operate with extreme restraint, knowing when to do what. For example, during the early stages of a bull market, regularly invest in mainstream coins and chase hot trends. In the mid-stage, use trend contracts for swing trading, and in the later stage, take profits and reduce positions. It is not difficult to grow 100,000 capital to 500,000 in a year by seizing the right rhythms 2-3 times.
2. Start steadily, don't be greedy for speed.
With a capital of 50,000-100,000, don’t always think about betting on a hundred times the coin. You should focus on the main line, understand the trend, use small funds for trial and error, and invest heavily in big opportunities. Never just buy whatever others shout, or you will end up trapped. At the very least, you should know how to read candlesticks, understand support and resistance, know the flow of funds and chip structure, and learn to control positions and set stop losses.
3. Rely on the system, not on luck.
Many people lose money because they lack a system, get envious of others and rush in without thinking, resulting in profits they can't hold onto and losses they can't bear to cut. Treat every operation as an investment decision, not as gambling. There are many opportunities in the crypto world, but you only need to repeatedly operate within the patterns you are good at and seize certain opportunities.
4. Clear path, combined strike
· In a bull market, layout mainstream coins to capture a 30%-50% increase;
· Rolling capital participates in hot rotation, airdrops, and new coin launches;
· Use small positions to amplify returns when the trend is clear, and strictly control drawdowns.
The key is to know when to charge and when to retreat. Do not be greedy or fearful, strictly execute, and a profit of 500,000 a year is not out of reach.
Hello everyone, I am Lao Wang. I joined the crypto world eight years ago, survived both bull and bear markets, and have achieved financial freedom. One person cannot accomplish everything, and a single sail cannot sail far! In this circle, if you do not have a good community and do not have firsthand information about the crypto world, I suggest you follow me, and I will guide you to shore! Welcome to join!!!

