How to buy cryptocurrencies, deposits and withdrawals
This article mainly introduces how to register an exchange, how to use a wallet, how to buy cryptocurrency, and how to deposit and withdraw funds.
Please make sure to download the correct and authentic version of the relevant software. If you download the wrong one, your wealth may be stolen by others. Many such things happen in the cryptocurrency circle every day.
The main way to identify is to see that the number of downloads is large, the download channel is normal, and everyone is using it.
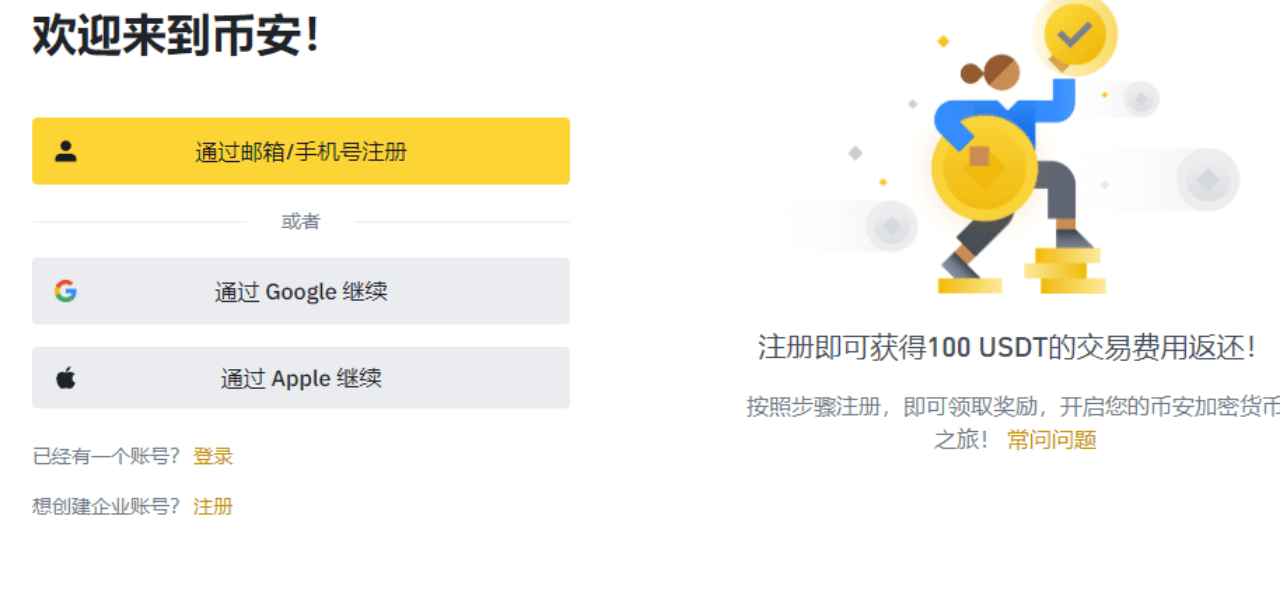
· Android users can directly open VPN to download from the official website · iOS users need to use an overseas Apple ID to log in to the overseas Apple Store to download related applications (free overseas Apple IDs can be obtained by searching AICoin IOS download tutorials in the browser. There are free accounts and passwords on the page) Register for an exchange In the previous article, we introduced many exchanges. Among them, the exchanges that I personally use more are Binance, Ouyi OKX, Zhima Gate, etc. I recommend that you use Binance and Ouyi OKX, which have relatively low risks. The main process takes the registration of Binance Exchange as an example. 1. Binance Binance Registration Method Binance Exchange, which ranks first in global trading volume, has a stable and secure server, large trading volume, low fees, and many currencies. It is a must-have trading platform for novice traders. Binance account registration is relatively simple. You only need an email and password to complete the registration in one minute. Binance registration step 1: Open the Binance Binance registration link and enter the registration page. [Binance official website] https://www.binance.com
Binance registration step 2:
Taking email registration as an example, enter "Email", "Password", "Confirm Password"
Binance registration step 3:
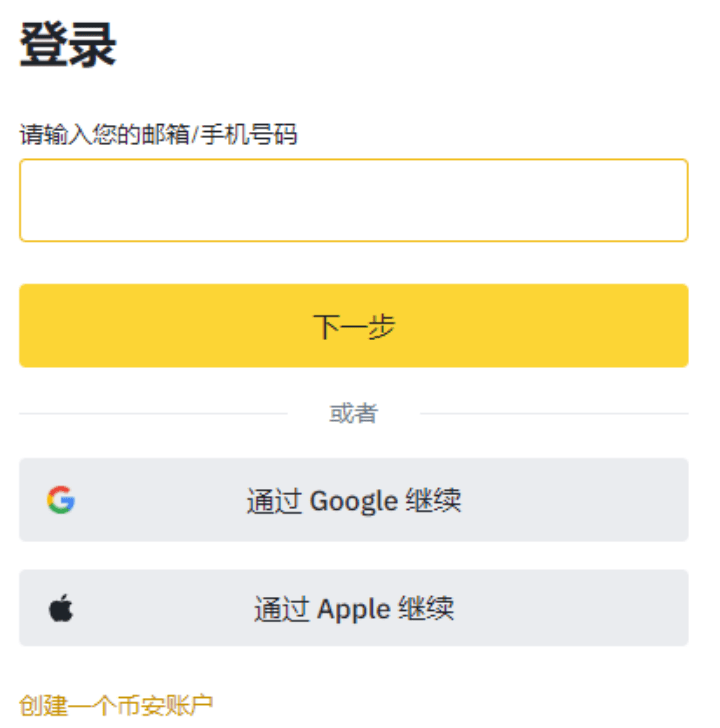
Enter your email account and password to log in. Binance account preparation includes account registration, security settings, and identity verification. After completing registration, you must complete security settings and identity verification in a timely manner.
2. Binance Identity Verification If your registered country does not match your actual country of residence, you need to switch your place of residence to your current place of residence before starting identity verification. For example, if you live in Hong Kong, you need to switch to Hong Kong.
1. Binance real-name authentication (KYC) After completing Binance registration, you must complete KYC real-name authentication before recharging. Follow the instructions on the official website, upload your ID card in "Identity Authentication", and complete the face recognition authentication. The authentication can be completed in 5 minutes, and you can recharge and trade after passing. Binance identity authentication: Click on the head, enter the "User Center", enter basic information such as name, ID number, and upload photos of the front and back of the ID card; then scan the face for verification according to the prompts.
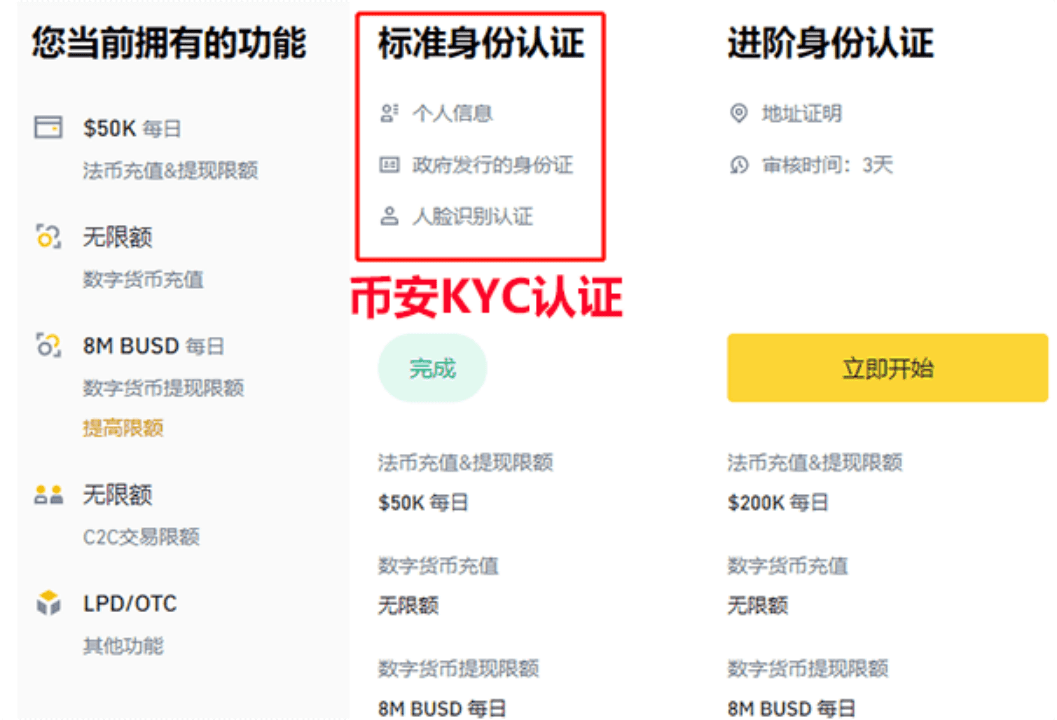
You can upload photos of the front and back of your ID card as required (the ID card must be valid, the document must be fully in the photo, and it must be complete and clear). Generally, users only need to complete the "standard identity verification" and the credit limit is sufficient.
The daily fiat currency deposit and withdrawal limit is US$50,000, and the cryptocurrency deposit limit is unlimited. The 24-hour cryptocurrency withdrawal limit is 8 million BUSD, equivalent to US$8 million.
If you need a larger deposit and withdrawal amount in fiat currency, you need to complete advanced certification. If you have any questions during registration and account verification, you can contact Binance customer service.
How to buy cryptocurrency
USDT is abbreviated as U, which is equivalent to US dollars. It is often used as a trading medium and valuation standard in cryptocurrency transactions. For example, the price of BTC is 66,000 USDT. If we want to buy cryptocurrency, we often need USDT first.
There are two main ways to buy USDT: one is to buy it through the OTC merchants of the exchange through C2C, and the other is to buy it through friends/colleagues through C2C.
Here we mainly talk about deposits. Withdrawals are similar to deposits. You need to pay attention to safety to avoid having your card frozen.
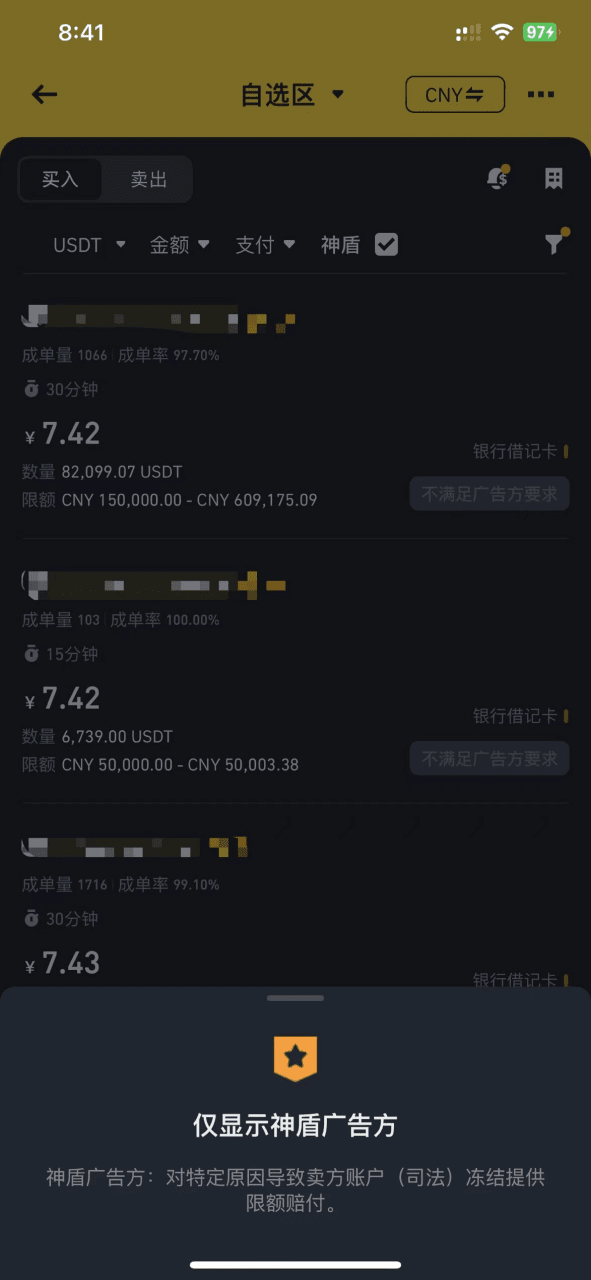
Find an exchange OTC merchant to buy
1) Click Quick Buy on the home page to enter.
2) On the coin purchase page, select the appropriate merchant based on your requirements (amount, transaction method).
The general transaction method is to choose a bank card
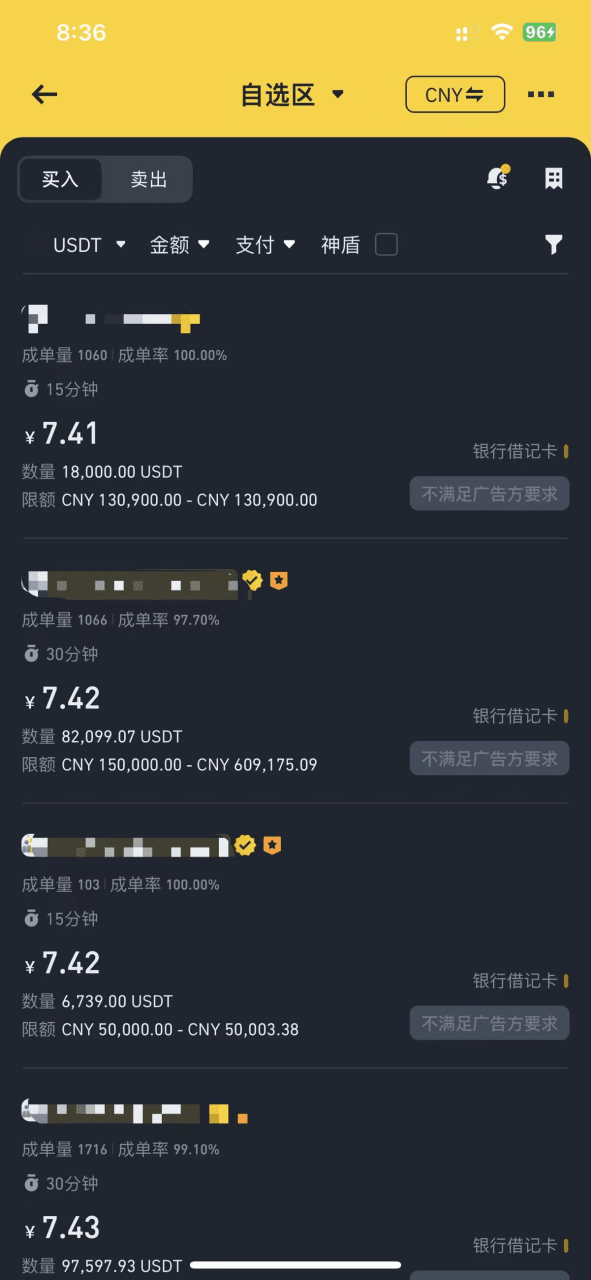
Determine whether the merchant is trustworthy to avoid freezing of bank cards due to money laundering.
The longer the registration time, the better. Don't buy if you have registered for a few days.
The more margin the better. It must be greater than your purchase amount.
The higher the order volume and order success rate, the better. It proves that they will not run away.
The higher the requirements for you, the better. For example, you must meet a certain number of transactions, hold a certain amount of positions, etc. This means that the other party is also afraid of receiving black money.
There must be both buyers and sellers. People who only sell are 90% likely to be money launderers. Stay away from such OTC merchants. For example, the following picture is relatively trustworthy. Binance launched the Shield Pro last year. The Shield Pro advertising side performed well and there were no frozen cards. The service is supreme, the payment is released quickly, and the user feedback experience is full. If a frozen card occurs, the official will compensate in time.
After selecting a merchant, you can make the purchase and then jump into the chat communication with the merchant.
The merchant may ask you to provide relevant proof, such as recent bank transaction records. Once the merchant trusts you, they will send you information such as your bank card number for you to transfer money.
Pay the merchant according to the purchase amount and notify the merchant after the payment is successful. Then wait for the merchant to release u to you. If the merchant does not transfer u to you within the specified time, you can choose to appeal and the platform will handle it.
After successfully purchasing u, you must transfer u from the capital account to the corresponding account (such as a spot account) before trading.
The successfully purchased u has a time limit of t+1, that is, it can only be withdrawn from the exchange to the on-chain wallet after 24 hours. This will be discussed later when using the wallet to purchase on-chain cryptocurrencies.
2) Find a friend or colleague to buy it (risky)
Another way is to find friends or colleagues who are already in the circle to sell USDT to you.
However, this method is relatively risky, so be careful and be sure to choose someone you trust.
Select recharge on the spot or fund account page, which can be USDT or other cryptocurrencies, such as SOL.
Then select a recharge network (public chain). After selection, an address will be generated. Send this recharge address to your friend/colleague and tell him the recharge network (public chain) you chose.
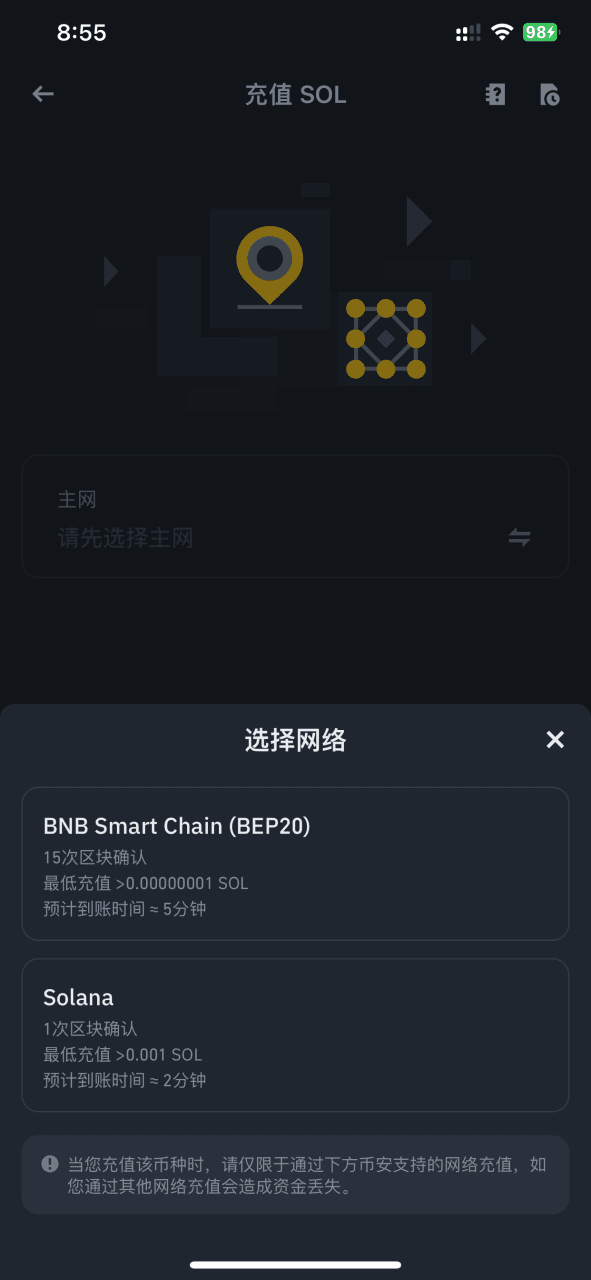
Solana or bnb chain are commonly used. Different chains have different transaction fees. Of course, if the other party recharges you directly from the exchange, there is generally no fee.
Your friend/colleague will transfer u to your address according to the network you choose, and you will transfer the fiat currency to your friend/colleague. Remember that it must be the same network. If the network (public chain) is different, the money may not be recovered.
If the network (public chain) is all EVM-compatible, you can find customer service and tell them that you charged incorrectly and ask them to help you retrieve it.
After the transaction is successful, you can happily buy cryptocurrency
How to use the wallet
What we talked about earlier was mainly within exchanges. Exchanges are centralized and there is a certain degree of distrust.
Therefore, many people will prepare some on-chain wallets. The chain is decentralized, and transactions on the chain are usually queryable by everyone.
We usually call the token transactions on the chain the primary market, because many coins here have not yet been listed on the exchange and have huge room for appreciation, so there are more opportunities, but of course there are more risks. There are many scams and it is easy to be deceived.
The most popular public chains are ETH, BNB, AVAX, and Solana. Among them, Solana is not compatible with EVM.
Of course, if you still feel a little confused after reading the tutorial below, you can check out the official documentation of Token Pocket, which contains a lot of tutorials to help you understand and use the wallet. And the previous article [Must-Read] A beginner's nanny-level introductory cryptocurrency wallet tutorial
1) Download the wallet app.
On mobile, I usually use the token pocket app
On the web, I usually use the metamask Google Wallet plugin, followed by the phantom shadow wallet.
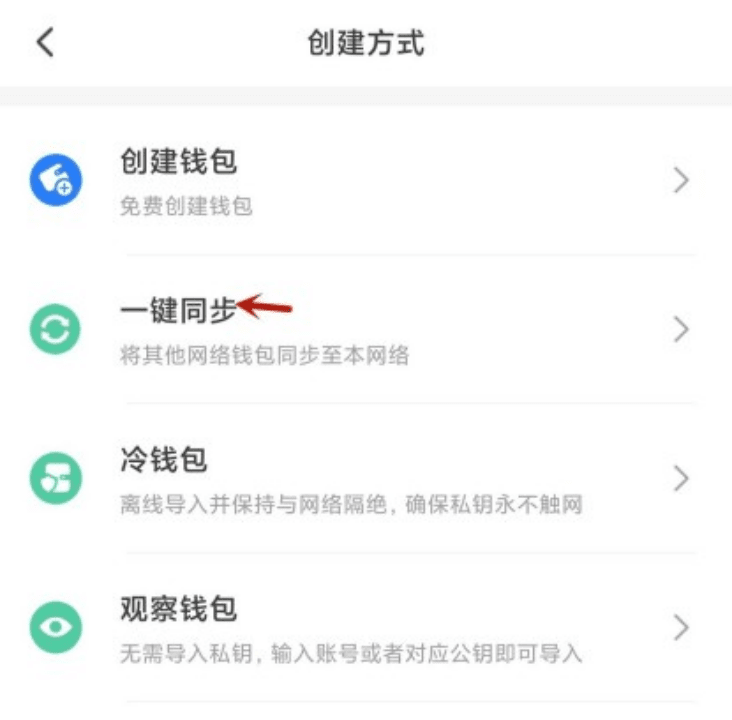
2) Create a wallet. You can refer to the wallet creation document on token pocket.
We can create it on the web or on the mobile terminal. Generally, I like to create it on token pocket, and then import the created wallet into other wallet applications.
Click Switch Network (Public Chain) in the upper left corner of the homepage and select a public chain according to your needs, such as BNB Smart Chain.
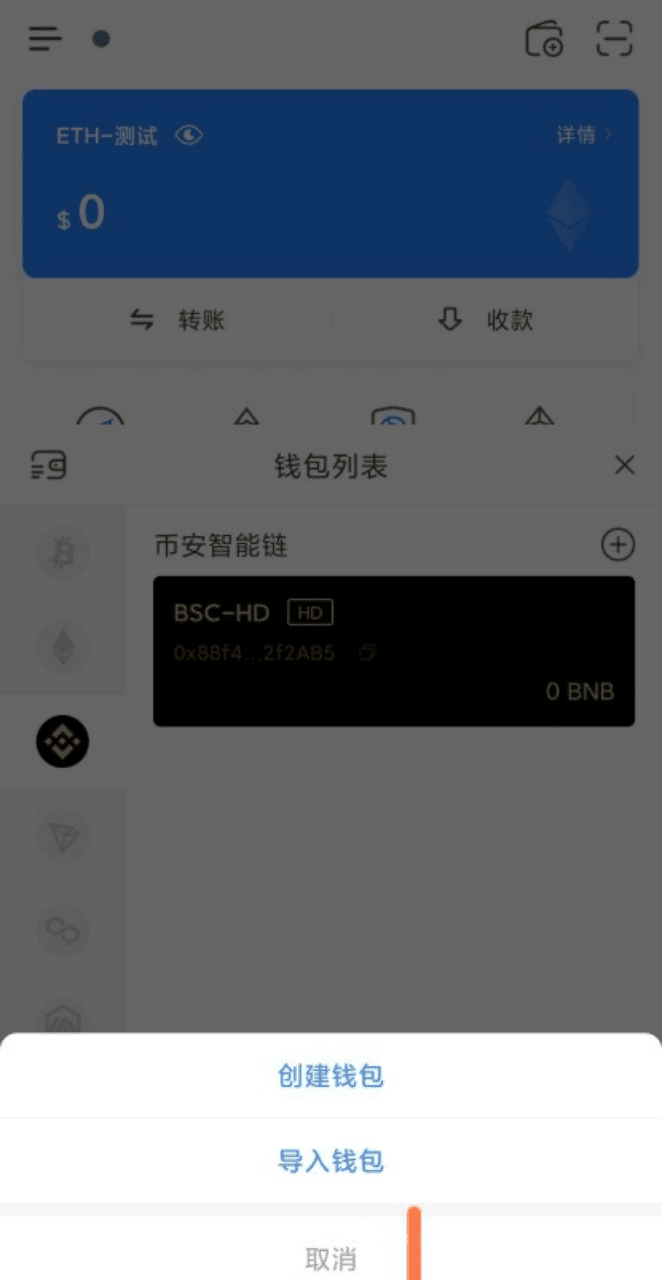
Then select Add/Create Wallet and set a password. After the creation is successful, a mnemonic will pop up for you to back up. Note that the mnemonic is very important, which is equivalent to your wallet private key. Do not tell others. If you have already created a Little Fox wallet on the web page, you can import the wallet mnemonic directly.
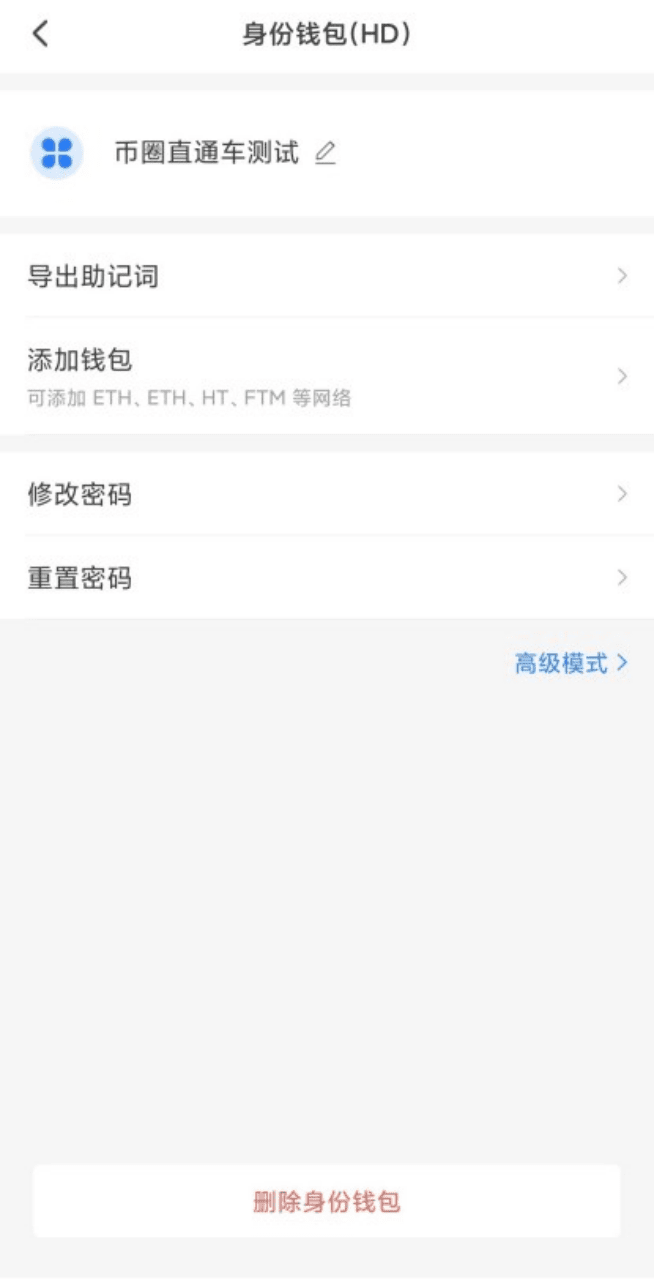
Wallets created on the EVM chain can also be synchronized to other EVM-compatible chains without having to be created repeatedly.
If you transfer cryptocurrencies from a centralized exchange to a wallet on the chain, for example, if wallet A that was originally intended to be transferred to the bnb chain was accidentally transferred to the eth chain, the money can be recovered. You only need to synchronize wallet A to the eth chain.
This is because your wallet is created through the algorithm on the EVM chain, and your wallet address is universal on the EVM chain.
3) Top up your wallet
Although you can access dapps with a wallet, you can’t do much, such as trading, transferring, etc. You need to recharge your wallet. Because various activities on the chain require gas fees, it is recommended to directly transfer the tokens required for gas fees when transferring for the first time, such as eth and bnb.
There are two main ways to top up, but you need to pay attention to the transfer network and gas fee. If there is no gas fee in the wallet, such as bnb, you should transfer some bnb to the wallet address. Otherwise, even if there is u in the wallet, you cannot perform transfers, transactions, etc.
Withdraw from the exchange to the on-chain wallet
Someone transfers money to your wallet
How to receive payment
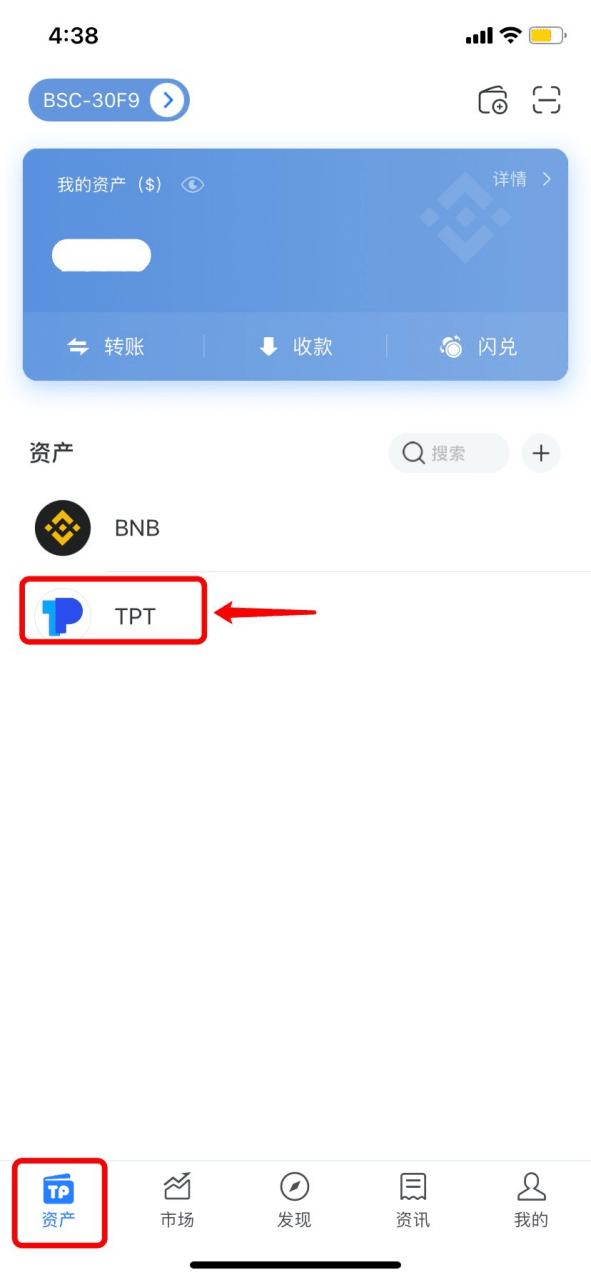
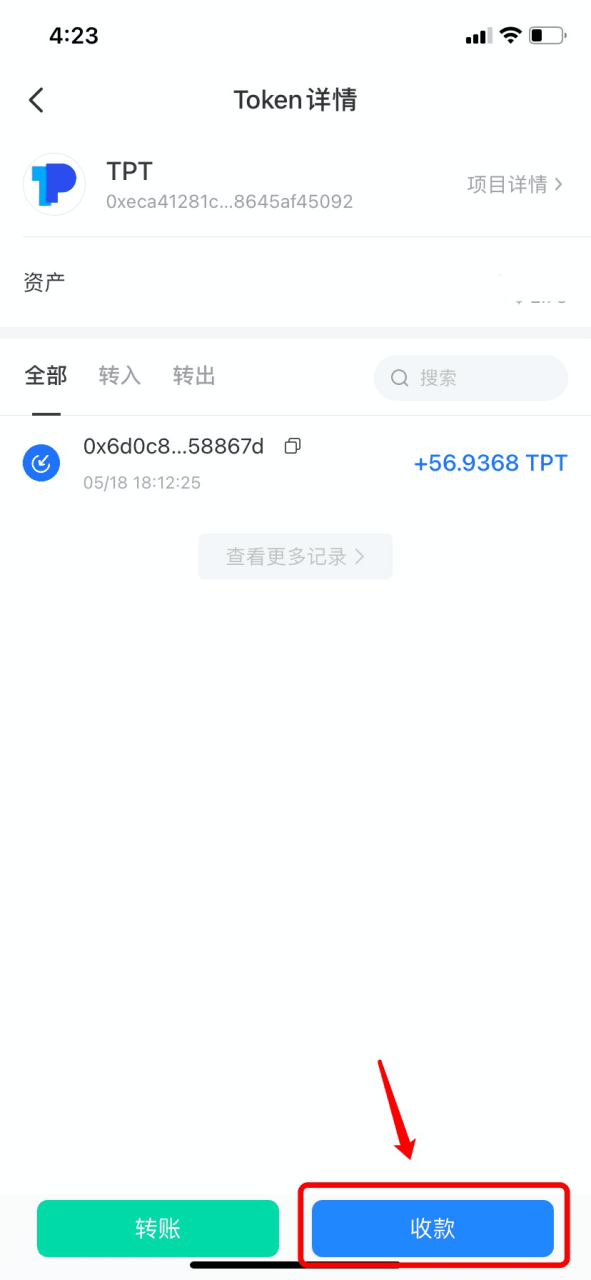
1. Open TokenPocket and select the token you want to receive on the [Assets] page; (Here we take receiving TPT from the BSC chain as an example)
2. Click [Receive Payment];
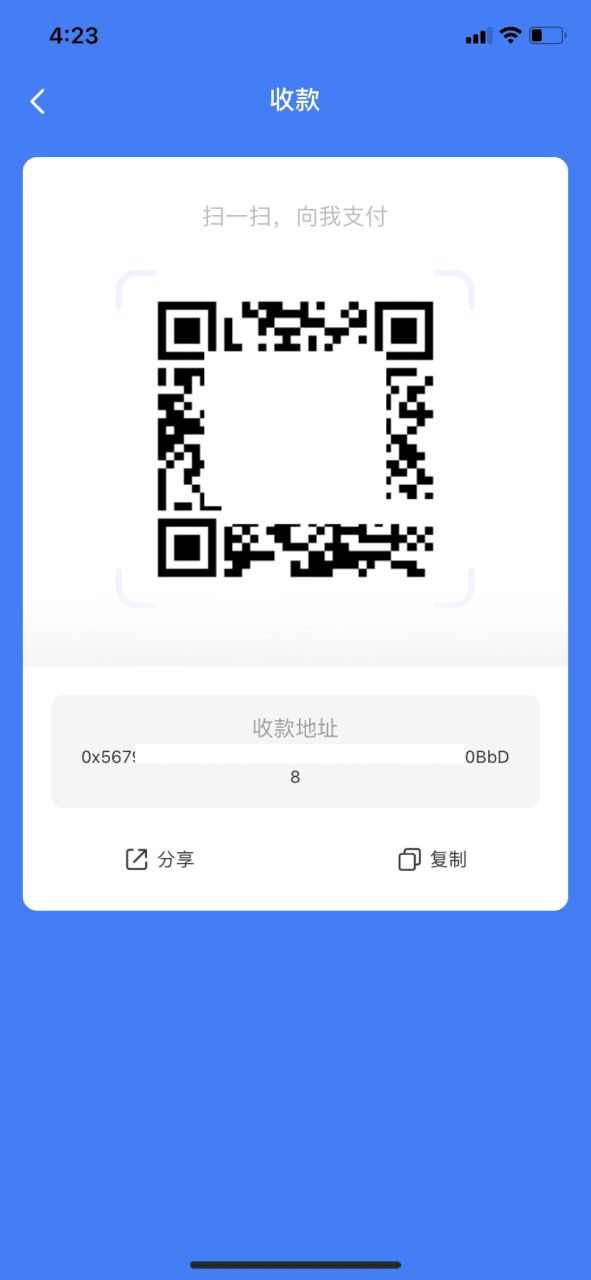
3. On the withdrawal page of the centralized exchange/decentralized wallet, you can scan the QR code or copy the payment address to the withdrawal address.
Notice:
1) When making any transfer, please confirm that the selected transfer channel is consistent!
2) If the token is not displayed after transferring to TokenPocket, please check whether the token has been added.
How to add tokens
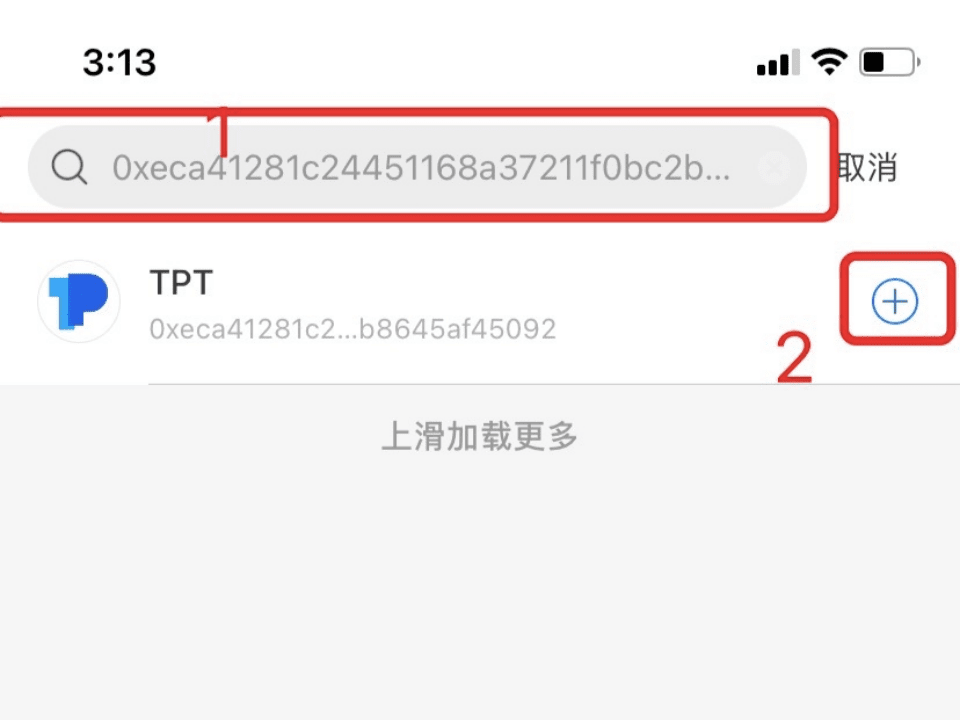
1. Open TokenPocket, select the wallet you want to add tokens to, and click [+] on the [Assets] page to add a new token;
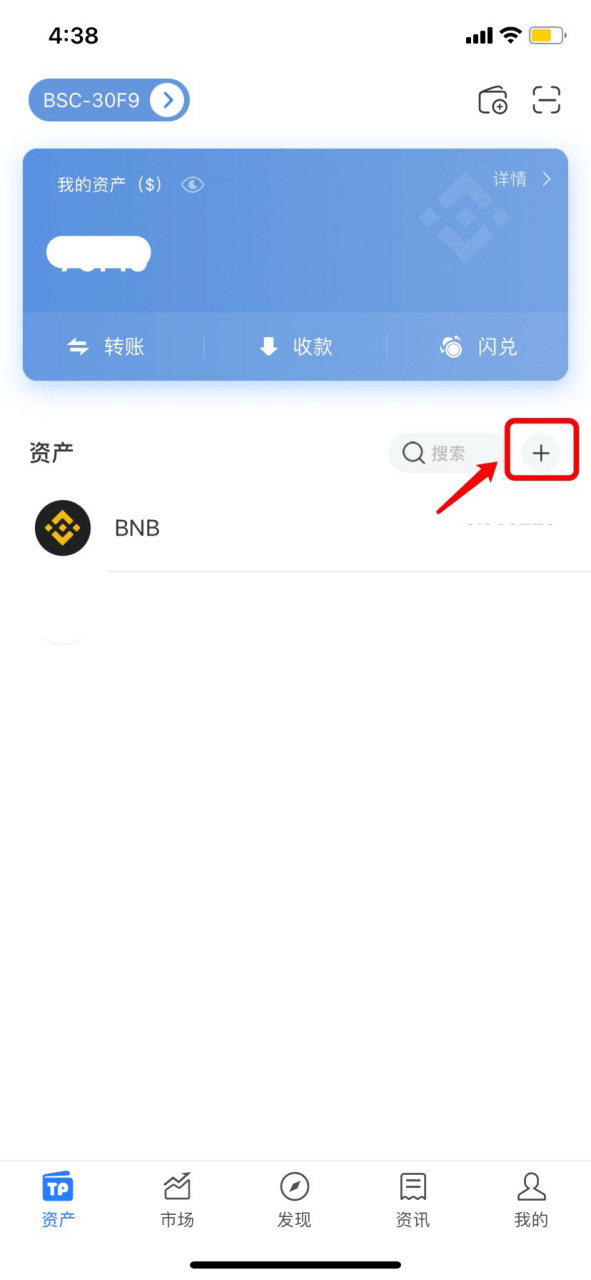
2. Enter the contract address of the token, and then click [+] on the right to complete adding the token. (Here we take adding TPT as an example)
Tip: If you import other wallet addresses, you need to add tokens yourself to display the assets.
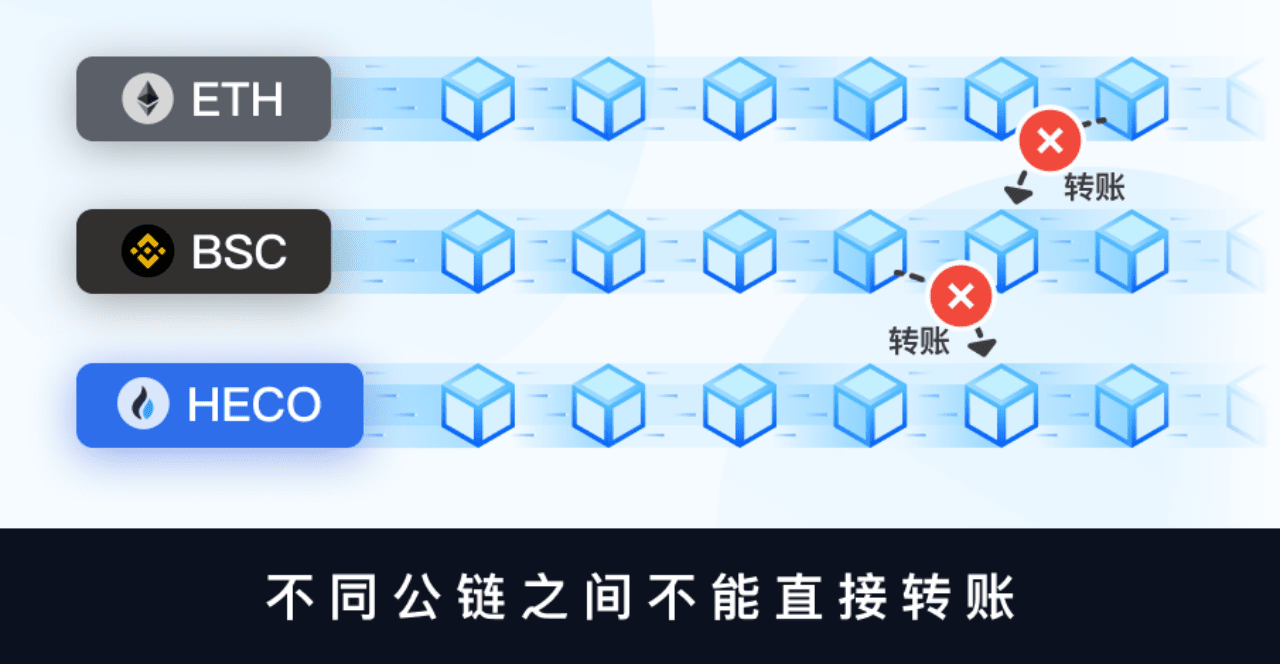
About token transfers between different public chains
Learn about the precautions for receiving and transferring tokens on different public chains through this article
EVM is the abbreviation of Ethereum Virtual Machine Chain, which is a blockchain network compatible with the Ethereum Virtual Machine (EVM), such as Ethereum, BNB Chain, Polygon, Arbitrum and other public chains.
Due to the increasing demand for cross-chain transactions, the same asset will appear on different public chains. For example, USDT can be circulated in public chains such as ETH, BSC, Polygon, Arbitrum, etc. Although different public chains can use the same address to collect assets, the assets between them cannot be transferred directly to each other.
What is mining fee?
Gas Fee is also called network fee. As the name suggests, it is the handling fee paid to miners. When you transfer money on the blockchain, miners (or nodes) need to package your transfer transaction and put it on the blockchain to complete the transaction. In this process, the computing resources of the blockchain will be consumed, thus generating miner fees.
In an EVM-compatible chain, the transaction fee is determined by the Gas Price (unit price) and the consumed Gas Limit (quantity), where the calculation formula is as follows: Miner Fee = Gas Limit * Gas Price
The Gas Limit is mainly affected by the complexity of the operations according to the content of the smart contract. The more operations there are, the higher the Gas Limit will be. The Gas Price is set by the initiator. The higher the Gas Price set by the initiator, the faster the transaction it initiates can be packaged.
Note: The network fee of Ethereum is ETH; the network fee of Binance Smart Chain (BNBChain) is BNB; the network fee of TRON is TRX; the network fee of Polygon/Matic is MATIC; the network fee of Solana is SOL; the network fee of OKExChain is OKT;
If the network is not fully used, it can be returned.
The mining fee (network fee) charged by the transfer network will vary depending on the situation of the network. Once the transaction is confirmed, the mining fee cannot be refunded regardless of whether the transaction is successful.
The mining fee is charged by the transfer network you choose, and the TokenPocket wallet does not charge any fees!


