
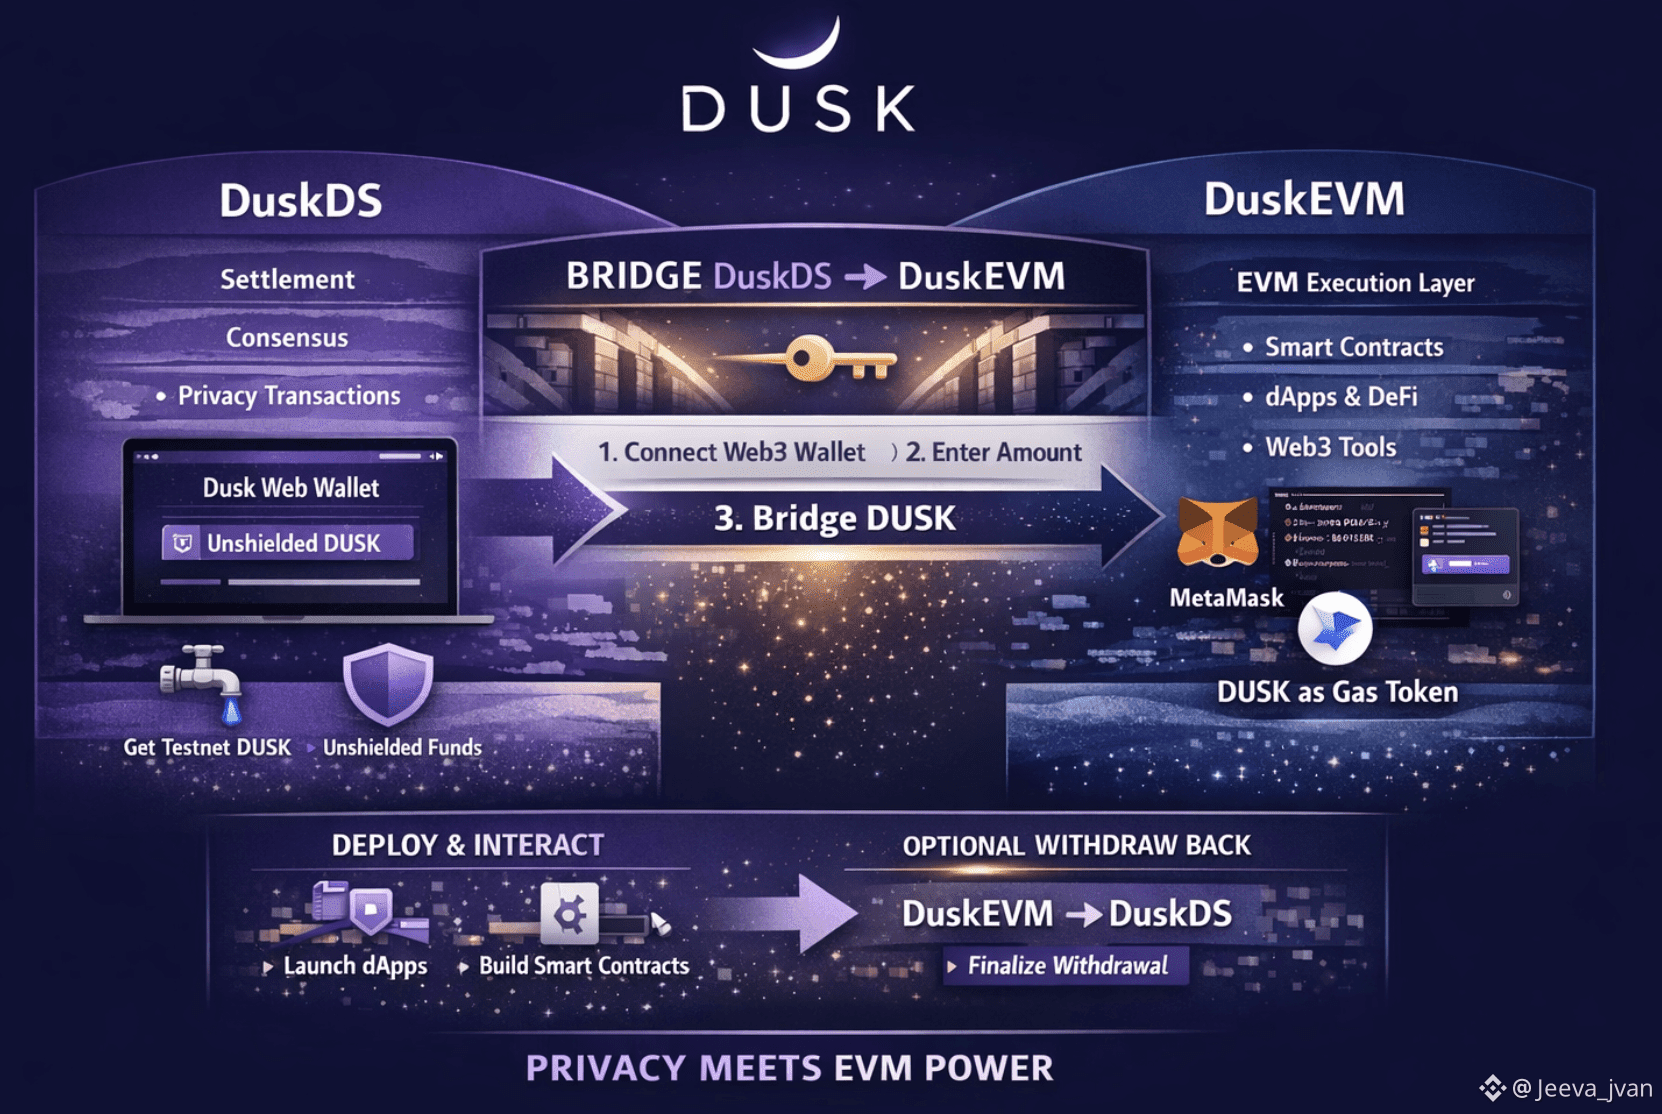
Dusk Network is designed with a modular architecture that separates privacy-enabled settlement from EVM execution. This separation is not a limitation — it is a strength. It allows users and developers to move assets seamlessly between layers depending on what they want to do.
The DuskDS → DuskEVM bridge is the key that connects these worlds.
By bridging DUSK from DuskDS to DuskEVM, users unlock the ability to deploy smart contracts, interact with dApps, and use standard Ethereum tooling — while still benefiting from Dusk’s privacy-first settlement layer.
This article walks through the entire process, from preparation to post-bridge usage, in a clear and practical way.
🧠 Why Bridge DUSK to DuskEVM?
DuskDS is responsible for:
Settlement
Consensus
Privacy-enabled transactions
DuskEVM is responsible for:
Smart contract execution
EVM compatibility
Developer tooling and dApp interaction
Once bridged, DUSK becomes the native gas token on DuskEVM, meaning:
You can deploy contracts
Interact with DeFi and applications
Use MetaMask and standard Web3 tooling
Test and build exactly like on Ethereum — but on Dusk
The bridge makes this transition seamless.
✅ Prerequisites Before You Start
Before initiating a bridge transaction, make sure you have the following ready:
A Dusk Web Wallet account
Some testnet DUSK (available via the Nocturne Faucet)
The DUSK you want to bridge must be unshielded
A Web3 wallet such as MetaMask or WalletConnect
(Optional for developers) familiarity with DuskEVM and deployment tooling
Bridging works only with public (unshielded) DUSK, so shielded balances must be converted first.
🔓 Step 1: Open the Dusk Web Wallet (DuskDS Testnet)
Start by accessing the Dusk Web Wallet on the DuskDS testnet.
Unlock your wallet or restore it using your 12-word recovery phrase
Confirm you have enough unshielded DUSK
Make sure you have a small extra balance to cover bridge fees
If needed, unshield funds using the standard wallet flow
Once ready, proceed to the Bridge section.
🔗 Step 2: Connect a Web3 Wallet to DuskEVM Testnet
Inside the Web Wallet:
Go to Dashboard → Bridge
Click CONNECT WEB3 WALLET
Choose MetaMask or WalletConnect
Approve the connection
Your Web3 wallet will prompt you to:
Add the DuskEVM network (if not already added)
Switch to the DuskEVM network
After approval, the bridge interface becomes active and recognizes:
Your DuskDS unshielded address
Your EVM address from the Web3 wallet
This pairing enables secure asset movement between layers.
⚙️ Step 3: Configure the Bridge (DuskDS → DuskEVM)
The bridge uses a simple three-step wizard.
🔁 Choose Origin and Destination
From: DuskDS
To: DuskEVM
The UI automatically prevents invalid selections.
💰 Enter the Amount
Input how much DUSK you want to bridge
The wallet shows your available unshielded balance
Overspending is automatically blocked
Fees are clearly displayed
⛽ (Advanced) Adjust Gas Settings
For most users:
Default gas limit and price are sufficient
Advanced users may adjust gas settings manually.
If values are invalid, the wallet prevents you from continuing.
✍️ Step 4: Review and Send the Transaction
Before sending, review all details carefully:
Amount being bridged
From address (DuskDS)
To address (DuskEVM EVM wallet)
Gas fees and deductions
If everything is correct:
Click SEND
Behind the scenes:
A DuskDS transaction locks your DUSK
The bridge schedules minting on DuskEVM
Your EVM address is credited once processed
🔍 Step 5: Track the Bridge Transaction
On DuskDS
The bridge UI shows live status updates
Click VIEW ON BLOCK EXPLORER
Inspect transaction hash, fees, and confirmation
You can also search manually in the DuskDS Testnet Explorer.
On DuskEVM Testnet
After processing (usually a few minutes):
Your Web3 wallet balance increases
DUSK appears as native gas
You can view transactions in the DuskEVM Explorer
Explorer behavior is fully EVM-style (blocks, gas, logs)
🚀 Step 6: Using DuskEVM After Bridging
Once bridged, DUSK functions like ETH on Ethereum — but on DuskEVM.
🔑 Use Your Web3 Wallet Normally
Keep the network set to DuskEVM
Send DUSK to other EVM addresses
Interact with dApps and protocols
Approve and sign transactions normally
🧪 Deploy and Test Smart Contracts
For developers:
Configure Hardhat or Foundry with:
DuskEVM RPC
Chain ID
Use the funded EVM address as the deployer
Deploy contracts exactly like on Ethereum
Because DuskEVM is EVM-equivalent and built on the OP Stack, most tooling works out of the box.
🧩 Use dApps on DuskEVM
If a dApp supports DuskEVM:
Open the dApp
Connect your Web3 wallet
Ensure the network is DuskEVM
Use bridged DUSK to trade, provide liquidity, or interact
🔄 Step 7: Withdrawing Back to DuskDS (Optional)
The bridge also supports DuskEVM → DuskDS withdrawals.
Process overview:
Go to Dashboard → Bridge
Set:
From: DuskEVM
To: DuskDS
Enter amount and submit
After submission:
A transaction is sent on DuskEVM
Withdrawal enters a finalization period
Once ready, a Finalize now button appears
Finalization releases DUSK back to DuskDS
Total time can take up to ~15 minutes
🌘 Final Thoughts
The Dusk bridge is more than a transfer tool — it is the gateway between privacy-first settlement and full EVM programmability.
It allows:
Users to move seamlessly between layers
Developers to build with familiar tools
Dusk to maintain a clean, modular architecture
By bridging DUSK, you don’t leave Dusk behind —
you expand what Dusk can do.
