I am 35 years old, and I have been in the crypto space for 10 years since I entered at 25.
Someone asked me, have I made money over the years? The answer is very simple: from 2020 to 2022, my account broke 8 figures. Now I go out and stay in hotels that cost 2000 a night, living easier than many post-80s in real industries or e-commerce.
What is the secret? It's not talent, it's not luck, but a simple method so stupid it's called the '343 Batch Building Method'. With it, I reliably made over 20 million.
Take BTC as an example:
Step one: — Start with a small trial
If you take 120000 as a capital pool, start with 30% 36000 to test the waters. Small position, steady mindset, can handle the risk.
Step two: - Re-divide
If it rises, wait for a pullback to add; if it falls, add 10% for every 10% drop, gradually completing the 40% position. This way, no matter how the market fluctuates, the cost can be averaged.
Step three: - Wrapping up and increasing positions
When the trend stabilizes, then add the last 30%, keeping the entire rhythm clean and tidy.
This method may sound 'foolish', but foolish things are often enduring.
In the market, the hardest part is not finding the perfect trade but controlling greed and fear.
I have seen too many people lose everything overnight relying on shortcuts, while what I rely on is 'not panicking, not being greedy, and adding in increments.'
The result is: while others chase highs and cut losses, I can steadily move away.
Brothers, don’t underestimate the 'foolish method'; it is the real ATM in the crypto world.

Persisting in these ten principles of trading cryptocurrencies will surely yield rich rewards.
First, do not easily let go of low-priced chips. Keep your faith intact to prevent market makers from manipulating the price.
Second, chasing highs and cutting losses, going all in is always a big taboo. When the trend is favorable, building positions in increments during a decline is lower risk, lower cost, and potentially greater profit.
Third, reasonably allocate profits to maximize the release of funds, rather than continuously increasing positions.
Fourth, during a sharp rise, take profit; during a sharp decline, hold your coins. At all times, maintain a positive mindset. Do not speculate, do not be impulsive, do not be greedy, do not be fearful, and do not fight battles without preparation.
Fifth, the low-priced coins bought during ambush or private placements rely on experience and market makers betting on the coin's future, while the subsequent secondary market game relies on technology and information to follow the market makers. Do not get it backwards, or it will end up in a mess.
Sixth, building positions and offloading should be layered and segmented, gradually widening price levels to effectively control the ratio of risk to profit.
Seventh, familiarize yourself with the co-movement effect, watch the market while keeping an eye on other coins' trends. Each coin does not exist in isolation in market trading; they are interrelated. Many tools are available now to check coin information and consult.
Eighth, the allocation of positions should be reasonable. The allocation of hot coins and value coins should be reasonable, paying attention to the ratio of pressure resistance and profit intake. Being too conservative will miss opportunities, and being too aggressive may face high risk! The biggest feature of value coins is stability, while hot coins are characterized by extreme volatility; they may skyrocket or plummet.
Ninth, having coins on the plate, cash in the account, and cash in hand is the safest and most reassuring configuration. Do not go all in; going all in is a sure way to fail. The grasp of risk control and the reasonable allocation of funds are key to your mindset and success. Idle money investment is fundamental.
Tenth, master basic operations, learn to apply concepts flexibly, grasp the basic thinking of trading, observation is the premise, remember the high and low points of each occasion as reference data, learn to record, summarize materials independently, develop reading habits, and cultivate the ability to filter information.
Finally, remember that while we also speculate and trade coins, we are definitely not gambling with coins. Amidst the chaos of information, refine and extract the essence, stick to your principles, and you will definitely reap rewards.
Trading cryptocurrencies is not easy; it requires comprehensive consideration of multiple factors. From selecting capacity trends to paying attention to policies and trading volume, and then strictly executing stop-loss and take-profit strategies, every point is crucial. Investors should continuously learn and practice, integrating these secrets to form their own investment system while maintaining a good mindset. Only by steadily moving forward in the fluctuations of the crypto world can one improve the likelihood of making profits and achieve steady asset growth.

In the crypto world, a trading strategy with a 95% win rate (trend line drawing) can, once learned, stabilize a monthly income in the seven figures and an annual income in the eight figures!
This chapter is very important and very detailed. For first-time learners, it may be challenging, so I hope you can watch it multiple times.
First, we will explain how to draw lines, mainly based on the following three steps:
Confirm the trend
Confirm high and low points
Correctly draw the line
Let's first look at the first step: confirming the trend. As we mentioned earlier, not all structures can use Fibonacci tools. At least in a fluctuating market, we do not use it; we only use this tool in trending markets.
So how do we confirm the trend?
Of course, you can use the previous trend line course to help you identify a trend. If you can draw a line through two points and verify it at the third point, then this trend line is a valid trend line.
At this time, you can also use trend lines to assist in confirming this trend; this is also a method.
Of course, you can use other tools to determine the trend, such as moving averages, which do not have a unified standard. Today, we will use another method to confirm the trend, which is simpler: using EMA200.
EMA (Exponential Moving Average) is the full name of the exponential moving average line. Another familiar one is MA, which means simple Moving Average or moving average.
MA means simply adding up the closing prices of each day and dividing by the number of days.
EMA works differently; it applies weight. The meaning of weight is that yesterday's price has a more significant impact on today, while the price from the day before yesterday also affects today but less than yesterday's. The price from two days ago has even less impact compared to yesterday and the day before.
The EMA moving average is smoother compared to the MA moving average, and I personally prefer to use EMA.
Of course, we will provide a detailed introduction to the use and differences of MA and EMA in the moving average chapter.
As a side note, many stock traders usually use the daily MA250 as a bull-bear boundary filtering line. If a stock's daily price is below MA250, they will not consider buying.
Only when a stock's daily line is above MA250 will they consider buying, and then use other indicators to screen the stocks to purchase.
Returning to our topic, we use EMA200 to judge the trend of the market. Let's first look at the following chart Figure 2.4-17.
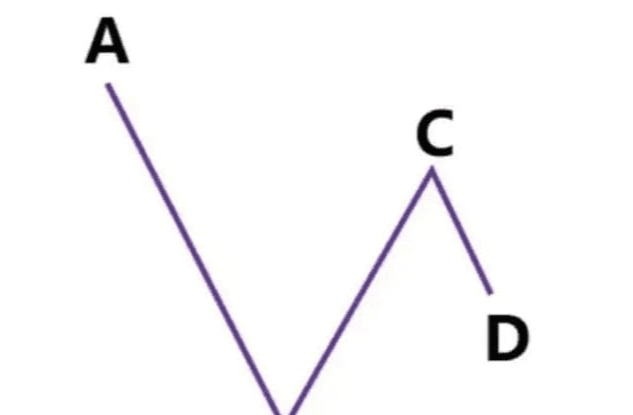
Figure 2.4-17
We can see the price drops from high point A to low point B and then rises to high point C. C did not break through the previous high A. At this time, the price reaches position D; how should we draw?
Should it be drawn based on the high and low points of AB or the high and low points of BC?
At this point, it is very simple; we add the EMA indicator and modify the parameters to 200, as shown in Figure 2.4-18, which indicates the setting for EMA200.

Figure 2.4-18
If the price twists around EMA200, as shown in Figure 2.4-19.
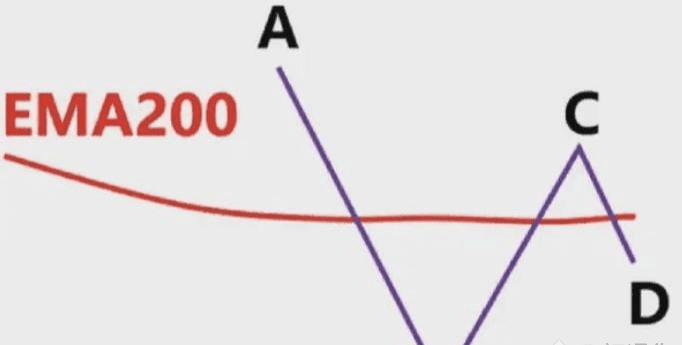
Figure 2.4-19
Then we consider the current market to be in a fluctuating or disorderly state, and we do not participate in such markets.
If the price is above EMA200, we consider the current market to be upward, as shown in Figure 2.4-20.
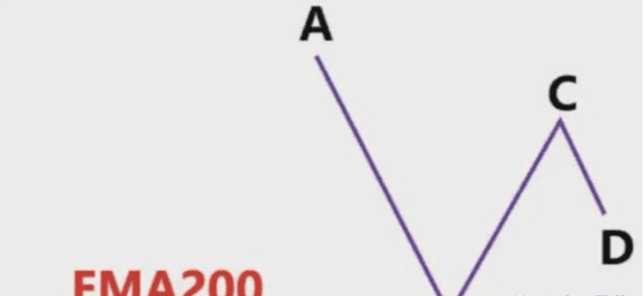
Figure 2.4-20
At this time, we should draw the Fibonacci retracement line based on the high and low points to observe the price reaction in the area of 0.382-0.618 to formulate corresponding strategies.
If the price is below EMA200, we consider the current market to be downward, as shown in Figure 2.4-21.
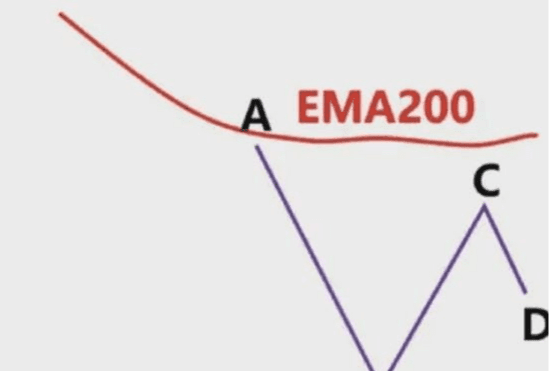
Figure 2.4-21
At this time, we should draw the Fibonacci retracement line based on the high and low points to observe the price reaction when it rebounds to the 0.382-0.618 area to formulate corresponding strategies.
After confirming the trend, we move to the second step: confirming high and low points, which is how to find high and low points.
Drawing Fibonacci areas is quite subjective; if your defined high and low points are different, your Fibonacci areas will surely be different. This will inevitably lead to different support and resistance areas, potentially causing misjudgments. So how should we find high and low points?
Let's assume the market is in an uptrend, as shown in Figure 2.4-22. How should we operate?
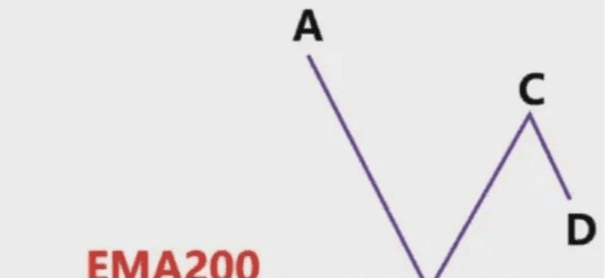
Figure 2.4-22
First, we cannot directly connect BC as the wave high and low points and then draw Fibonacci. At this point, the price drops from the high point C down to point D. At point D, it could go either way; let's first consider the hypothetical decline.
Then we need to draw Fibonacci based on the previous wave's high point A and low point, and observe if point B's area is in the 0.382-0.618 position of this Fibonacci retracement.
If the area of B is within the 0.382-0.618 retracement area, as shown in Figure 2.4-23.
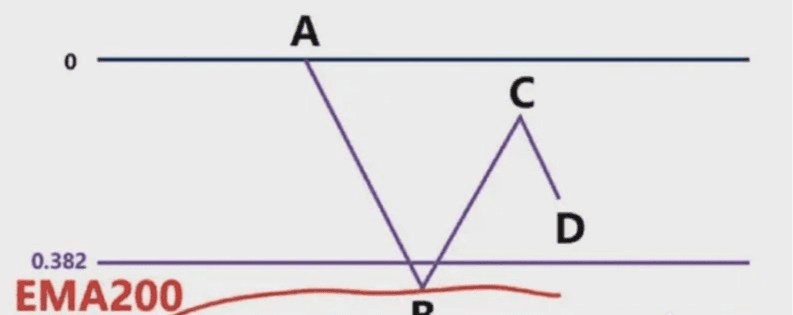
Figure 2.4-23
At this time, there may be a secondary test of wave low point B, meaning it will test the previous low position B again, forming a double bottom pattern and then directly rising.
Remember, double tops and double bottoms have greater power when following the direction of the trend. In other words, we should look for double bottoms in an uptrend and double tops in a downtrend.
So we need to draw a horizontal support line from point B, as shown in Figure 2.4-24, waiting for the price to reach this area to observe price behavior, whether it will form a double bottom.
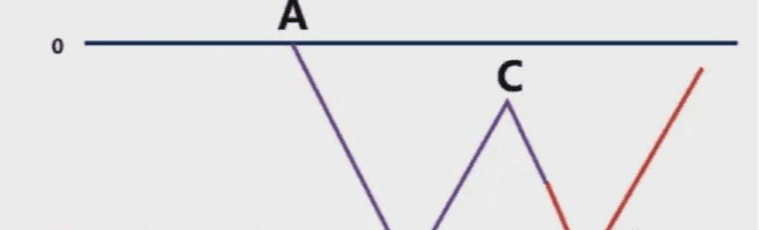
Figure 2.4-24
If the area of B is not in the 0.382-0.618 retracement area but above 0.382, meaning it belongs to a light retracement area, as shown in Figure 2.4-25.
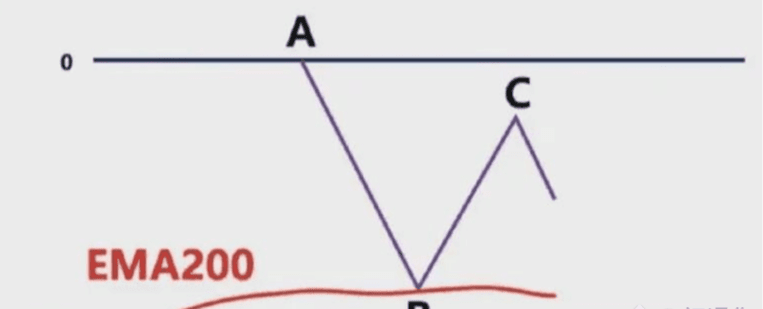
Figure 2.4-25
At this time, we should also draw the horizontal support line at point B. The price may conduct a second test at the wave low point B, forming a double bottom pattern, and then directly rise.
It is also possible to break through the support area to point D, forming equal distances for AB and CD, and point D just retraces to the 0.382-0.618 area of Fibonacci, then continues to rise, as shown in Figure 2.4-26.
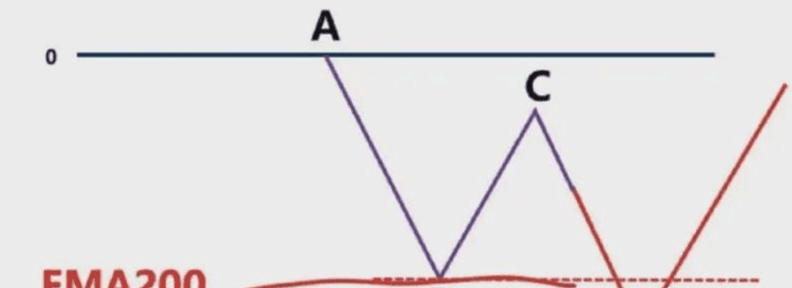
Figure 2.4-26
This means that the current pullback is not a simple pullback; it is a two-segment equal pullback. Because short-term traders at point C will take short positions based on the equal distance principle of AB and CD, taking profits directly at point D while the bearish energy exhausts and bullish forces continue to push, leading to a further price rise.
Of course, it can also form a three-segment retracement and continue to rise, but as long as the trend is not broken, we should trade in the direction of the trend.
If the area of B is not within the 0.382-0.618 area but below 0.618, it is in a deeper retracement, as shown in Figure 2.4-27.
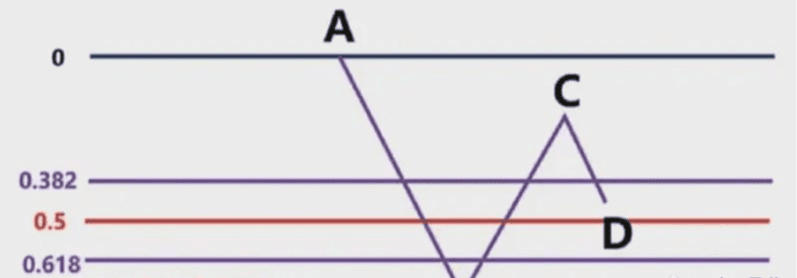
Figure 2.4-27
This indicates a deep pullback, suggesting that the upward momentum is insufficient. The buying power becomes somewhat weak, and the selling power may also intervene in the market.
At this point, we also need to draw the horizontal support line at point B. We can pay attention to C’s drop to this horizontal support position and observe the reaction, as shown in Figure 2.4-28.
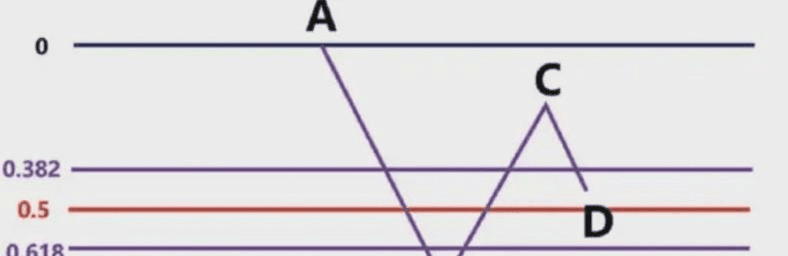
Figure 2.4-28
As mentioned many times before, if the market has not shown a reversal, we should operate in the direction of the trend, because operating in the direction of the trend is always the easiest way to make money.
If the B point above is broken, it may require a range consolidation pattern.
At this time, we need to pay attention to the price performance of the horizontal support area drawn from the previous low point B. This will be explained in detail in subsequent courses; we mainly discuss how to find wave high and low points here.
The situations discussed in the above charts are that the decline in segment CD did not stop at point D but continued to decline. These are our coping strategies.
So if there is no decline at point D and instead an increase occurs, how should we draw the wave high and low points? As shown in Figure 2.4-29.
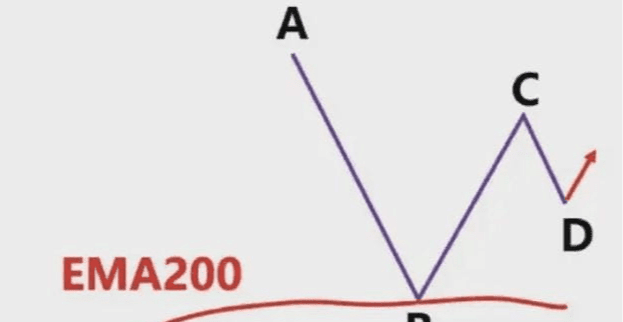
Figure 2.4-29
At this time, we should draw a horizontal resistance line from the previous wave high point A and wait for the price to break through the performance after the previous wave high point A.
If the price breaks through the previous wave high point A and creates a new wave high point E, then declines, we can draw the Fibonacci area using wave low point B and wave high point E, observing the price action in the area between 0.382-0.618, as shown in Figure 2.4-30.
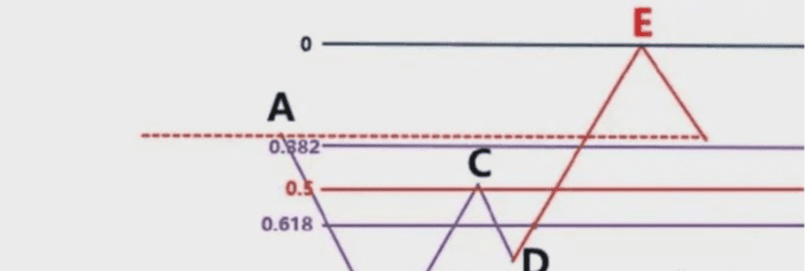
Figure 2.4-30
At this time, if the horizontal resistance line drawn at point A is also in this area, it will form area resonance, so pay close attention to this area.
Of course, when the price breaks through the previous wave high point A, it may face resistance and fall back, then break through again, forming a dense interval, as shown in Figure 2.4-31. At this time, it is a position waiting for an explosion.
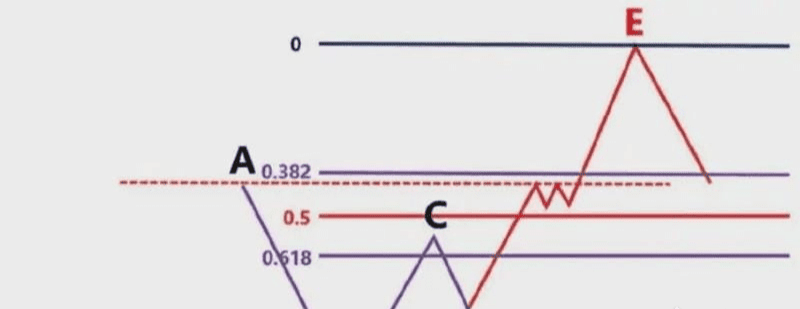
Figure 2.4-31
The most important thing is to see whether it can break through and form a new wave high point. After the breakthrough, we can find high and low points to draw Fibonacci areas.
So, this is the entire process of confirming wave high and low points in an uptrend.
Let’s assume the market is in decline, as shown in Figure 2.4-32. How should we operate?
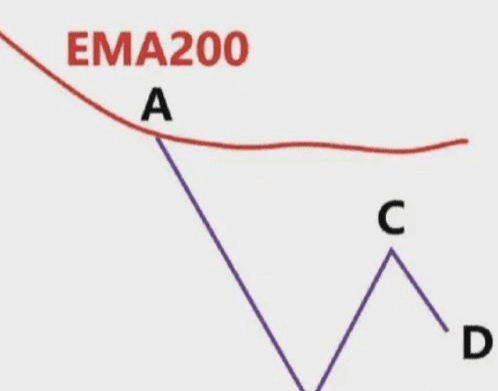
Figure 2.4-32
First, we cannot directly connect BC as the wave high and low points and then draw Fibonacci. At this point, the price drops from high point C down to point D. At point D, it could either rise or fall. Let's first consider the hypothetical rise: how should we draw the Fibonacci area?
At this time, we need to draw the Fibonacci area using the previous wave high point A and wave low point B, then observe if point C's position is in the 0.382-0.618 position of this Fibonacci retracement area.
If point C is in the 0.382-0.618 rebound area, as shown in Figure 2.4-33.
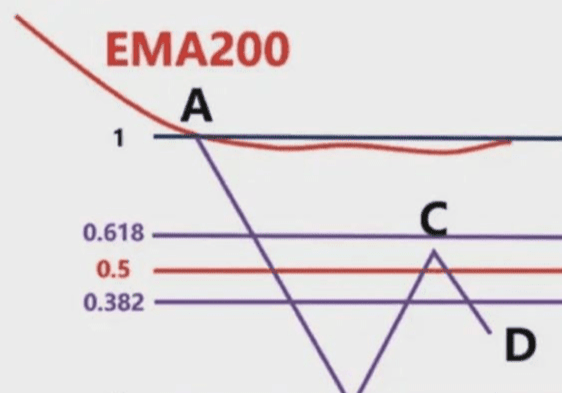
Figure 2.4-33
At this time, there may be a secondary test of wave high point C, meaning it will test the previous high position C again, forming a double top pattern and then directly declining.
As we said earlier, we should look for double bottoms in an uptrend and double tops in a downtrend. Always remember to trade in the direction of the trend.
Therefore, we need to draw a horizontal resistance line from point C, and then wait for the price to reach this area to observe the price behavior, to see if a double top pattern appears, and then decide how to enter, as shown in Figure 2.4-34.
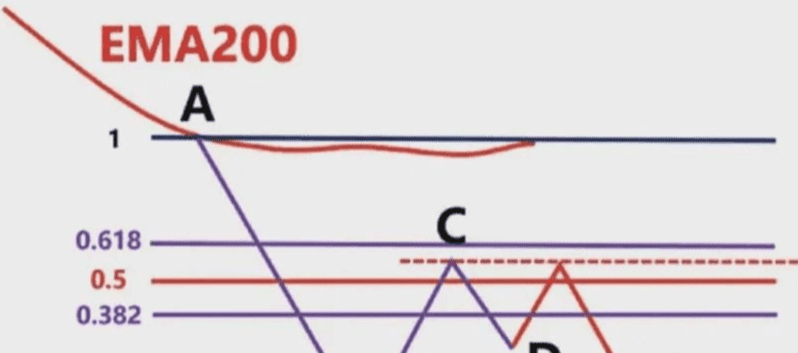
Figure 2.4-34
If the area of C is not in the 0.382-0.618 area but above 0.382, meaning it is above the light rebound area, as shown in Figure 2.4-35, how should we operate at this time?
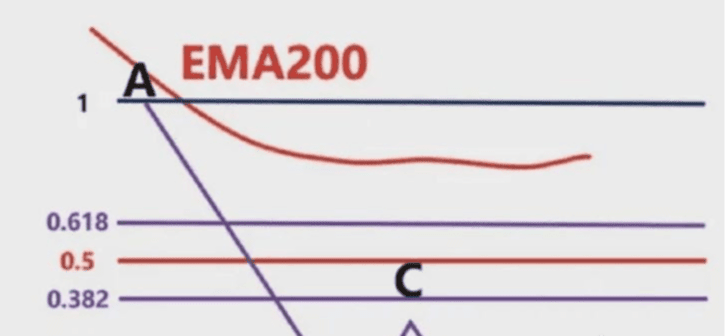
Figure 2.4-35
At this time, we should also draw the horizontal resistance line at point C. The price may conduct a second test at the wave high point C, forming a double top pattern, and then directly decline, as shown in Figure 2.4-36.
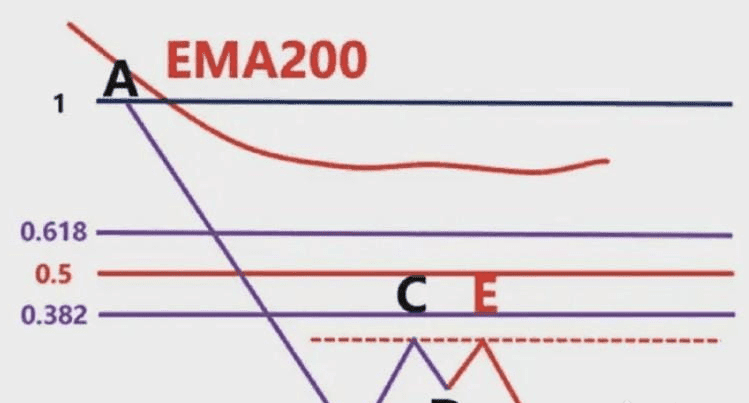
Figure 2.4-36
It is also possible to break through the resistance area to point E, forming equal distances for BC and DE, and point E just retraces to the 0.382-0.618 Fibonacci area, then continues to decline, as shown in Figure 2.4-37.
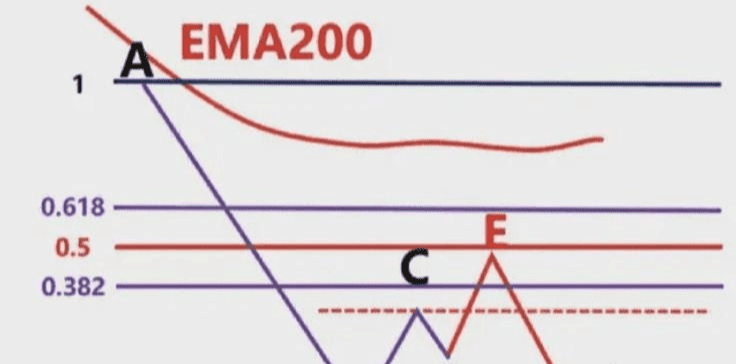
Figure 2.4-37
This means that the current rebound is not a simple rebound; it is a two-segment equal rebound.
Because short-term traders at point D will follow the principle of equal distances between BC and DE, taking profits directly at point E, leading to exhaustion of bullish energy while bearish forces continue to apply pressure, causing the price to continue to decline.
Of course, it may also form a three-segment rebound and then continue to decline. However, as long as the trend is not broken, we should trade in the direction of the trend.
If point C is not in the 0.382-0.618 area but below 0.618, it means it belongs to a deeper rebound, as shown in Figure 2.4-38.
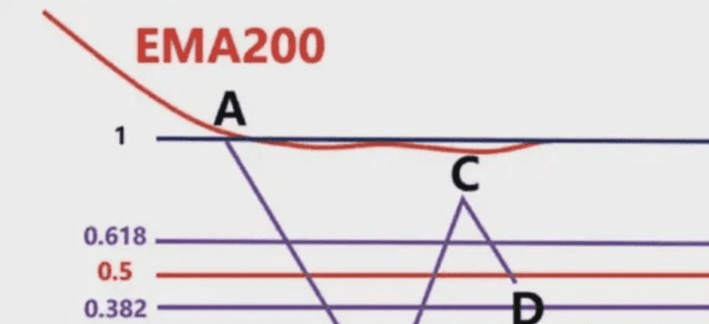
Figure 2.4-38
This indicates that there has been a deep rebound in the decline, reflecting insufficient selling power, which may cause market fluctuations or reversals.
At this time, we draw the horizontal resistance line at point C, and we can pay attention to the price's reaction when it rebounds to this horizontal resistance position, as shown in Figure 2.4-39.
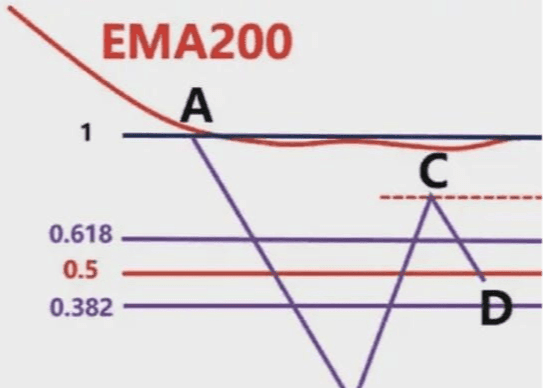
Figure 2.4-39
As mentioned many times before, if the market has not shown a reversal, we should operate in the direction of the trend, because operating in the direction of the trend is always the easiest way to make money. We observe whether it will form a double top, as shown in Figure 2.4-40.
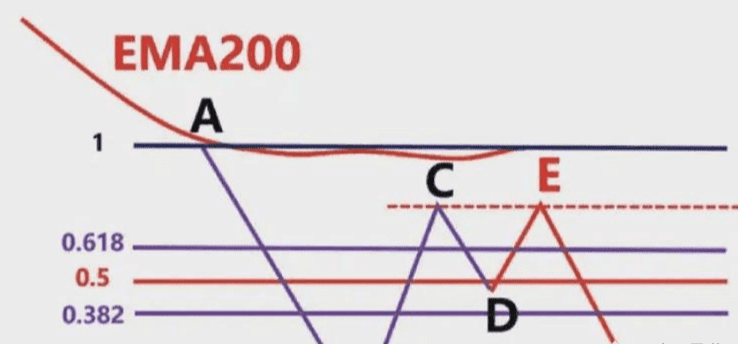
Figure 2.4-40
So it may form a double top at the resistance line drawn at high point C and then fall with the trend. Of course, it may also directly break through this resistance line.
If the position of point C is broken, we need to pay attention to wave high point A and draw a horizontal resistance line from A. Then observe the price's reaction when it approaches this resistance line, as shown in Figure 2.4-41.
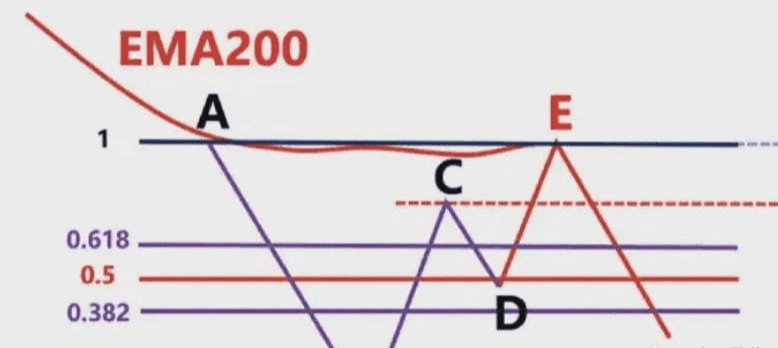
Figure 2.4-41
It may undergo a range consolidation pattern or reversal; it may also continue to decline after consolidation. These are unpredictable, and what we need to do is keep a close watch.
The above charts mainly illustrate several scenarios assuming an increase at point D.
If at point D the price does not rise but continues to decline, as shown in Figure 2.4-42, how should we find wave high and low points?
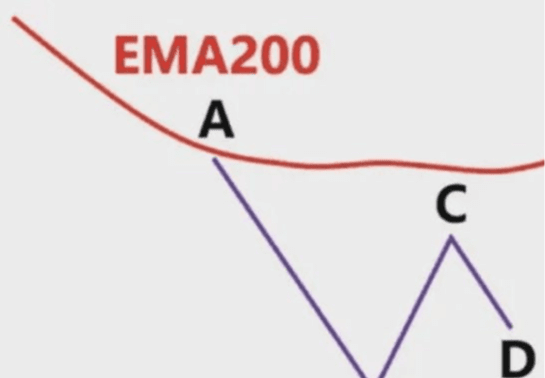
Figure 2.4-42
At this time, we should draw a horizontal support line from wave low point B and wait for the price to break below wave low point B, then create a new wave low point E.
At this time, we can draw the Fibonacci area using wave high point C and wave low point E, observing the price behavior in the area between 0.382-0.618, as shown in Figure 2.4-43.
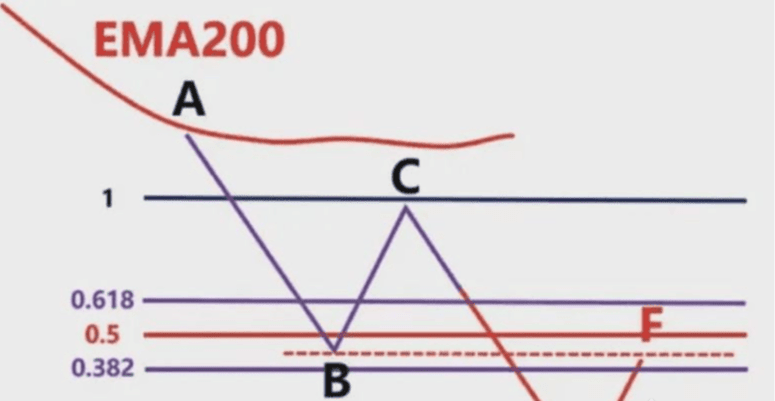
Figure 2.4-43
At this time, if the horizontal support line drawn at point B is also in this area, it will form area resonance, so pay close attention to this area.
Of course, when the price breaks below the previous wave low point B, it may support a rebound before dropping again, forming a dense interval, as shown in Figure 2.4-44. At this time, it is a position waiting for an explosion.
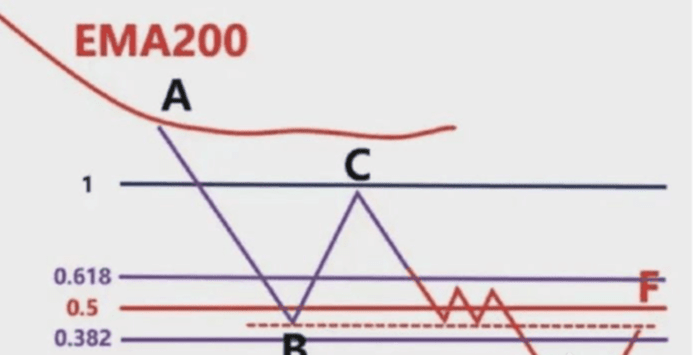
Figure 2.4-44
The most important thing is to see whether it can break down, forming a new wave low point. Then we can draw Fibonacci areas.
That’s how to find wave high and low points in a downtrend.
Now that the trend is determined and the wave high and low points are confirmed, how should we draw them correctly?
It's very simple; if it's an uptrend, the rule for drawing lines is to first find the wave low point, then find the wave high point, which means drawing from bottom to top. At this point, we can see that 1 is below and 0 is above.
If you first find the wave high point and then the wave low point, the values shown in your drawing will be different, as shown in Figure 2.4-45.

Figure 2.4-45
It is clear that the left side is correct, while the values on the right are reversed.
Some people draw without care, and it leads to bad drawing habits, so in the early stages of learning, try to develop the correct habits; otherwise, it will be difficult to correct later.
If it is a downtrend, the rule for drawing lines is to first find the wave high point and then find the wave low point, which means drawing from top to bottom. At this time, we can see that 0 is below and 1 is above.
If you first find the wave low point and then find the wave high point, the values shown in your drawing will be different, as shown in Figure 2.4-46.

Figure 2.4-46
It is clear that the left side is correct, while the values on the right are reversed.
That’s the whole detailed process of how to draw Fibonacci.
Here is a question: Should we connect the high and low points by connecting the shadows or connecting the bodies?
In my personal understanding, it is to connect the highest point and the lowest point, so it naturally connects the shadows rather than the bodies.
Finally, let’s take a look at the explanation of the actual trading chart to deepen our impression, as shown in Figure 2.4-47.
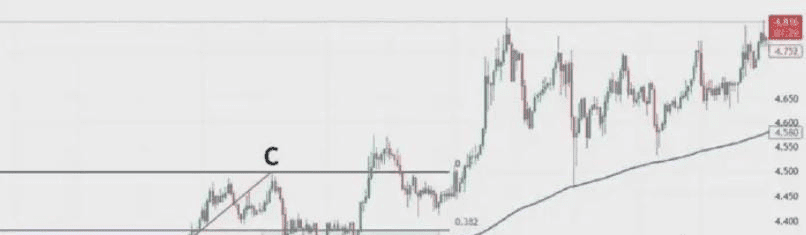
Figure 2.4-47
The blue line in the chart is EMA200. We see high point A and low point B; at this time, the price is above EMA200, so we only take long positions and do not short. We draw a purple horizontal resistance line from high point A.
We see that the subsequent price directly breaks through A to reach high point C. We draw the Fibonacci area using low point B and high point C, and observe the price's performance when it returns to the 0.382-0.618 area, shown in the light green area on the chart.
We see that the price forms a double bottom in the area marked by the red arrow, while forming a small dense interval at the bottom on the right. We can directly enter when breaking through the top of this interval. Of course, you can also choose other entry methods.
Let's take a look at another chart, as shown in Figure 2.4-48.
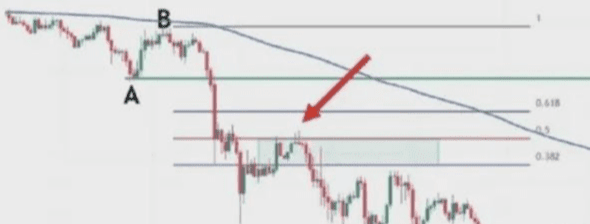
Figure 2.4-48
The blue line in the chart is EMA200. We see low point A and high point B. At this time, the price is below EMA200, so we only short and do not long. We draw a green horizontal support line from low point A.
We see that the subsequent price directly breaks through A to reach low point C. We draw the Fibonacci area using high point B and low point C, and observe the price's performance when it returns to the 0.382-0.618 area, shown in the light green area on the chart.
We see that the price signals a double cross star (DD) in the 0.5 area of Fibonacci (marked by the red arrow), forming a micro double top with a small high point on the left. This is an entry signal; of course, you can also choose other entry methods. That’s all about drawing Fibonacci; I hope you can practice more and master it.
In the crypto world, it's essentially a battle between retail investors and market makers. If you don't have cutting-edge news or first-hand information, you can only be cut! If you want to layout together and harvest the market makers together, feel free to find me! I am Old Wang.

