Since I first entered the cryptocurrency world, my funds have climbed from fifty thousand to one hundred thousand, then surged to three hundred and twenty thousand, and in the third year, I broke through the five hundred and ninety thousand mark. By August of the fourth year, this figure had soared to three million seven hundred and eighty thousand, and just three months later, in November, my assets had accumulated to over seven million.
In the following years, I was able to extract as much as eighty million in profits from the cryptocurrency market.
However, this journey has not been smooth sailing. At one point, my assets were close to a peak of four million, and I considered myself a prominent figure in the cryptocurrency world. In a moment of impulse, I quit my job and devoted myself entirely to trading cryptocurrencies, even going so far as to take on debt to increase my investments. But fate played a cruel joke on me; the arrival of the financial storm not only made me lose all my profits but also burdened me with heavy debts. In the end, I had to painfully sell my property, and my relationship with my husband reached a freezing point, nearly leading us to part ways.
Those were incredibly dark days; in just a few months, I plummeted from the heights of success to the depths of despair. This experience made me realize that my past successes were largely due to sheer luck.
Therefore, I made up my mind that if I wanted to continue on the path of trading, I had to settle down and study. In addition to consolidating my basic knowledge and analyzing market dynamics, I also delved into technical indicators. I understood that without in-depth market research and a reasonable money management plan, my funds would eventually run out. As a retail investor, without a solid foundation, blindly following the crowd will only lead to regret in the end.
For the next three years, I cut off all contact with classmates and friends, staying home day after day, reviewing and researching, taking short breaks on the keyboard when I was tired. This arduous and persistent effort finally allowed me to achieve financial freedom through cryptocurrency trading.
Today we'll briefly explain Al Brooks' candlestick counting method. Many readers have expressed difficulty understanding how to count candlesticks when reading his books. However, candlestick counting is a fundamental chart reading tool throughout all of Al Brooks's works. If you don't know how to count candlesticks, reading his books will be very challenging.
If you are currently reading Al Brooks's books, or are interested and plan to read them later, then you can take a look at this section of the tutorial. If you have no interest in Al Brooks's books at all and only want to learn from my course, then you can skip this part for now.
Correct understanding of tools
I want to emphasize first that counting candlestick charts is just a basic chart reading tool, not some trading secret, nor is it a mysterious method that will allow you to trade directly and make money after learning it. Like trend lines, its definition is very simple.
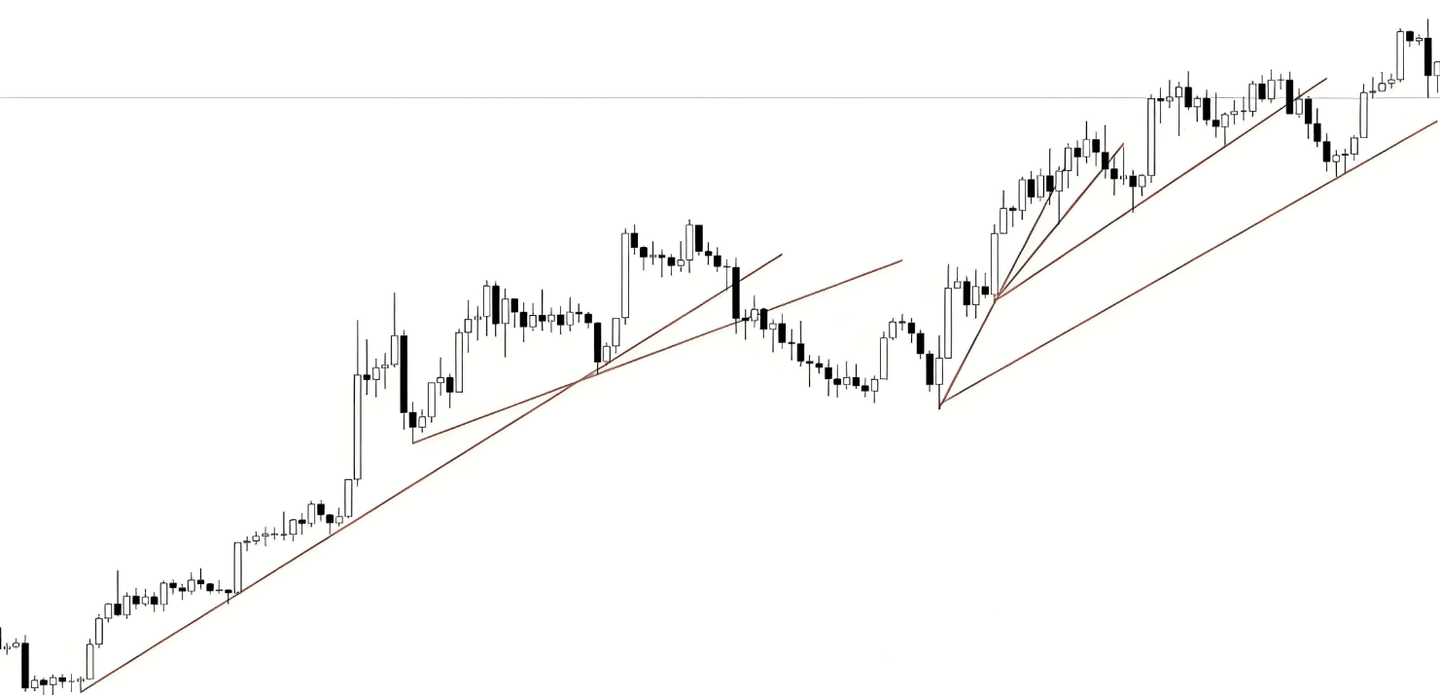
Trend lines can be drawn in any way; as long as you connect the lows of a price swing within an uptrend, it becomes a trend line. A single chart can have countless trend lines, like the many I've drawn in this chart, and many more I haven't shown. However, this doesn't mean you should trade based on every trend line, nor does it mean every trend line is useful.
For example, if you learn to play basketball and practice for a while, you might master the skills of dribbling and shooting.
If you were to directly compete against a basketball pro, what would your chances of winning be?
You basically can't win. What you've learned are just the basics, while experts have mastered sophisticated techniques through long periods of practice. You can't defeat them just by learning some basics.
The same applies to the investment market. The market is essentially a game between people. For your buy order to be filled, someone else must be selling; what you buy is what they are selling. Similarly, your sell order must be bought for it to be filled. Therefore, if you make money in a transaction, there must be a corresponding individual or group losing money.
The Game of the Strong
Institutional investors and seasoned traders possess substantial financial resources and strong technical analysis capabilities, and have honed their emotional control to an unparalleled level. This allows them to outperform most market participants, taking money from others' pockets and putting it in their own. If you also want to make money in the trading market, you must be as intelligent as them, master trading techniques, and learn to control your emotions. Only then can you outperform other major players or expert traders; in other words, only then will you be qualified to join their ranks and profit from the pockets of the weaker participants. Major institutions and expert traders are all powerful participants in the market.
What are disadvantaged participants? They are those who lack proficient chart reading skills, are not good at technical analysis, cannot control their emotions, often follow the crowd, and make decisions based on emotions.
No matter how much money he has, if he possesses these characteristics, he is a vulnerable participant.
In a market, powerful participants profit from the losses of weaker participants; this is an objective law of market operation. In a zero-sum game, one shouldn't indulge in the pipe dream that everyone can make money.
Some newbies, or rather, some seasoned investors who have been investing for a long time but haven't learned anything, buy a stock or cryptocurrency, think it has great potential, and everyone buys together, forming a cult of personality and driving up the price, believing everyone who buys will make money. This is a zero-sum game; it's impossible for everyone to profit. If you all buy together, someone will inevitably lose money. Who loses? Of course, it's the last group to buy in.
How can you ensure you're not the last one left holding the bag? You need to learn technical analysis to analyze the market objectively and logically, instead of participating based on emotions or beliefs. Before you decide to trade or invest, you should first examine yourself: do you possess the characteristics of a strong participant, or conversely, the weaknesses of a weak participant?
If you find yourself in the category of a weak participant, then don't trade yet. Instead, focus on improving your technical analysis skills, refining your trading system, and training your emotional control.
Wealth doesn't come to those who are impatient.
When I first entered the investment market, like most people, I entered during a bull market. At the time, I knew nothing, but I rode the wave of the bull market and made a lot of money. However, in the bear market, I lost all my profits. Then I realized that I had no advantage in this investment game. If I continued to participate like this, I would only end up losing everything.
So I began to learn, searching for and building my own strengths. I chose to study technical analysis. During the learning phase, I only reviewed and summarized past trades, without making any actual trades. I knew my knowledge base was still incomplete, and rushing into trading was pointless and would only accelerate my losses.
I only start practicing after I've learned a complete system. After practicing for a while, I identify my own problems, then continue to research and refine it, eventually developing a trading system that suits me.
Many beginners rush into trading as soon as they learn a new concept, indicator, or system. I don't think that's a good approach. To make money in trading, you must execute a complete and effective system. Each concept or tool you learn is merely a part of that system. It's quite clear who has the advantage and who has the disadvantage when trading with a single tool within the system versus trading with the complete system.
K-line
In today's sharing, I will teach you how to count candlestick charts, but I will not teach you how to use candlestick charts for trading. Albrooks used four whole books to explain in detail how to use this tool, and I cannot explain it all in one tutorial. If you want to learn how to use candlestick charts for trading, I suggest you read the books carefully on your own.
Definition of high and low points
Let's first look at the definitions of highs and lows. Highs and lows are divided into four levels: 1, 2, 3, and 4. The following are the specific definitions of highs and lows:
High 1: A candlestick in a bull market or near the bottom of a trading range, where the high point is higher than the high point of the previous candlestick.
High 2: After High 1 appears, if a candlestick with a lower high appears next, then after this adjustment, the next candlestick with a higher high than the previous candlestick is High 2.
High 3, High 4: and so on, the third and fourth high points are High 3 and High 4 respectively.
The textual definition alone can be difficult to understand, but it becomes much easier to grasp when combined with charts. Below, I will show some charts and explain how to count candlesticks.

On the left are translations from ebooks I downloaded a long time ago, and on the right are translations from printed books I bought. You can take a quick look; we'll just browse through them here. If you're interested, you can pause and read on your own.
Definition of High 1/2/3/4:
High 1: A candlestick in a bull market or near the bottom of a trading range, where the high point is higher than the high point of the previous candlestick.
High 2: After High 1 appears, if a candlestick with a lower high appears next, then after this adjustment, the next candlestick with a higher high than the previous candlestick is High 2.
High 3, High 4: and so on, the third and fourth high points are High 3 and High 4 respectively.
Definition of low 1/2/3/4:
Low 1: A candlestick whose low is lower than the low of the previous candlestick, occurring in a bear market or near the top of a trading range.
Low 2: After Low 1 appears, if a K-line with a rising low point appears next, then after this adjustment, the next K-line with a low point lower than the previous K-line is Low 2.
Low 3, Low 4: And so on, the third and fourth lows are Low 3 and Low 4 respectively.
The ebook includes illustrations at the end, making it easier to understand. However, many examples in the book are rather abstract, representing variations of forms, and therefore more complex to grasp. We'll start with simpler examples and then delve deeper into the more complex cases.
Let's look at the examples from Grade 11 and Grade 12. This part is actually very simple, and most people should be able to understand it.
Examples of Grade 1 and Grade 2
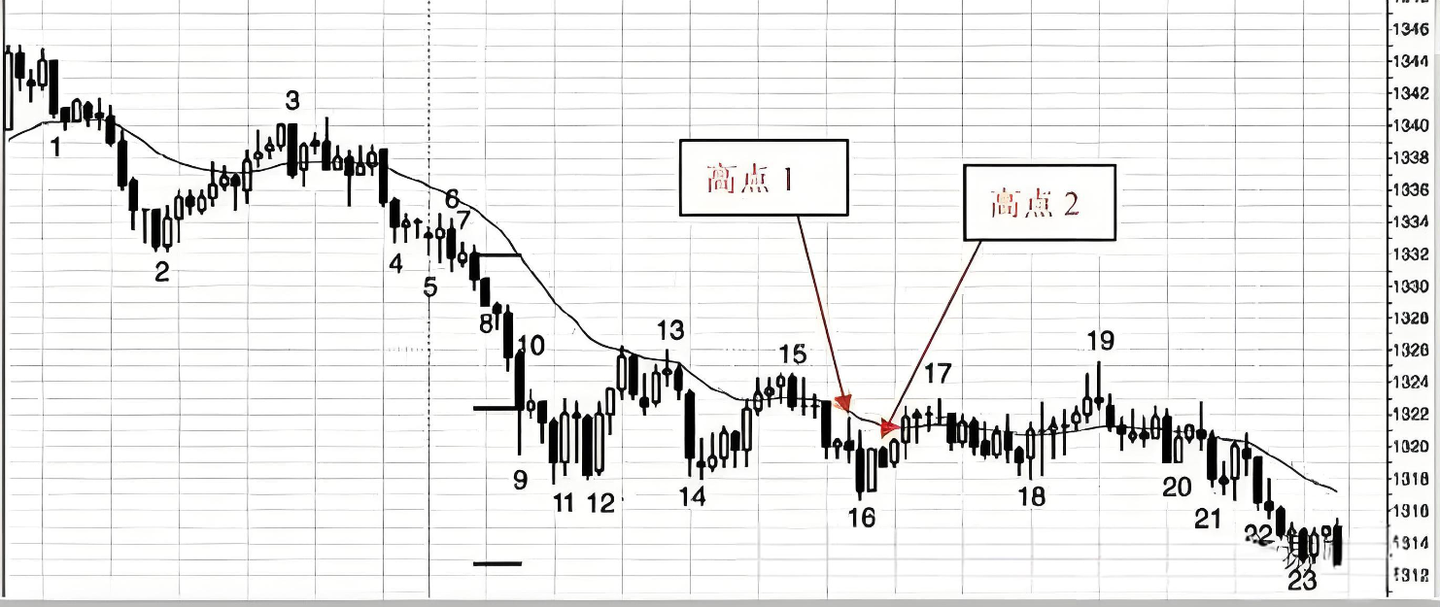
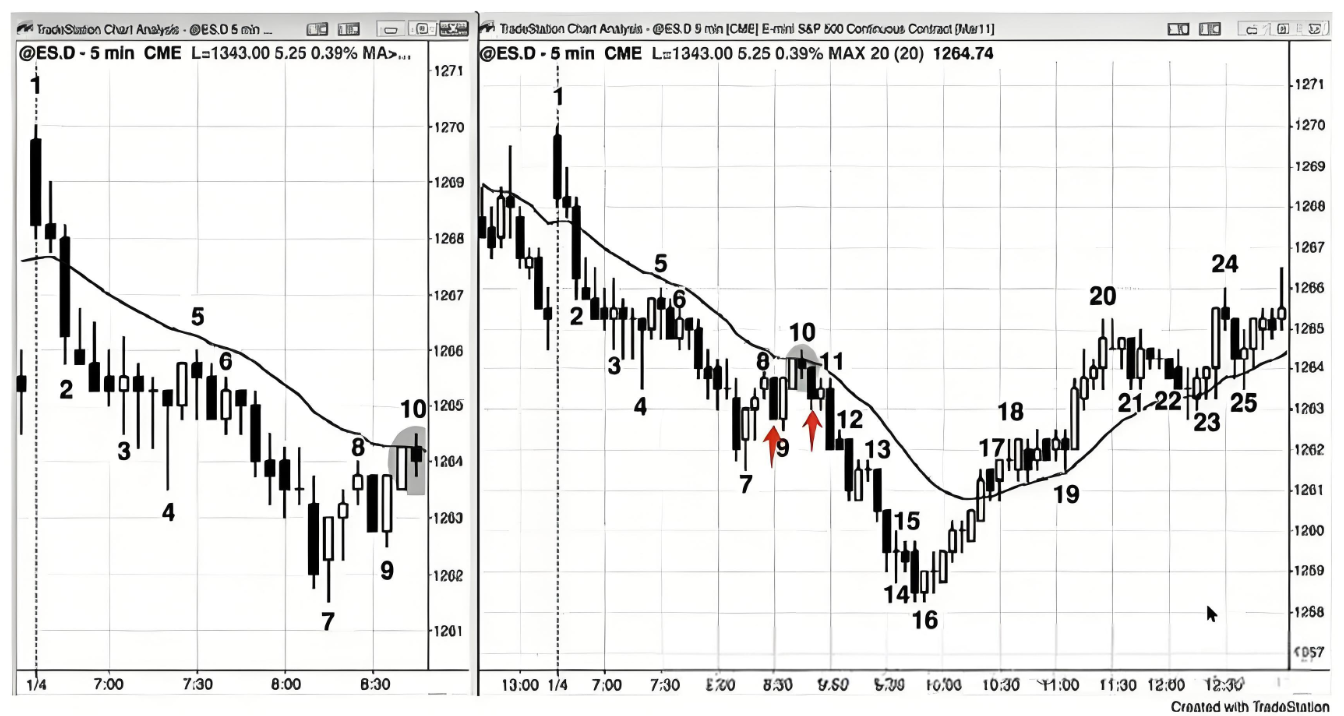
Starting from the downward wave of K-line 15, or the lower leg of the decline, we see that the highs of the K-lines decrease sequentially until the K-line marked by the red arrow. Here, the K-line marked by the red arrow is the first K-line whose high is higher than the high of the previous K-line. Since the high of this K-line exceeds the high of the previous K-line, this is high 1.
step:
1. Find High 1: In the downward wave that starts from K-line 15, find the first K-line whose high point is higher than the high point of the previous K-line. This is High 1.
2. Waiting for High 2: After High 1 appears, continue to observe the changes in the high points of the K-line. After High 1 appears, the high points decrease, which is a continuation of the wave. K-line 16 is a long bearish candlestick, followed by a long bullish candlestick with an inside bar, but the high point of this bullish candlestick does not exceed the high point of K-line 16, so it cannot be counted as High 2.
However, after this bullish candlestick, a small bearish candlestick appeared. The high of this small bearish candlestick exceeded the high of the preceding bullish candlestick, although it didn't seem obvious, it actually exceeded it by one point. Therefore, this is the second candlestick whose high is higher than the high of the previous candlestick, which is called High 2.
Summarize:
High 1: A candlestick whose first high point is higher than the high point of the previous candlestick.
High 2: After High 1 appears, the next high point is higher than the high point of the previous K-line.
If after high 2, the highs continue to decrease, resulting in high 3, high 4, and so on, you can continue counting downwards. The process of counting candlestick charts is actually very simple.
Examples of Grade 1 and Grade 2
In the examples of grades 10 and 11, we see a clear downward wave, making it relatively easy to understand. However, the situation of grade 1 and 12 might be more difficult for beginners to grasp due to its sideways consolidation characteristic. Below, we will explain the definition and counting method of grade 1 and 12 in detail using specific candlestick charts.
Example: Grade 1 and Grade 2
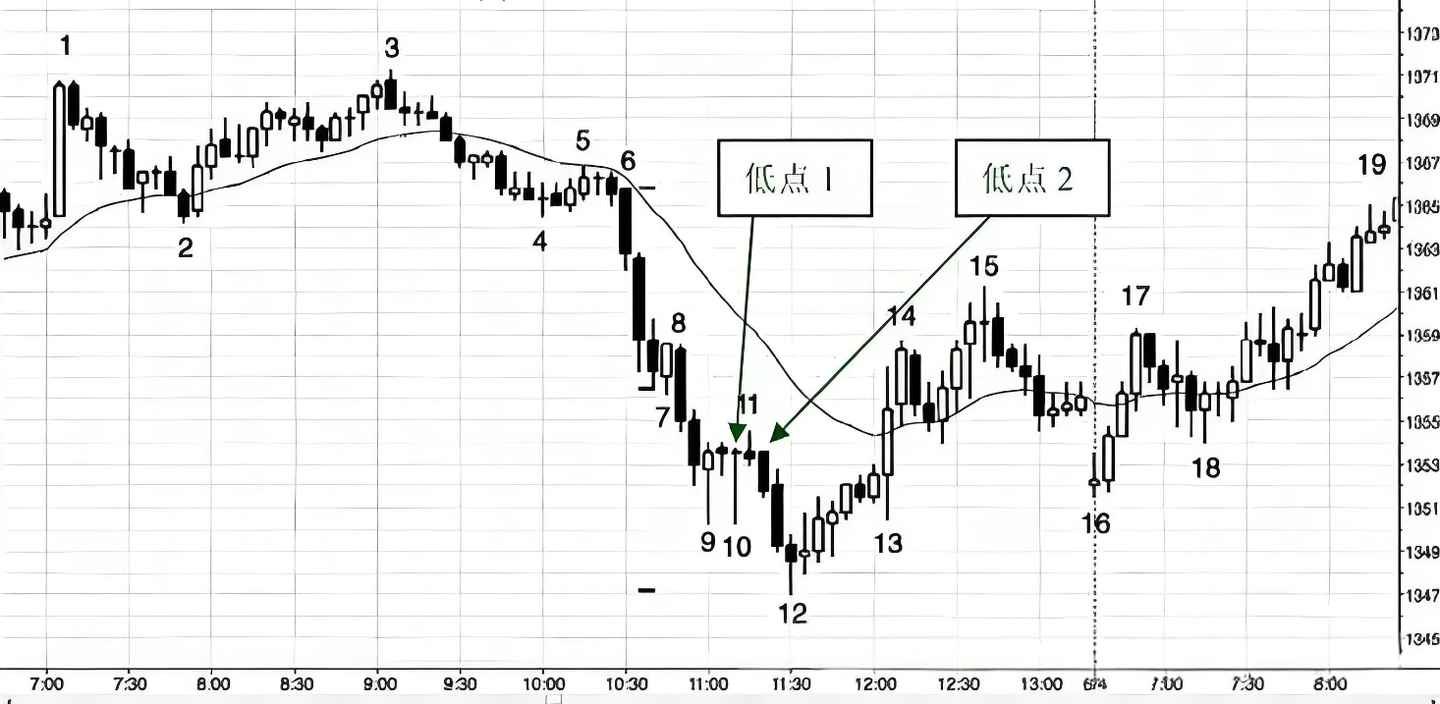
Let's look at the situation from K line 6 to K line 9.
1. First year of junior high school:
The period from K6 to K9 is a rapid downward wave.
Starting from K-line 9, the downward momentum paused, and the market entered a period of adjustment, although the adjustment was sideways.
After candlestick 9, a small doji candlestick appeared, indicating a pause in the downward momentum.
Subsequently, the low of K-line 10 broke below the low of the small doji, forming the first downward breakout, which is the first low.
2. Lower Second Grade:
After the first low appears, the low of the K-line 10 rises.
K-line 11 closed with a bearish candlestick with a long upper shadow.
In any case, the next candlestick after candlestick 11 broke below the low of candlestick 11 again, forming a second downward breakout, which is called the second low.
Summarize :
Lower 1: In a downtrend, the first candlestick whose low point is lower than the low point of the previous candlestick. Starting from candlestick 9, the low point of candlestick 10 breaks through the low point of the small doji, forming Lower 1.
Low 2: After Low 1, the second candlestick appears with a low point lower than the low point of the previous candlestick. Starting from candlestick 9, the bearish candlestick after candlestick 11 forms Low 2.
Through this example of a lower low and a higher high, we can see that even though the correction is horizontal, the principles of counting candlesticks still apply. The key is to find the candlestick that started the correction and correctly mark the low and high. Understanding these basic concepts is crucial in practice. Mastering the method of counting candlesticks will greatly enhance your chart analysis skills.
Case 1
We will look at specific examples to see how to count candlestick charts and understand the buy and sell signals in candlestick charts.
Failed buy signal at the second low
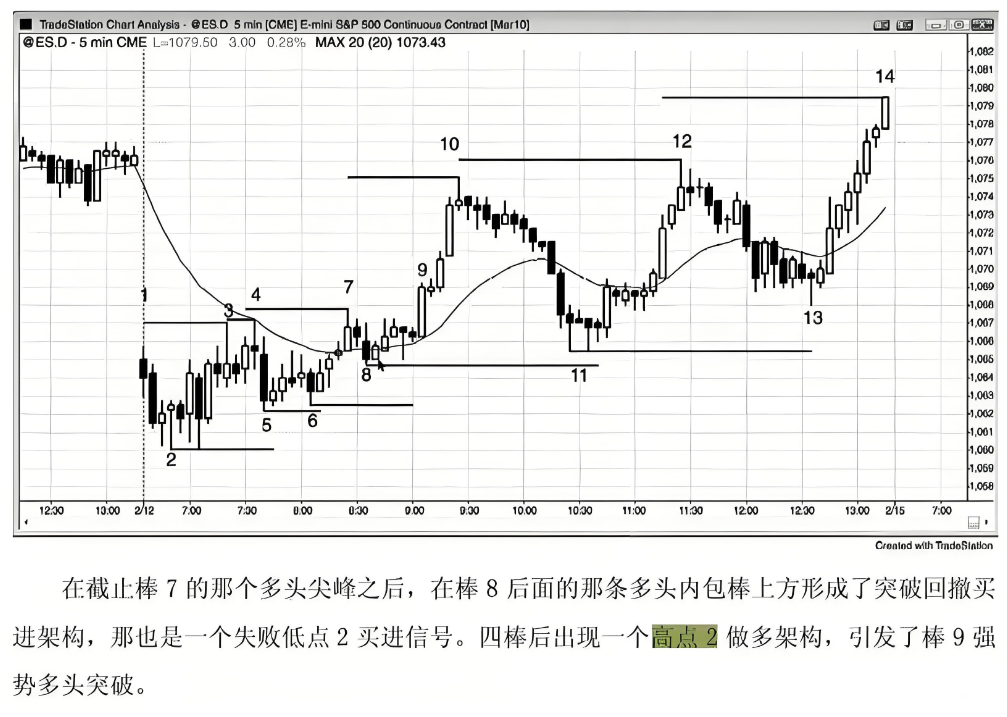
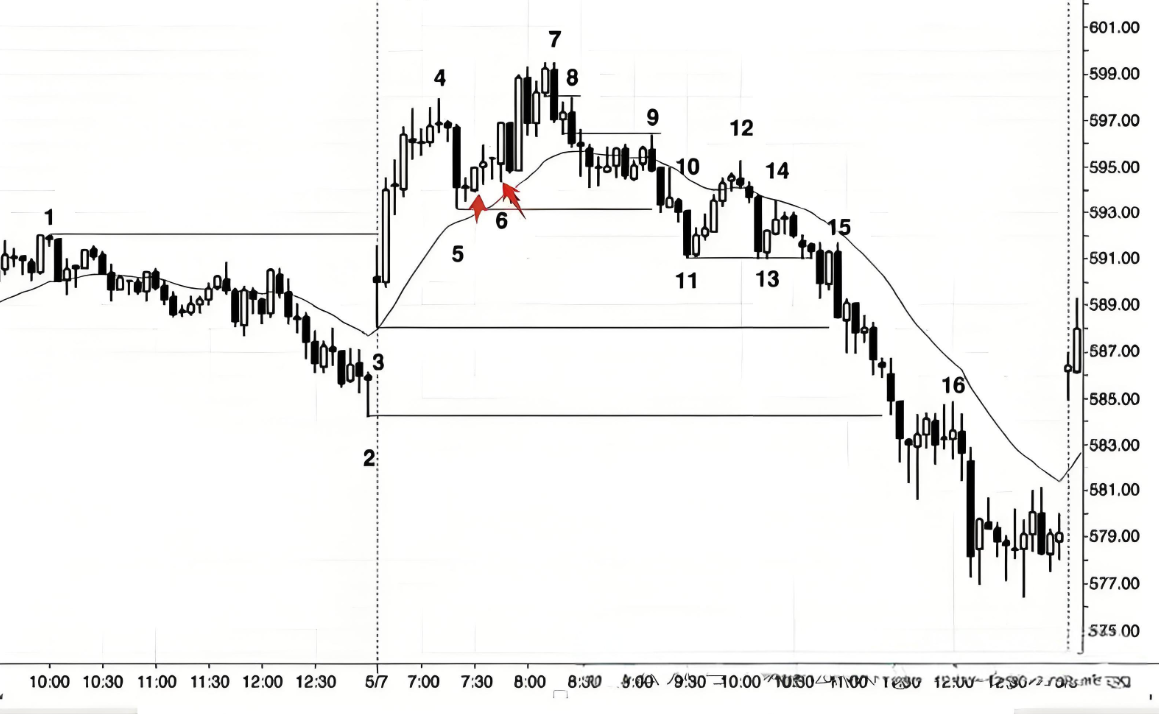
Looking at this chart, the book states: "A breakout pullback buy pattern is formed above a bullish engulfing candlestick after candlestick 8, which is a failed low-two buy signal."
Why is it considered a failed buy signal at the second low?
Starting from the starting point of the rise in K-line 5 (not from K-line 2, because the rise from K-line 2 to K-line 5 should be considered two different price movements), find the K-lines with lower lows in the upward wave starting from K-line 5, thus determining the first low (K-line 6) and the second low (K-line 8). K-line 8 is then considered an entry K-line for a double breakout downtrend. However, this signal was rejected by the market.
Grade 11 breakout buy signal
Using the same chart as before, the book states: After four candlesticks, a high point 2 forms a bullish structure, triggering a strong bullish breakout on candlestick 9.
Why is it said that there is a high 2 breakout pattern at position 9 on the K-line?
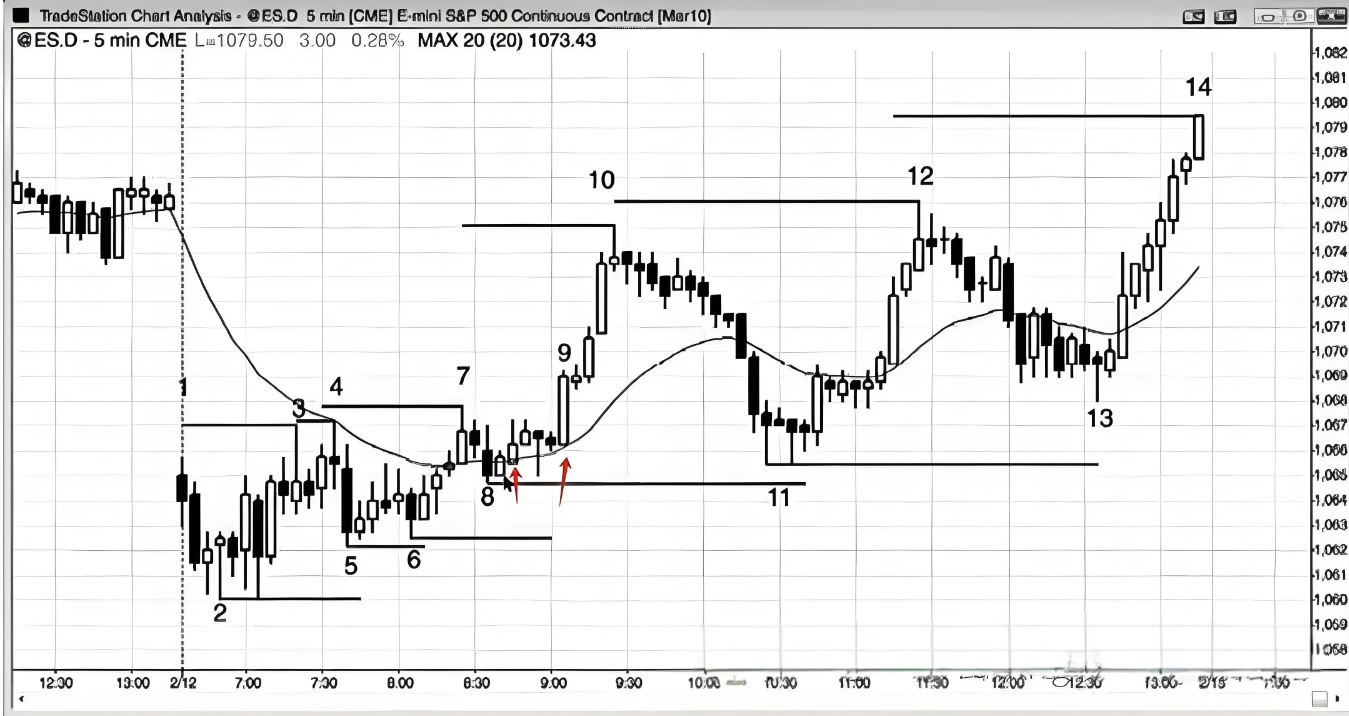
Starting from the pullback from the high of candlestick 7, a bullish candlestick appeared, breaking through the high of the previous candlestick, forming high one. During the pullback following high one, candlestick 9 broke upwards through the high of the previous candlestick, forming high two.
Flexible use of tools
While there are certain rules to follow when counting candlestick charts, there is also flexibility to be found:
The general rule is to count the breakouts of lows at the top of a range and the breakouts of highs at the top of a range. However, just like drawing trend lines, counting candlesticks can be adjusted according to specific market conditions. The key is to understand the significance of price breakouts of previous candlesticks.
Case 2
In this case, we see that candlestick 6 forms a bullish pattern (higher than the second candlestick). This pattern is relatively simple and clear:
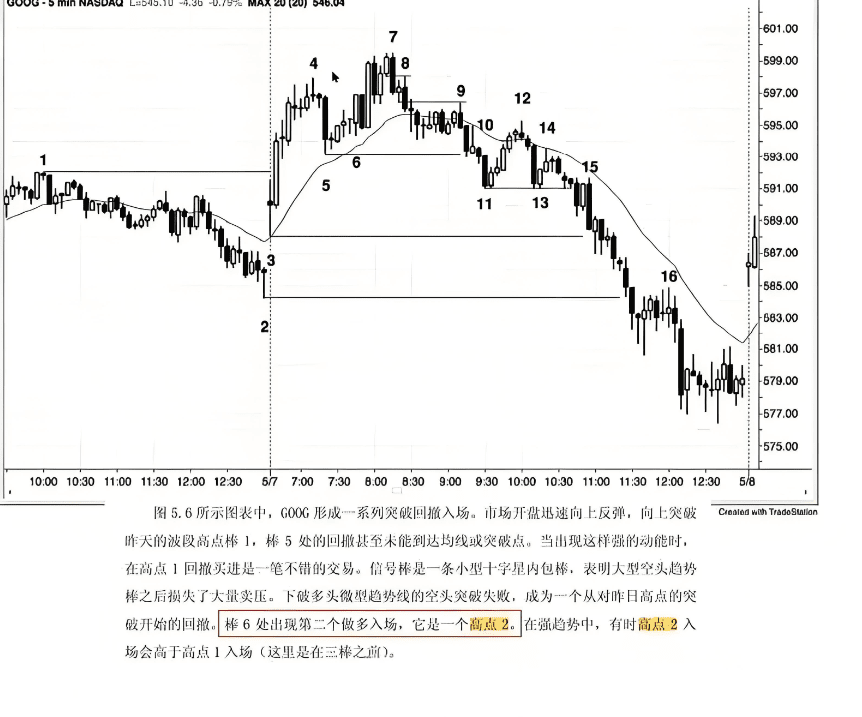
The pullback started from candlestick 4. The bullish candlestick after candlestick 5 was the first upward breakout above the high of the previous candlestick. The bullish candlestick of candlestick 6 was the second upward breakout above the high of the previous candlestick, forming a "high-two-buy" pattern.
This case is relatively simple and should be easy to understand for those familiar with candlestick chart analysis.
Furthermore, while overlapping candlesticks are also analyzed using candlestick patterns in Abu's book, my trading system dictates whether to participate based on the specific circumstances. Overlapping candlesticks often represent trading ranges, and this pattern is generally unsuitable for participation, especially when there are no clear breakout signals. I might consider participating only at very critical levels, even if the signaling candlesticks are weak. #币安区块链周
Case 3
Let's look at another example from Grade 11:
This case is very simple and should be easy for everyone to understand. It shows an upward correction starting from candlestick 7. The bearish candlestick following candlestick 8, i.e., candlestick 10, forms the first downward breakout signal. Subsequent bearish candlesticks continue downward, breaking the low of candlestick 10, forming the second breakout signal. #美SEC代币化股票交易计划
Case 4
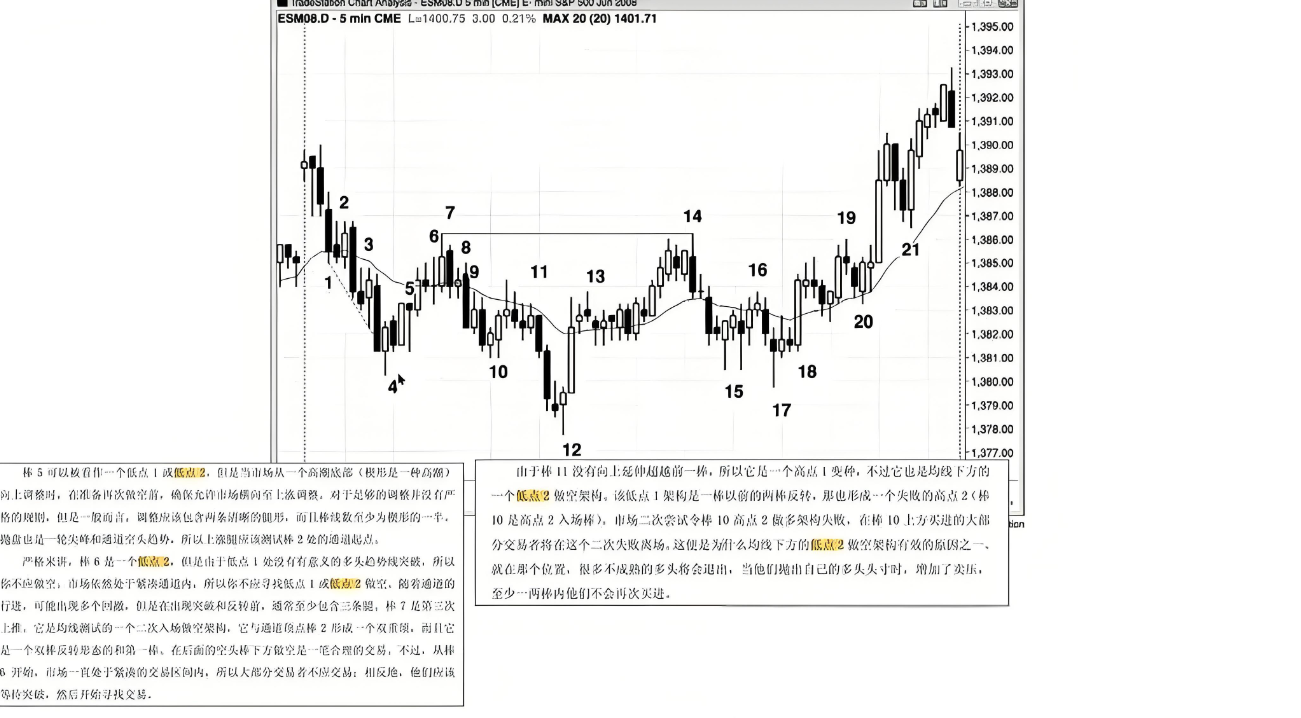
K-line 5 can be considered as low 1 or low 2.
K-line 6 represents the second downward breakout.
The second low of K11: The retracement is calculated starting from K10. In this case, the low of K10 breaks downward, forming the first second low. After the first second low, the low rises, and then a second downward breakout occurs, which is the second low breakout, forming the second second low.
The second low of candlestick 14: Calculated from the starting point of the rise in candlestick 12. During this process, in the pullbacks after two upward movements, the low of candlestick 13 broke through, forming the first second low. Candlestick 14, as the second low breakout, formed the second low. It can be seen that after the first upward breakout, the low broke downwards, and subsequent lows continued to rise; the low of candlestick 14 then broke through, forming the second second low.
The second low of candlestick 16: Counting from the starting point of the pullback, this candlestick is the first low. The first low point breakout forms the first low. Subsequently, the low point breakout after candlestick 16 forms the second low point breakout, i.e., the second low.
The microscopic meaning of K-lines
During a bull market pullback, counting to the fourth high can help us understand the pullback and the trend. For example:
Grade 11 and Grade 12: Represent one callback and two callbacks.
Senior year of high school: a leading indicator of trends.
"High 4" indicates a channel. If the price does not continue its original trend after "High 4", the trend may become invalid.
To understand these concepts, you can refer to charts with shorter timeframes. For example, consider a chart for senior high school students:
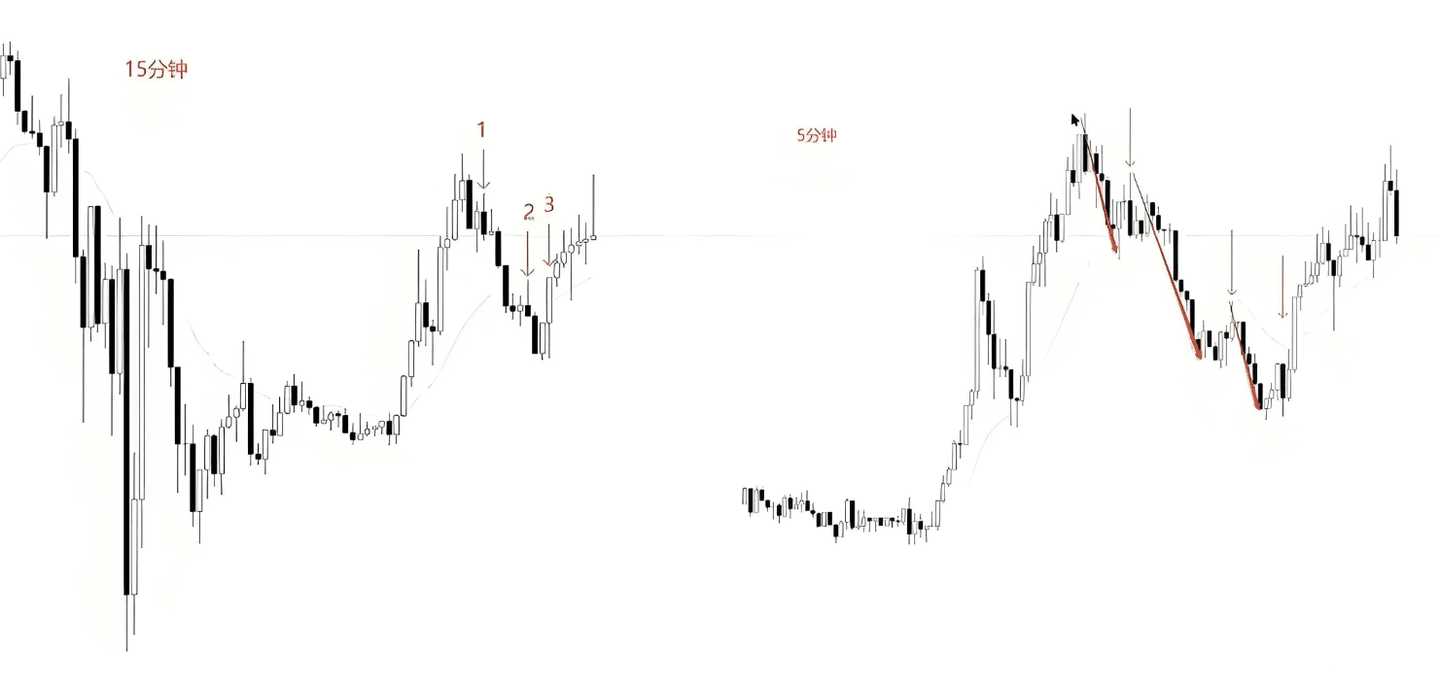
On the 15-minute chart, the definition of senior year is quite clear:
The first breakout above the high point forms the first high.
The second high point breakout forms the second year of high school.
The third breakthrough of the high point led to the senior year.
On the 15-minute chart, the high three pattern is very clear. However, on the 5-minute chart, this high three pattern manifests as a three-stage decline. In Abu's system, all three-stage impulses can be called "scorpion patterns," even if they don't perfectly conform to the scorpion pattern's criteria.
If a high-four pullback occurs, then on a shorter timeframe, the high-four pattern will appear as a channel. If you don't understand certain patterns on a longer timeframe chart, you can refer to a shorter timeframe chart, which will usually make them easier to understand.
Practice makes perfect. As your trading experience grows, and after extensively studying charts of short-term candlestick patterns and long-term candlestick charts showing 1/2/3/4 highs and 1/2/3/4 lows, you will naturally develop the skill of "reading the patterns of short-term charts from long-term charts." This makes understanding the concept much easier.
Case 5
Let's look at another example of a variant.
What are variants? For example, let's observe on a 4-hour chart:

1. Start counting from point A. If the count is from the top down, mark it as low one. Next, look at candlestick one (the candlestick indicated by the arrow), which is the first downward breakout.
2. The subsequent long bearish candlestick, also known as the second candlestick, can be interpreted as a second breakout, but it looks more like a variant.
How do we understand this variant? On the 4-hour chart, the high of this second candlestick exceeds the high of the lower candlestick, so it can be considered a second variant.
To understand this variation more clearly, we can look at the 1-hour chart. On the 1-hour chart, we can see the following:
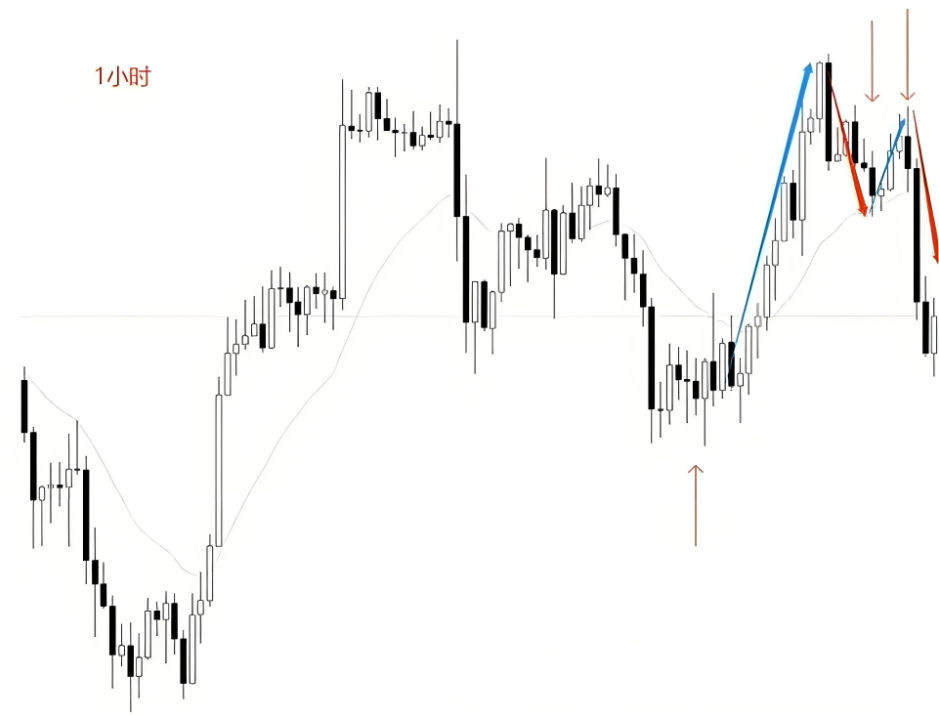
1. The upward trend starts from below, indicated by the blue arrow.
2. This was followed by a bearish breakout, marked by a red arrow.
3. The upward momentum and the subsequent bearish breakout.
On this shorter timeframe chart, the pullbacks and breakouts marked by the black lines become more pronounced. We can see that the bears actually made two breakouts, although we only see one on the 4-hour chart.
In summary, when encountering difficult-to-understand variations, you can switch to a shorter timeframe chart to observe how prices move, which can provide a clearer understanding of the variation's performance.
at last
Finally, here's a summary: since it's impossible to explain every case in the book, I'll summarize a few key points to help you understand the vast majority of the cases:
1. Basic methods for counting candlestick charts
In most cases, counting candlesticks from the band point is correct. This is the most commonly used method and is applicable to the analysis of most candlestick patterns.
2. Solutions when encountering difficult-to-understand variations
If you encounter variations that you can't understand, you can switch to a smaller timeframe chart for analysis. This method also applies to charts like mini channels, mini double bottoms, and mini wedge triple pushes in the book. If you don't understand something on a larger timeframe chart, try analyzing it on a smaller timeframe; it will be easier to understand that way.
3. Possible reasons why pairs cannot be counted.
If you still can't understand the candlestick charts no matter how you count them, it might be due to a misjudgment of the market. The purpose of counting candlesticks is to identify pullbacks; if your understanding of market movement is incorrect, your candlestick count may also be wrong. Improving your overall chart reading skills and correctly identifying pullbacks are essential for accurately counting candlesticks.
4. The difference between Abu's candlestick chart method and my double breakout method
Abu's candlestick counting method differs from my method for counting candlesticks during a double breakout. My double breakout method does not start counting from the wave point. Although I also refer to it as the first and second, it's actually just for ease of expression.
Candlestick charts are just a basic chart reading tool in Abu's book. If you are interested in these topics and want to study them in depth, I recommend reading Abu's books. The books offer very in-depth analysis of the micro-movements of prices, but they also require a higher level of understanding. If you don't have a certain level of trading experience, I suggest accumulating relevant knowledge first before starting your studies.
The above is the trading experience that Yan'an shared with you today. Many times, you miss out on many money-making opportunities because of your doubts. If you don't dare to try, explore, and understand, how will you know the advantages and disadvantages? Only by taking the first step will you know what to do next. With a cup of warm tea and a word of advice, I am both a teacher and a good friend to you.
Meeting is fate, understanding is destiny. I firmly believe that those destined to meet will eventually meet, even from afar; those not destined will simply pass each other by. The road of investment is long, and temporary gains or losses are merely the tip of the iceberg. Remember, even the wisest can make a mistake, and even the most cunning can have a stroke of genius. No matter your emotions, time will not stand still for you. Pick yourself up from your troubles, stand up again, and move forward with renewed vigor.
The martial arts manual has been given to you all; whether you can become famous in the martial arts world depends on yourselves.
Be sure to save these methods and review them multiple times. If you find them useful, please share them with other cryptocurrency traders. Follow me to learn more about the crypto world. Having weathered the storm, I'm here to help those who are already struggling in the crypto market! Follow me, and let's journey together in the crypto world!